
Turn your child’s little handprint into a fun dinosaur with this easy dino handprint craft! This colorful project is perfect for preschoolers, kindergarteners, or any child who loves dinosaurs. With colored paper, paint, and a few basic craft supplies, your child can create a cute prehistoric friend. Parents can help with tracing, cutting, and painting while kids enjoy adding their own creative details.
Materials Needed
- Colored craft papers – Choose colors for the dinosaur, eyes, spikes, and other details.
- Acrylic paint – Pick a dinosaur color such as green, blue, orange, or any color your child likes.
- Paintbrush – Use a small or medium brush to spread the paint evenly.
- Sharpie – A black Sharpie works well for drawing the dinosaur’s eyes, mouth, and other details.
- Craft glue – Use glue to attach the paper pieces.
- Pencil – For tracing your child’s hand and drawing shapes.
- Scissors – For cutting out the handprint and paper pieces.
How to Make a Dino Handprint Craft
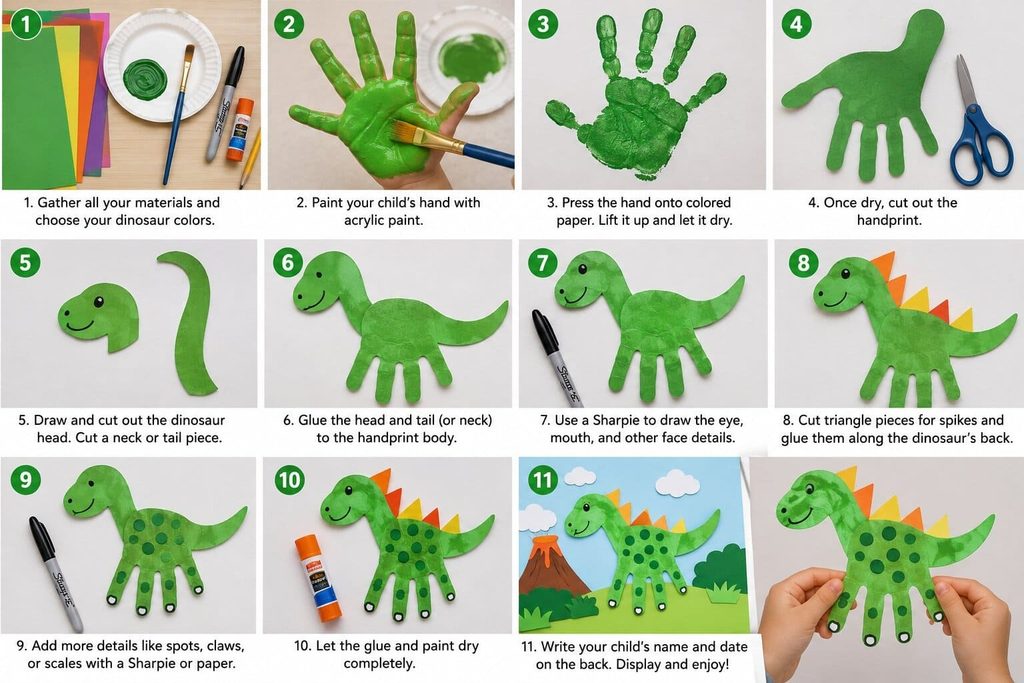
Step 1: Choose the Dinosaur Colors
Start by letting your child choose the colors for the dinosaur. Green is a classic choice, but there is no need to stick to one color.
Try blue, purple, orange, or even a mix of colors. Letting your child make this choice adds a fun personal touch to the dinosaur handprint craft.
Place all the supplies on a clean work surface before you begin.
Step 2: Paint Your Child’s Hand
Have your child place one hand on a piece of paper or a washable work surface.
Using the paintbrush, gently cover the palm and fingers with acrylic paint. Try to apply an even layer of paint.
For younger children, parents should help with this step.
Parent tip: Keep a damp cloth nearby in case any paint gets on your child’s hands or the work surface.
Step 3: Make the Handprint
Carefully press the painted hand onto a sheet of colored craft paper.
Press the palm and fingers down gently. Make sure each finger touches the paper.
Then lift the hand straight up.
You should now have a colorful handprint. Let the paint dry completely before moving to the next step.
The palm will form the main part of the dinosaur, while the fingers can become the dinosaur’s legs or other body features.
Step 4: Cut Out the Handprint
Once the paint is dry, use scissors to carefully cut around the handprint.
Younger children may need an adult to do the cutting. Older kids can practice their cutting skills with close supervision.
Try to cut close to the edges while keeping the handprint shape easy to recognize.
Step 5: Create the Dinosaur Head
Use a pencil to draw a simple dinosaur head on colored craft paper.
You can make a round head, a long dinosaur head, or a shape inspired by your child’s favorite dinosaur.
Cut out the head and place it near the top of the handprint.
Ask your child where they think the head should go before gluing it down. This gives them a chance to help build their own dinosaur.
Step 6: Add the Dinosaur Neck and Tail
Cut a long, curved piece of colored paper for the dinosaur’s neck or tail.
Place it behind or beside the handprint to create the dinosaur’s body shape.
You can make the tail short and thick or long and curved. There is no wrong way to design it.
Once everything looks right, glue the pieces together.
Step 7: Make the Dinosaur Face
Now it is time to give your dino some personality!
Use a black Sharpie to draw an eye on the dinosaur’s head. You can also draw a smiling mouth, nostrils, and a few small details.
For a fun look, let your child choose whether the dinosaur should look happy, silly, surprised, or friendly.
Keep the details simple so the handprint remains the main part of the craft.
Step 8: Add Dinosaur Spikes
Dinosaur spikes are a fun way to decorate your handprint art.
Cut several small triangles from colored craft paper. These will become the dinosaur’s spikes.
Place the triangles along the dinosaur’s back or neck. When your child likes the arrangement, glue them in place.
You can use one color for all the spikes or mix several colors.
Step 9: Add More Details
Let your child add a few extra details to finish the dino handprint art.
They can draw spots, scales, claws, toes, or small lines on the dinosaur’s body with a Sharpie.
You can also cut tiny circles or other shapes from colored paper and glue them onto the dinosaur.
Try not to add too many pieces. A few simple details can make the dinosaur look great.
Step 10: Let the Craft Dry
Place the finished dinosaur flat on the table and allow the glue and paint to dry completely.
Avoid moving the craft while the glue is still wet. This helps keep the paper pieces in place.
Once it is dry, write your child’s name and the date on the back.
This simple step turns the project into a cute dinosaur handprint keepsake that you can save for years.
Step 11: Display Your Handprint Dinosaur
Your dino is ready for its big debut!
Hang the dinosaur handprint craft on the refrigerator, bedroom wall, or classroom display. You can also place it beside other dinosaur crafts to create a fun prehistoric scene.
For an extra creative touch, let your child draw trees, rocks, volcanoes, clouds, or grass around the dinosaur.
Give It A Try
This dino handprint craft is a fun way to turn a simple handprint into a colorful dinosaur. Kids can enjoy painting, tracing, cutting, gluing, and drawing while creating their own prehistoric friend.
Parents can guide the tricky steps and let their child make the creative choices. So grab some paper and paint, make a handprint, and bring this cute dinosaur craft to life!

Sohel Rana is the writer, editor, publisher, and founder of The Tidy Porch. He is the man who is responsible for the craft (my wife created) being converted into a written piece. He also helps her wife (Sumona) by capturing videos of each craft. In short, he brings each craft created by her wife in front of you by transforming it into an article and a video.
