
Last fall, my little one came home from a zoo week with orange paint on her elbow and a roar in her throat. “Make a tiger with me!” she begged. So we pressed her hand into orange paint and stamped it down.
With the fingers spread wide, it looked like a fluffy tiger ruff. A few black stripes later, she was growling at the dog. I loved how simple it was. You do not need fancy supplies or a lot of time.
This tiger handprint craft works at home or in class. You will make one bright tiger in about 25 minutes.
What You Need for This Tiger Handprint Craft
You need paper, washable orange paint, and a few craft scraps. Most families and classrooms already own these.
- White cardstock, 8.5 x 11 inches (thick printer paper works too)
- Washable, non-toxic orange tempera paint (no orange? mix yellow with a little red)
- Black washable paint or a washable black marker
- A paper plate for the paint and a soft sponge brush
- A thin brush or cotton swabs for stripes
- Orange or black paper scraps for ears
- White paper for eyes and pink paper for the nose (no googly eyes needed)
- A glue stick, white school glue, and scissors
- Wet wipes and a damp towel
This craft fits ages 2 to 7. Toddlers need a grown-up to help with pressing. Plan on 25 minutes of hands-on time, plus drying. The mess level is medium, mostly from the orange paint.
How to Make a Tiger Handprint Craft Step by Step
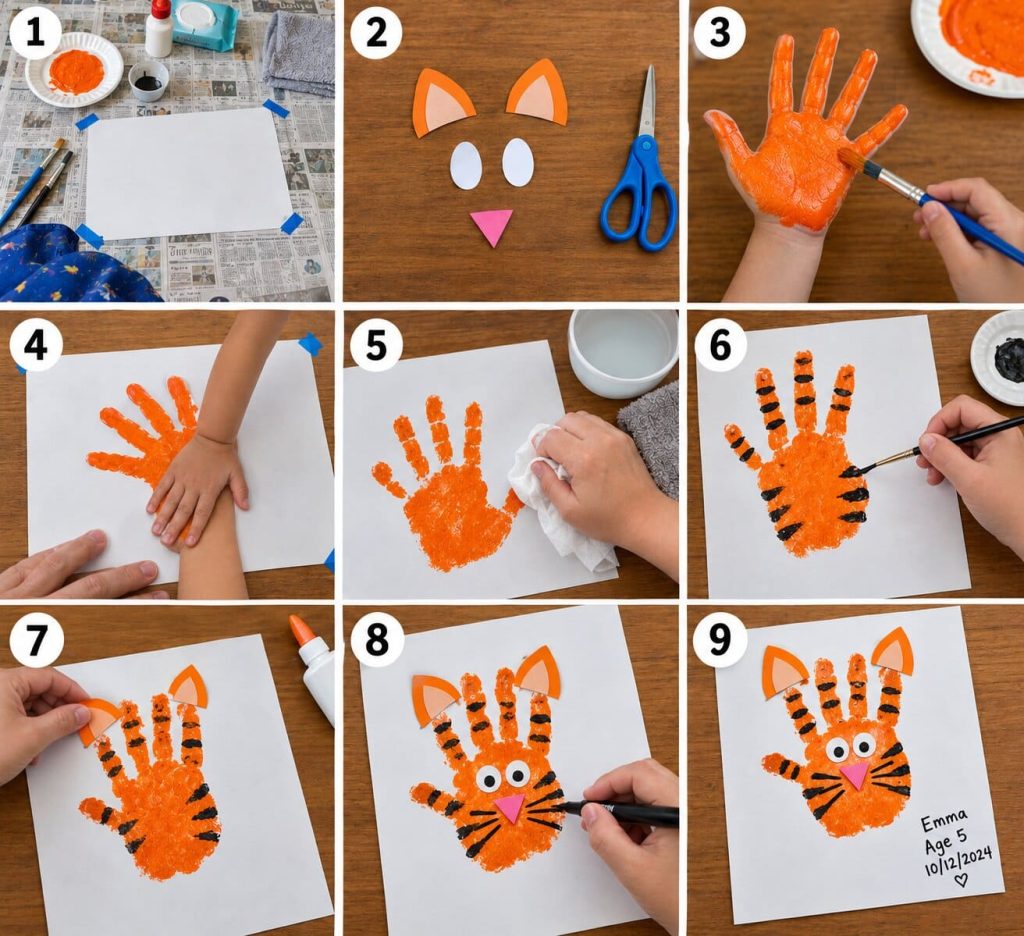
This tiger handprint craft takes nine steps. Read them once before you start so nothing catches you off guard.
Step 1: Set Up Your Space
Cover the table and get the wipes ready before any paint comes out. Spread newspaper or a plastic cloth on the table. Put your child in an old shirt with the sleeves pushed up. Tape the corners of the paper down so it cannot slide.
Step 2: Cut Out the Small Pieces
Cut every small piece now, while hands are still clean. Make two ears from rounded triangles about 1.5 inches wide. Cut two white ovals for eyes, about one inch long. Cut one small pink triangle for the nose. Set them in a dry pile.
Step 3: Paint the Hand
Brush a thin, even layer of orange paint over the palm, fingers, and thumb. Thin paint prints clean, while thick paint turns into a blob. Ask your child to spread their fingers wide. Check the gaps between the fingers, because paint likes to skip them.
Step 4: Press and Lift the Print
Place the wrist about two inches from the bottom edge, with the fingers pointing up. Press the whole hand down firmly for a slow count of three. Then press each fingertip with your own finger. Lift the hand straight up, because dragging causes smears.
Step 5: Clean Up and Let It Dry
Wipe your child’s hand right away with a wet wipe, then wash with soap and warm water. Move the paper to a flat spot. Let the orange paint dry for 15 to 20 minutes. It should feel dry, with no cool or sticky spots.
Step 6: Add the Black Stripes
Dip a thin brush or cotton swab in black paint and make short, curved lines. Put one stripe across each finger. Add two or three stripes on each side of the palm for the cheeks. No two stripes need to match, since every tiger has its own pattern.
Step 7: Glue On the Ears
Use white school glue to attach the two ears. Place them at the top corners of the palm, where the pointer and pinky fingers begin. Let them peek out to the sides. Press each ear for ten seconds while you count out loud together.
Step 8: Add the Face
Glue the two white eyes on the palm, side by side. Draw a black dot in the middle of each one. Glue the pink triangle below the eyes, with the point facing down. Then draw three whiskers on each side of the nose with a black marker.
Step 9: Write the Name and Date
Use a marker to write your child’s name, age, and the date at the bottom. Let the tiger dry flat for 30 minutes. Glue needs more time than paint, so wait until the ears feel firm.
Tips for Getting a Clean Orange Handprint With Little Kids
The best trick is one practice print on scrap paper. It shows your child how hard to press, and the real print comes out much cleaner.
Open the wet wipes before you start, not after the paint is on. Ask a helper to hold the paper steady while you guide the hand. If your child wiggles, hold the wrist gently and press together on the count of three. A smudge is not a disaster. Let it dry, then dab a little orange paint over it, or turn it into an extra stripe.
Orange paint can stain, so choose washable tempera and rinse clothes with cold water soon. Aprons help a lot.
How to Use This Tiger Handprint Craft in a Zoo or Safari Unit
This craft fits easily into a big cats lesson. Read a simple tiger book first, then let kids make their tigers while you talk. Tigers are the largest of the big cats, and every tiger has its own stripe pattern. Kids love to hear that their tiger stripes will be one of a kind.
For a “T is for tiger” lesson, have children write a big T next to their tiger. Turn stripe painting into a counting game by asking, “How many stripes did you paint?” End the activity with a roaring game, where everyone growls softly and then loudly. Hang all the tigers together on a jungle bulletin board with green paper leaves.
Running a Tiger Handprint Craft With a Group or Classroom
You can finish a whole class in one session by setting up stations. Cut every ear, eye, and nose ahead of time and keep them in small cups. Write each child’s name on the back of their paper in pencil before the paint comes out.
Set up one station for painting and printing, and one for stripes and gluing. One adult at each station keeps the line moving. Plan about five minutes per child at the paint table. Lay wet prints flat on a table, a baking sheet, or a clean floor corner. Do not hang them up, because wet paint will drip. A second tray for finished tigers keeps things from getting mixed up.
How to Turn Your Tiger Handprint Into a Keepsake or Gift
A framed tiger with your child’s name and age makes a gift grandparents will love. Trim the paper to fit an 8 x 10 frame and center the tiger. You can also glue the print onto the front of a folded card for a birthday or a thank-you.
To protect it, keep the frame out of direct sunlight, which can fade paint over time. Write the date on the back as well. A few years from now, you will be glad you did, because little hands grow fast.
Tiger Handprint Craft FAQs
What is the best paint for toddlers?
Washable, non-toxic tempera or finger paint works best. It wipes off skin easily and washes out of most clothes. Check the label for a non-toxic seal.
What age can do this craft?
Most children from 2 to 7 years old can join in. Toddlers need help with pressing and gluing. Older kids can cut, glue, and add stripes on their own.
Can I make it without paint?
Yes. Trace your child’s hand on orange paper and cut it out. Then glue it onto white paper and add the stripes and face with markers. This is a good choice for kids who dislike messy hands.
How do I keep orange paint from staining?
Use washable paint, cover clothes with an apron, and wipe spills right away. Rinse stained fabric with cold water before washing.
How long does it take to dry?
Thin orange paint dries in 15 to 20 minutes. Give the glued ears and face about 30 more minutes before you frame or move the tiger.
Time to Make Your Tiger
Grab some orange paint and a sheet of paper, and give this a try today. Your tiger will be ready before snack time. Hang it up, frame it, or send it to someone who loves your child. I would love to hear how yours turns out.

I’m Sloane Everly, the heart and soul behind TheTidyPorch.com, where I pour my love for home decor, interior styling, and curated living into everything I do.
I’m all about turning houses into homes that feel like you—full of warmth, character, and a little bit of magic.
My style? Think cozy charm with a splash of bold, always designed to make your space feel like a hug you never want to leave.