
Last October, my daughter came home from a crunchy-leaf walk with pockets full of acorns. She dumped them on the kitchen table and announced we were “feeding the squirrels.”
Then she spotted the brown paint. One painted hand later, she pressed it on paper and grinned at the smudgy shape. It looked like a little acorn. We added a cap, and the whole table went quiet while she worked.
That print stayed on our fridge for weeks. Now I make it with groups, too. It works for one child or twenty. You will make an acorn handprint craft in about 20 minutes.
What You Need for This Acorn Handprint Craft
You need paint, paper, and a few scraps, and most of it is probably in your craft drawer already. Gather everything before you call the kids over. Wet hands and a missing glue stick are a bad mix.
- Light brown or tan washable paint (no tan? mix brown with a little white)
- One sheet of white cardstock, 8.5 x 11 inches
- Dark brown paper for the cap (no brown paper? cut up a paper bag)
- Scrap of brown paper for the stem
- Red, orange, or yellow paper for the leaf (no leaf paper? use a real fallen leaf)
- Glue stick or white school glue
- Dark brown marker or a little dark brown paint
- Paper plate and a sponge brush
- Scissors, wet wipes, and a pencil
Age range: 1 to 6 years, with help for the youngest.
Time needed: About 20 minutes, plus drying.
Mess level: Low to medium. Washable paint wipes right off.
How to Make an Acorn Handprint Craft Step by Step
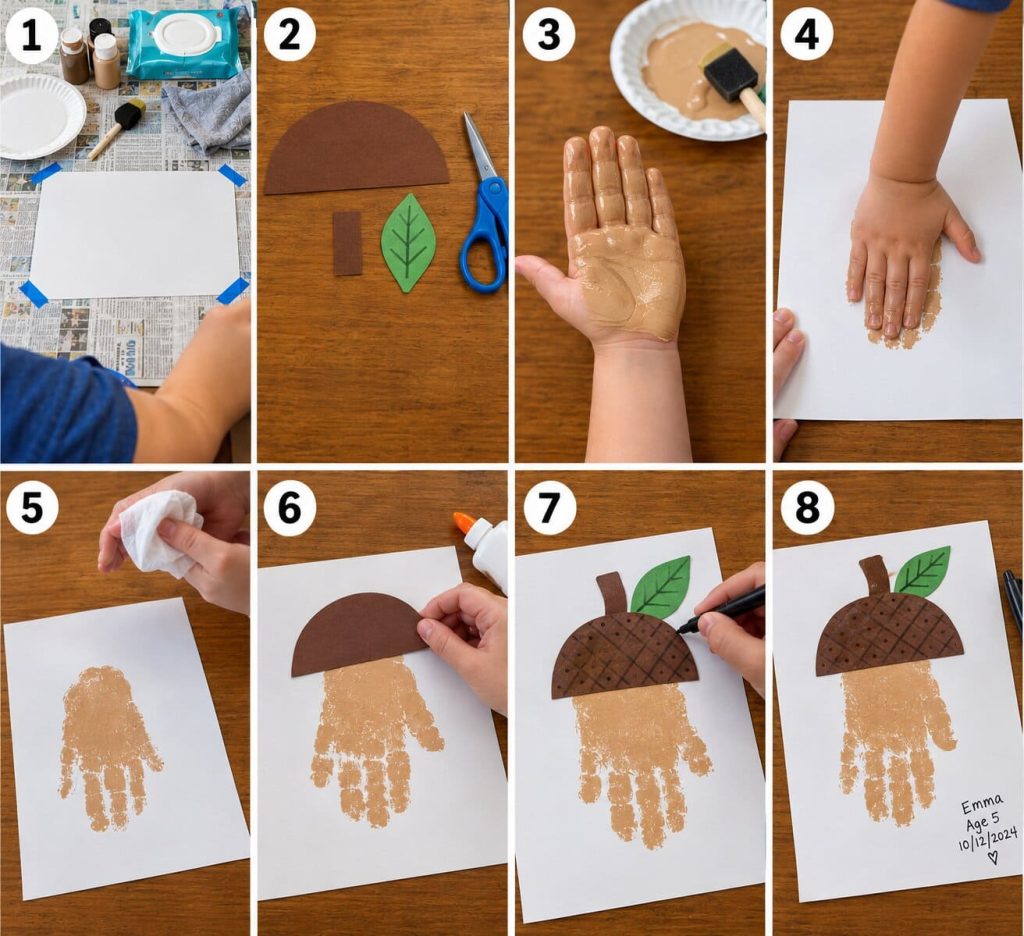
Follow these eight steps in order, and you will end up with a sweet acorn every time. Do the cutting first, because painted hands and scissors do not mix.
Step 1: Set Up and Protect Your Space
Cover the table with newspaper or a plastic cloth. Put the wet wipes within reach before any paint comes out. Roll up sleeves, or better, use an old T-shirt. A calm setup makes the rest feel easy.
Step 2: Cut the Cap, Stem, and Leaf
Cut a half-circle about 4 inches wide from the dark brown paper. Trace a bowl if you want a neat curve. Cut a small stem, about the size of your thumb, from the brown scrap. Cut one small leaf from the colored paper. Set them aside to dry-fit later.
Step 3: Paint the Hand With Fingers Together
Squeeze a dime-sized puddle of tan paint onto the plate. Spread it thin with the sponge brush. Brush it over the child’s palm and four fingers. Keep the fingers pressed together like a mitten. Tuck the thumb up and out so it stays clean.
Step 4: Press the Handprint With Fingers Pointing Down
Hold the cardstock flat. Turn it so the middle sits in front of the child. Have them set the wrist near the top and the fingers pointing down toward you. The fingers become the rounded bottom of the acorn. Press the whole hand down with a gentle, firm push. Count to three.
Step 5: Lift Straight Up and Clean Up
Hold the paper down with one hand. Ask the child to lift their hand straight up, like a tiny elevator. Do not drag or twist it. Wipe the hand right away with a wet wipe. Then check the print for gaps.
Step 6: Let It Dry, Then Glue On the Cap
Let the print dry for 15 to 20 minutes. Thin paint dries fast. Glue the brown half-circle over the top of the palm so the curved edge points up. Cover the wrist part of the print. Press it flat for a few seconds.
Step 7: Add Texture, Stem, and Leaf
Draw a crosshatch or dots on the cap with a dark brown marker. Or dip a fingertip in dark paint and dab dots all over. Glue the stem on top of the cap. Glue the leaf beside the stem.
Step 8: Write the Name and Date
Write the child’s name and the date in the bottom corner with a pencil or marker. Do it once everything is dry. Add the child’s age too. Future you will be glad you did.
Tips for Getting a Clean Handprint With Fingers Together
The best way to keep fingers closed is to paint them closed. Brush the paint over all four fingers while they are pressed together. Then keep that hand shape as it lands on the paper.
Use a thin layer of paint. A thick glob squishes out and fills the gaps between fingers, and the acorn turns into a blob. A sponge brush gives you a thin, even coat.
Have a helper hold the paper still. A sliding sheet makes a smeared print. For wiggly hands, gently hold the child’s wrist and press down with them.
If the print has a gap between fingers, don’t redo it. Once dry, dab a little tan paint in the gap with a fingertip. If you get a smudge, let it dry and cover it with the cap or the leaf. Keep wet wipes ready for sticky hands.
How to Use This Acorn Handprint Craft in a Fall or Nature Unit
This craft fits best at the end of a nature walk. Start outside and hunt for real acorns and leaves. Let the kids fill a small bag. Acorns grow on oak trees, so look under the big ones. Then bring your finds inside to match the craft.
Pair it with a squirrel and woodland animals lesson. Squirrels collect acorns and bury them for winter. Ask the kids where they would hide theirs.
For a letter lesson, make it an “A is for acorn” page. Have each child trace the letter A beside the print. For math, count real acorns into a basket, one by one.
Hang every acorn on a bulletin board with a bare paper tree. Pin the handprints in the branches and under the tree, as if they have fallen. Add each child’s name. It looks wonderful from the hallway.
Running an Acorn Handprint Craft With a Group or Classroom
You can run this with a whole class if you set it up in stations. Station one is cutting, station two is painting, and station three is gluing. Kids rotate when you ring a bell.
Cut all the caps, stems, and leaves ahead of time. This is the biggest time saver. Put one paint plate for every four kids so nobody waits long.
Write each name on the back of the cardstock before the paint comes out. Wet prints are hard to name later. Set up a drying spot on a counter, the floor along a wall, or a clothesline with clips. Plan about five minutes per child at the painting station. Keep wipes and a bucket of soapy water nearby for hands.
How to Turn Your Acorn Handprint Into a Keepsake or Gift
The easiest keepsake is a framed print with a name, age, and year written at the bottom. Choose a simple frame, and the brown looks gorgeous against a white mat.
Fold a piece of cardstock in half and glue a small acorn print on the front to make a fall card. Grandparents love getting one in the mail. You can also start a yearly fall handprint tradition. Make a new acorn each October and watch the hands grow.
To protect the print, keep it out of direct sun, which fades paint. Slide it into a clear sleeve or frame it behind glass.
Acorn Handprint Craft FAQs
What is the best paint for toddlers?
Washable, non-toxic tempera or kids’ finger paint works best. It wipes off skin and cleans up from most surfaces. Check the label for a safe-for-children mark.
What age can do this craft?
Kids from 1 to 6 can make it. Toddlers need a grown-up to hold the hand and do the cutting. Older kids can cut, glue, and write their own names.
How can I make it without paint?
Trace the child’s hand on tan paper, keeping the fingers together. Cut it out and glue it on cardstock. Then add the cap, stem, and leaf as usual.
How do I keep the print from smudging?
Use a thin layer of paint and lift the hand straight up. Do not touch the print until it is dry. Move it flat to the drying spot.
How long does it take to dry?
A thin layer dries in about 15 to 20 minutes. Thick paint can take an hour. If you are in a hurry, a hair dryer on low helps.
Ready to Make Your Own Acorns?
Grab some brown paint and a few scraps of paper, and give it a go. The little prints are sweet and a bit silly. Pin this for your next fall lesson, and tell me how your acorns turned out!

Sohel Rana is the writer, editor, publisher, and founder of The Tidy Porch. He is the man who is responsible for the craft (my wife created) being converted into a written piece. He also helps her wife (Sumona) by capturing videos of each craft. In short, he brings each craft created by her wife in front of you by transforming it into an article and a video.
