
On a quiet December afternoon, my daughter Ella and I sat at the kitchen table with a plate of green paint. She squealed when the cold brush touched her palm. “It tickles!” she said.
I spread her fingers wide and pressed her hand down. When she lifted it, we both stared. The print looked just like a little tree. She wanted to send it straight to Grandma.
We added a star and some bright dots, and it became her favorite gift of the year. Today you will make a Christmas tree handprint craft, and it takes about 20 minutes.
What You Need for This Christmas Tree Handprint Craft
You need green paint, paper, and a few small scraps. Most of it is already in your craft drawer. Gather it all before the paint comes out, so you never leave a painted hand waiting.
- Green washable paint (no green? mix blue and yellow)
- One sheet of white cardstock, 8.5 x 11 inches
- Brown paper for the trunk (no brown paper? use a paper bag scrap)
- Gold or yellow paper for the star (no gold? use yellow paper or color a star with a marker)
- Red, yellow, and white paint for the ornament dots
- Paper plate and a sponge brush
- Glue stick and scissors
- Pencil, marker, wet wipes, and newspaper
Age range: Babies to age 6, with a grown-up helping the youngest.
Time needed: About 20 minutes, plus drying.
Mess level: Low to medium. Check the paint label to be sure it is made for kids and washes off skin.
How to Make a Christmas Tree Handprint Craft Step by Step
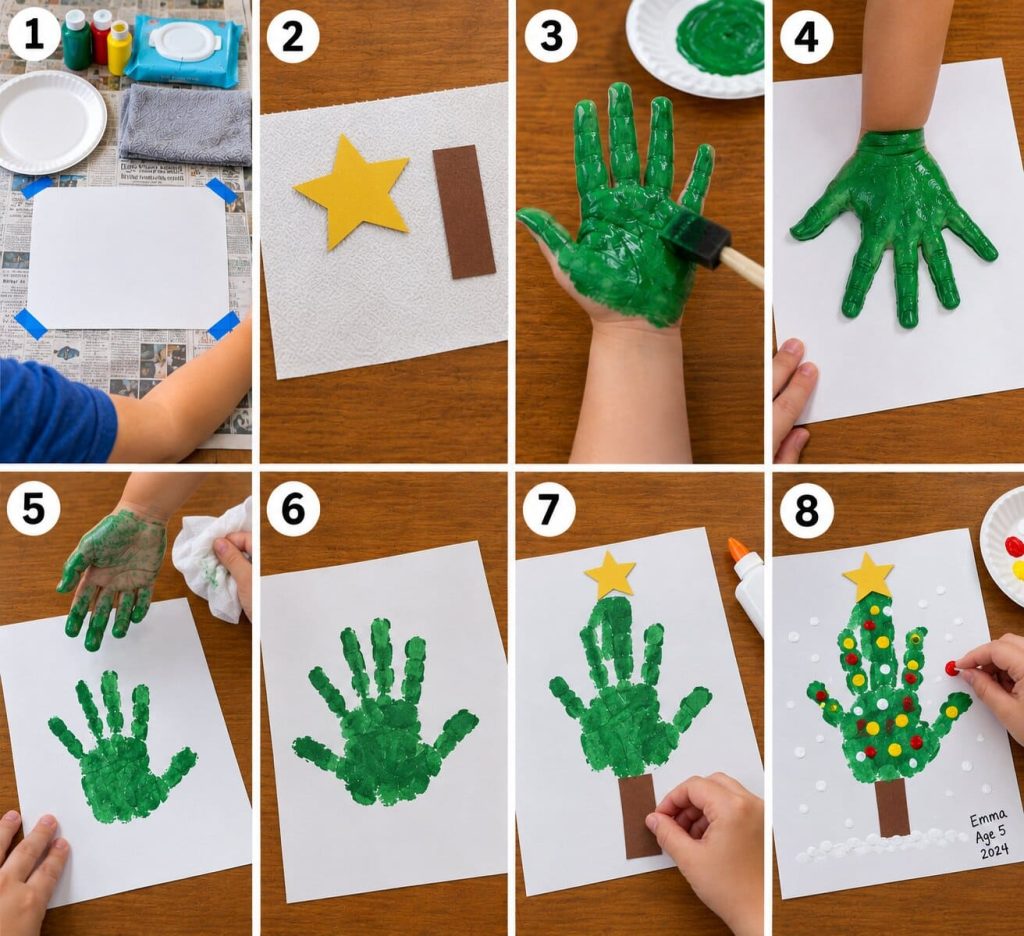
Follow these eight steps in order, and you will have a cheerful tree every time. Do the cutting first, because scissors and wet paint do not mix.
Step 1: Protect Your Space
Cover the table with newspaper or a plastic cloth. Set the wet wipes within reach. Roll up sleeves or use an old shirt. A little prep now saves a big cleanup later.
Step 2: Cut the Trunk and Star
Cut a brown rectangle about 1 inch by 2 inches. Cut a star about 2 inches wide from the gold paper. Fold the paper in half first if you want a neat, even star. Set both pieces on a paper towel until later.
Step 3: Paint the Hand With Fingers Spread
Squeeze a quarter-sized puddle of green paint onto the plate. Spread it thin with the sponge brush. Paint the palm, all four fingers, and the thumb. Cover the fingers from base to tip. Spread them wide as you go, like a starfish.
Step 4: Press the Hand With Fingers Pointing Down
Lay the cardstock flat. Have the child place the wrist near the top, with the fingers pointing down. Keep the fingers wide apart. Press the whole hand down with a firm, gentle push. Count to three. The wrist end is the tip of the tree, and the spread fingers and thumb are the branches.
Step 5: Lift Straight Up and Clean Up
Hold the paper down with your free hand. Ask the child to lift straight up, like an elevator. Do not slide or twist. Wipe the hand with a wet wipe right away. Then look over the print for gaps.
Step 6: Let the Print Dry
Set the paper flat in a safe spot. A thin layer dries in about 15 to 20 minutes. Keep it away from pets and curious hands. Wait until the paint feels dry before gluing anything on top.
Step 7: Glue On the Trunk and Star
Glue the brown rectangle just below the middle fingertip. That makes the tree stand tall. Glue the star above the wrist end as the topper. Press each piece flat for a few seconds.
Step 8: Add Ornaments, Snow, Name, and Year
Dip a fingertip in red, yellow, or white paint. Dab dots on the branches for ornaments. Dab a few white dots below the tree for snow. Let those dry. Then write the child’s name, age, and year in a bottom corner.
How to Turn Your Christmas Tree Handprint Into a Keepsake or Gift
The simplest keepsake is a framed print with the child’s name, age, and year at the bottom. A plain white mat makes the green stand out. Grandparents love it.
For a card, fold cardstock in half and glue a small print on the front. Write a short note inside. You can also make an ornament. Cut out the dried print, glue it on a paper circle, punch a hole, and tie on a ribbon.
Start a yearly tradition. Make a new tree each December and keep them together in a folder. You will see the little hand grow.
To preserve the print, store it flat and out of direct sun, which fades paint. To mail it, slide it between two pieces of cardboard in a flat envelope.
Tips for Getting a Clean Handprint With Fingers Spread
The best trick is a thin layer of paint. Thick paint squishes out and joins the fingers into a green blob. A sponge brush gives you an even, light coat.
Spread the fingers before you press. Then gently hold them apart with your own hand as the child presses down. A helper can hold the paper still so it does not slide.
Babies close their fists fast. Paint the hand with a sponge brush and press quickly, then wipe right away. Wiggly toddlers do better with you holding the wrist.
If you spot a gap or smudge, wait until it dries. Then cover it with an ornament dot or a snow dot. Keep wet wipes close for sticky fingers.
How to Make a Christmas Tree Handprint Craft With a Group or Classroom
You can run this with a whole class if you set it up in stations. Station one is painting, station two is pressing, and station three is decorating. Kids rotate when you ring a bell.
Cut all the trunks and stars ahead of time. That is the biggest time saver. Put out one paint plate for every four kids so the line stays short. Write each name on the back of the cardstock before any paint comes out.
Plan a drying spot, like a counter or a clothesline with clips. Allow about five minutes per child at the painting station. When the prints dry, tuck each one into an envelope or fold it into a card. It makes an easy parent gift before winter break.
Christmas Tree Handprint Craft FAQs
What is the best paint for babies and toddlers?
Washable paint made for kids works best. Check the label before you use it on little hands. A sponge brush keeps the layer thin.
What age can do this craft?
Babies to age 6 can make it. Babies and toddlers need a grown-up to hold the hand and do the cutting. Older kids can glue and write their own names.
How can I make it without paint?
Trace the child’s hand on green paper with the fingers spread. Cut it out and glue it on cardstock. Then add the trunk, star, and ornament dots with markers or stickers.
How do I keep the fingers from smearing together?
Use a thin layer of paint and spread the fingers wide. Press straight down and lift straight up. Do not slide the hand.
How long does it take to dry?
A thin layer dries in about 15 to 20 minutes. Thick paint can take an hour. A hair dryer on low can help.
Ready to Make Your Own Tree?
Grab your green paint and a willing little hand. The print will be messy, sweet, and full of memories. Pin this for your next holiday plans, and tell me how your tree turned out!

Sohel Rana is the writer, editor, publisher, and founder of The Tidy Porch. He is the man who is responsible for the craft (my wife created) being converted into a written piece. He also helps her wife (Sumona) by capturing videos of each craft. In short, he brings each craft created by her wife in front of you by transforming it into an article and a video.
