
Last spring, I planned letter D week for my homeschool co-op. I wanted a display that felt special. A worksheet would not do.
Then my nephew pressed his muddy hand on the patio and shouted, “Look, a duck!” He was right. I turned that happy accident into this d is for duck handprint craft. Each child makes one yellow duck.
Together, the ducks swim across a big blue letter D. It took us under an hour. Today, the kids still point to the wall and name their ducks. You can make one duck or a whole pond.
Why Is a Handprint Duck Good for Teaching the Letter D?
A handprint duck works because it links the letter D to a sound and a picture kids already love. Duck starts with the /d/ sound. When children say “duck” while they touch the D, the sound and the shape start to stick together.
The craft also feels personal. Kids remember what they make with their own hands. Pressing a hand flat into paint builds the same muscles they will use to hold a pencil. A shared pond lets every child see their duck on the wall.
What Supplies Do You Need?
You need washable yellow paint, a few paper supplies, and about 45 minutes. Here is the full list for one pond of up to 20 ducks:
- Yellow paint: washable, non-toxic tempera. Plan on 1 tablespoon per hand. A 16-ounce bottle covers a class of 20.
- White cardstock: one 6-by-8-inch sheet per child.
- Poster board: one white and one blue sheet, each 22 by 28 inches. The white is the base. You will cut the pond D from the blue.
- Orange paper: a 2-by-2-inch scrap for each duck’s beak.
- Markers: one black fine-tip, one orange, and one blue.
- Foam brushes and paper plates: one 1-inch brush and one plate for every two or three children.
- Basics: glue stick, scissors, pencil, and masking tape.
- Cleanup: wet wipes, paper towels, and a bowl of warm soapy water.
How Do You Set Up Before You Start?
Cover the table, pour the paint, and build a cleanup spot before anyone touches paint.
Tape down a plastic tablecloth or old newspaper. Pour about 1 tablespoon of yellow paint onto each plate. Spread it thin with a foam brush, because thin paint makes crisp prints.
Line up the stations in order: paint, paper, then wash. Before class, cut your pond D (the steps are below). Write each child’s name in pencil on the back of a card.
How Do You Make One Handprint Duck?
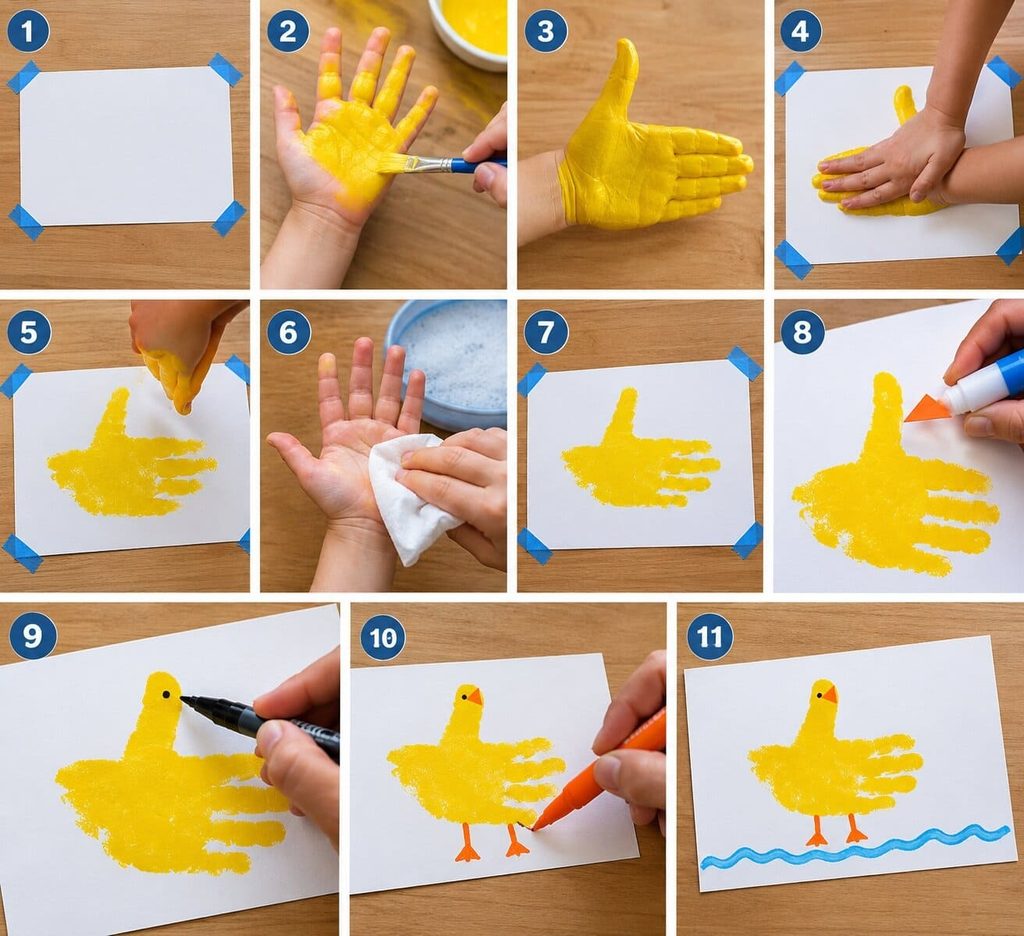
Paint the hand yellow, press it sideways on the card with the thumb pointing up, then add a beak, an eye, and feet. Follow these steps in order.
- Tape the card. Place a 6-by-8-inch card sideways on the table. Tape all four corners.
- Paint the hand. Have the child hold a hand palm up. Brush a thin layer of yellow over the palm, thumb, and all four fingers. If the paint looks see-through, add one more light coat. Thick paint makes blobs.
- Turn the hand sideways. Keep the four fingers tight together. Point the thumb straight up. The thumb is the neck and head. The palm is the body. The fingers are the tail.
- Press and hold. Lower the hand onto the card slowly. Press the palm first, then the fingers and thumb. Count slowly to five. With toddlers, a grown-up can steady the wrist.
- Lift straight up. Pull the hand away in one smooth move. Dragging causes smears. If a print smudges, let it dry, cut it out, and glue it to a fresh card.
- Clean the hand right away. Wipe with a wet wipe, then rinse in the soapy bowl.
- Let it dry. Set the card flat for 15 to 20 minutes.
- Add the beak. Cut a triangle from orange paper, about 1 inch wide and three-quarters of an inch tall. Glue it to the tip of the thumb, pointing away from the tail.
- Draw the eye. Use the black marker to make a dot the size of a pea. Place it about half an inch back from the beak.
- Add the feet. With the orange marker, draw two short legs under the palm, each half an inch long. Finish each leg with a tiny triangle foot.
- Add the water. Draw a wavy blue line below the feet. Now your duck looks ready to swim.
How Do You Build the D Is for Duck Pond?
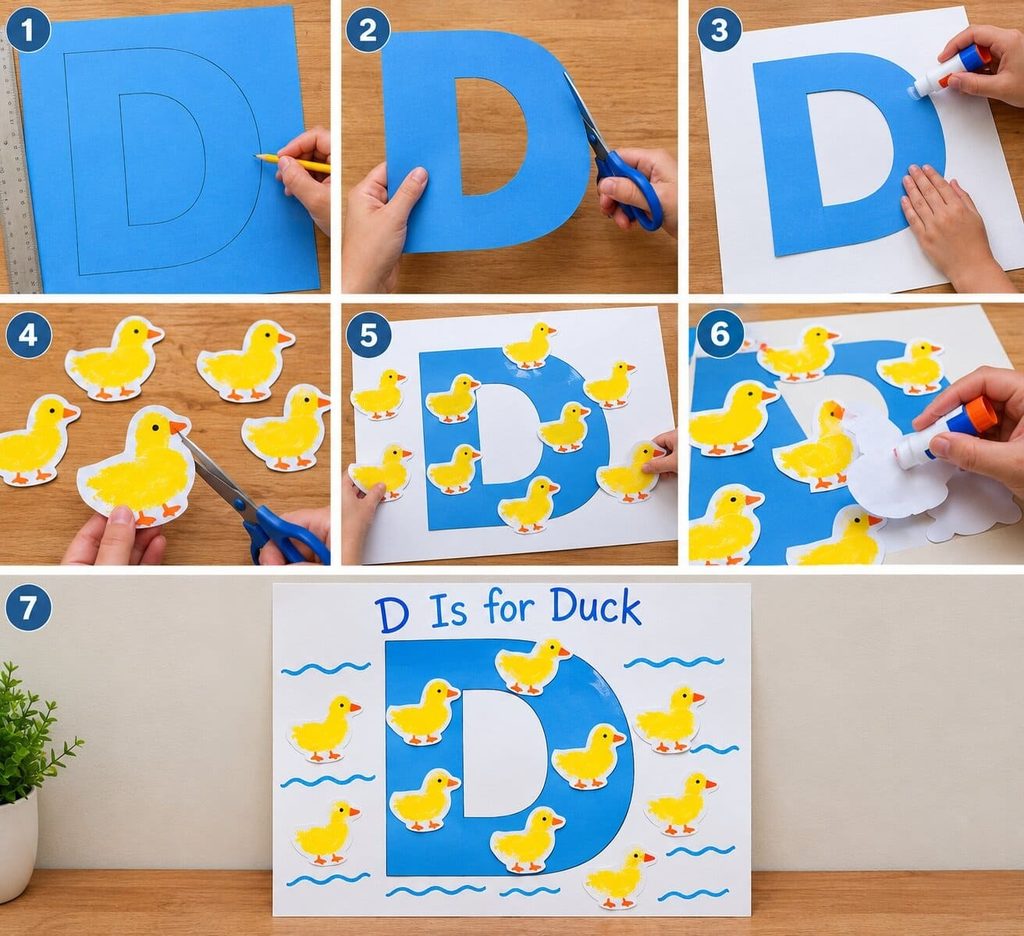
Cut a big blue D, glue it to a white base, and then glue each child’s cutout duck onto it. This part turns single crafts into one shared display.
- Draw the D. On the blue poster board, sketch a block letter D in pencil. Make it 20 inches tall and 13 inches wide, with strokes about 5 inches thick. Leave a hole in the middle, like a real letter.
- Cut it out. Cut along the outer line first. Then poke the scissors into the center and cut out the hole.
- Glue it down. Run a glue stick along the back edges. Center the D on the white poster board and press for 30 seconds.
- Trim the ducks. Cut around each dry duck, leaving an eighth-inch border.
- Plan the layout. Lay the ducks on the D before gluing. Face them all the same way for a swimming parade. Extra ducks can swim on the white base around the D.
- Glue the ducks. Rub a glue stick on the back of each duck and press it down for 10 seconds.
- Finish the water. Draw blue wavy lines around the D with a marker. Write “D Is for Duck” along the top.
For a family of three or four, shrink the D to 10 inches tall and use one sheet of construction paper.
How Can You Add Letter-Learning Activities?
Add three quick activities: trace the D, say D words, and count the ducks.
Start with tracing. Have children trace the pond D with a finger. Say, “Big line down, then a big curve around.” Next, play with D words. Ask for dog, door, dig, drum, and dance. Last, count the ducks together. Younger kids can count by ones. Older kids can count by twos.
What Changes for Toddlers, Preschoolers, and Kindergartners?
Toddlers need hands-on help, preschoolers can do most steps, and kindergartners can finish nearly everything alone.
Toddlers (ages 2 to 3): You paint the hand and guide the press. Skip the cutting. Use a black dot sticker for the eye.
Preschoolers (ages 3 to 4): They can paint and press with a little help. Let them glue on the beak and name their duck.
Kindergartners (ages 5 to 6): They can cut out their own duck and write their name on it. Challenge them to add a D word to the pond.
How Do You Keep and Date the Finished Art?
Write the child’s name, age, and date on the back in pencil, then store the art flat or frame it.
Take a photo of the finished pond before you take anything apart. Once the paint is fully dry, a mat inside a frame keeps it from touching the glass. Families can also make a new duck every year on the same size card. Line them up, and you can see how the hand grows.
What Mistakes Should You Avoid?
Most problems come from too much paint, too little drying time, or a rushed setup. Each one has an easy fix.
- Thick paint: It makes a lumpy print. Blot extra on a paper towel.
- Sliding paper: The card moves and the print smears. Tape every corner.
- Gluing wet ducks: Paint tears the paper. Wait the full 20 minutes.
- A D that is too small: The ducks crowd each other. Cut it larger, or let ducks swim on the base.
Frequently Asked Questions
What age is this craft best for?
It works well for ages 2 to 6. Toddlers need an adult to guide the hand. Kindergartners can do the cutting and gluing themselves.
What paint is safest?
Choose washable, non-toxic tempera made for kids. If you worry about sensitive skin, test a small dab on the child’s hand first.
How long does it take?
Plan on about 10 minutes of hands-on time for each child. Drying takes 15 to 20 minutes. A full class pond takes roughly 45 to 60 minutes.
How many kids can share one pond?
A 22-by-28-inch poster board holds about 20 ducks. For a bigger group, make two ponds.
How do I keep handprints from smudging?
Use thin paint, tape the card down, and lift the hand straight up. If a smudge still happens, cut out the clean part and glue it to a new card.
Can I make this without paint?
Yes. Trace the child’s hand on yellow paper and cut it out. Turn it sideways so the thumb points up. Add the beak, eye, and feet the same way.

Sohel Rana is the writer, editor, publisher, and founder of The Tidy Porch. He is the man who is responsible for the craft (my wife created) being converted into a written piece. He also helps her wife (Sumona) by capturing videos of each craft. In short, he brings each craft created by her wife in front of you by transforming it into an article and a video.
