
On Mia’s first Valentine’s Day, she was one. I pressed her red-painted hand to paper, and she wiggled like a fish. The print looked like a tomato that had lost a fight. I almost threw it out.
Instead, I wrote the date on the back and kept it. The next year, at age two, she held still for three whole seconds.
The new print was clear, and it was so much bigger. Putting them side by side made me tear up a little. This love bug handprint craft takes about 20 minutes. It also gives you a keepsake you can grow every Valentine’s Day.
Why Is a Love Bug Handprint Craft Worth Keeping Every Year?
A small hand changes fast, and a print freezes it in time. You get a cute bug now and a growth record later.
Here is how it works. You paint your child’s palm red and press it on paper. The palm becomes the bug’s body. The fingers become little legs. Then you add a head, eyes, and hearts with a marker.
I make one every year on the same white cardstock. When I lined up Mia’s two prints, the change surprised me. The fingers were longer. The palm was wider. Even her thumb had a new curve.
What Supplies Do You Need?
You need washable red paint, white cardstock, and a black marker. Everything else is optional or easy to swap.
Here is my exact list:
- Washable, non-toxic red paint (washable finger paint works too)
- White cardstock, 8.5 x 11 inches (thick printer paper works, but it wrinkles)
- A black marker (a black crayon works in a pinch)
- A paper plate for the paint
- A soft, wide paintbrush (a small sponge works too)
- Wet wipes and an old towel
- Two googly eyes and white glue (or just draw the eyes)
- A pencil for labeling
I picked cardstock because it stayed flat under Mia’s wet hand. Thin paper curled and tore on my first try. Check the label for “non-toxic” before you buy any paint.
How Do You Prep So You Avoid a Big Mess?
Cover your table and keep wipes within reach before you open the paint. A few minutes of setup saves you a lot of scrubbing.
Once, I left the wipes in a drawer across the room. By the time I got back, Mia had “decorated” her chair. Now I set up like this:
- Tape newspaper or an old sheet over the table.
- Dress your child in a smock or an old T-shirt.
- Put the wipes and a damp towel right next to you.
- Choose a spot near a sink.
- Lay out three sheets of cardstock. You will thank yourself later.
How Do You Make the Handprint, Step by Step?
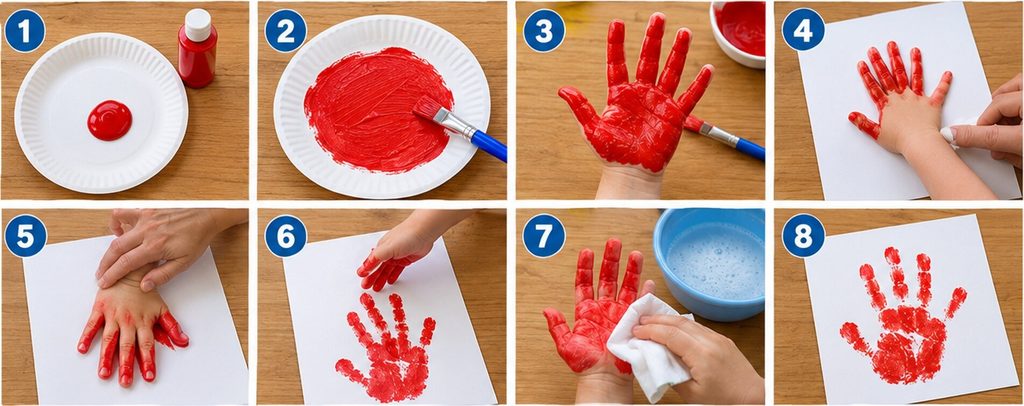
You need about 20 minutes of hands-on time, plus 15 to 20 minutes of drying. Follow these steps in order.
- Pour the paint (1 minute). Squeeze about one tablespoon of red paint onto the plate. That is all you need. My first try used four tablespoons, and Mia’s fingers merged into one red mitten.
- Spread it thin (1 minute). Brush the paint into a thin, even layer. It should look shiny, not gloppy.
- Paint the palm (1 minute). Brush a light coat over the palm and each finger. Skip the wrist. Keep the fingers a little apart so they print separately.
- Place the hand (1 minute). Hold the paper steady with one hand. Guide your child’s hand flat onto the lower two-thirds of the page, fingers pointing down. Leave the top empty for the bug’s head.
- Press (10 seconds). Press from the center of the palm out to each fingertip. Count slowly to five.
- Lift straight up. Do not slide the hand. Sliding is what causes smears. Lift by the wrist.
- Clean up right away (2 minutes). Wipe the hand while the paint is still wet. Do this before your child touches anything else.
- Let it dry (15 to 20 minutes). Set the print flat on a high shelf. It is dry when it no longer feels cool or tacky. A thicker coat may need 30 minutes.
If the print smudges, don’t wipe it. Wet paint only spreads. Let it dry, then turn the smudge into a heart or a spot with your marker. Or grab a spare sheet and try again.
How Do You Turn the Handprint Into a Love Bug?
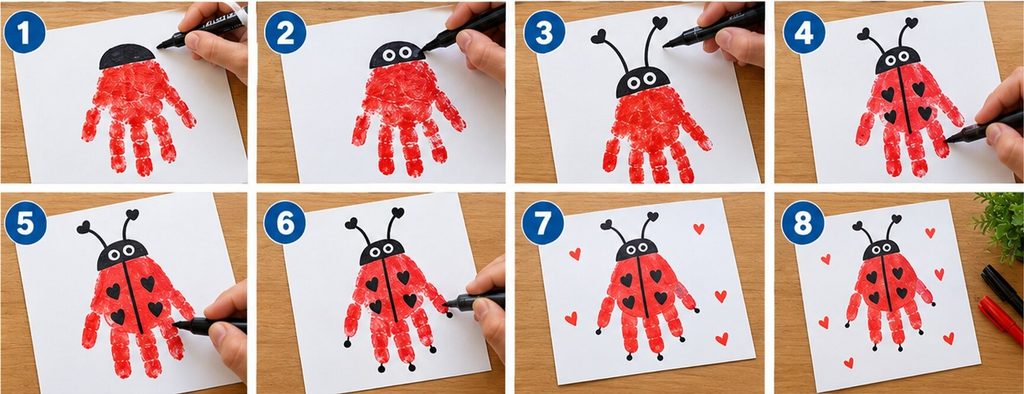
Once the paint is fully dry, use a black marker to add a head, eyes, antennae, and hearts. Those details turn a red hand into a bug.
Work in this order:
- Head: Draw a half circle above the palm and color it in black.
- Eyes: Draw two white circles with black dots, or glue on googly eyes.
- Antennae: Add two curved lines from the head. End each one with a tiny heart.
- Wings: Draw a straight line down the middle of the palm. Now the body has two wings.
- Hearts: Draw three or four small black hearts on the wings. Hearts, not dots, make it a love bug.
- Feet: Add small dots at the fingertips if you like.
Marker can’t be erased, so practice on scrap paper first. My first head came out skinny, so I covered it with a bigger half circle. Also, googly eyes are small enough to be a choking risk. I draw the eyes with Mia at the table and glue on the googly ones after she leaves.
How Do You Get a Wiggly Toddler or Baby to Cooperate?
Keep it short, pick a calm time, and bring the paper to the hand if your child won’t hold still. Patience works better than pressure.
These tricks helped me:
- Choose the right moment. Try right after a nap and a snack. A tired, hungry child will fight you.
- Flip the method. For babies, brush the paint on their palm while they lie on your lap. Then press the paper up against their hand.
- Bring a helper. One adult holds the child. The other handles the paper.
- Give a job. Let your child hold a spare brush or choose which sheet to use.
- Make noise. Sing a silly song during the five-second press.
- Quit when it’s over. If your child melts down, stop. Try again tomorrow.
How Do You Start Your Love Bug Growth Series?
Make one print each Valentine’s Day with the same paper and paint, label the back, and keep every print together. That is what turns one craft into a tradition.
Here is my system:
- Use the same supplies. The same cardstock and red paint make each year easy to compare.
- Label the back in pencil. Write the date, your child’s age, and one short note. Mine says: “Feb 14. Age 2. Says ‘bug!’ Loves bananas.”
- Measure the hand. Use a ruler from the wrist to the tip of the middle finger. Write that number on the back too.
- Pick a frame first. I use a simple three-slot frame, so each print needs to fit the same opening. I put a sticky note reading “Age 3” in the empty slot. It makes the frame feel unfinished in a good way.
- Store the extras flat. Keep spare prints in a large envelope or folder, away from direct sunlight.
- Compare each year. Set the old prints next to the new one and take a photo.
What Are Some Easy Mess-Free Variations?
A washable stamp pad or paper cutouts give you the same love bug with almost no mess. Both are great for babies and big groups.
- Stamp pad version: Press the palm on a large washable ink pad, then onto the cardstock. The print looks lighter than paint, but cleanup takes seconds. This works well for kids who hate wet hands.
- Paper cutout version: Trace your child’s hand on red construction paper. Cut it out and glue it onto white cardstock. Teachers and Sunday school leaders like this one because nobody needs a sink. Write each child’s name and the date on the back.
- Footprint version: For newborns, use a tiny foot instead of a hand. The same marker details work.
FAQs
What age can kids make this craft?
Any age works with help. I started at one year old. Newborns can do the footprint version.
What paint is safest for little hands?
Choose paint labeled “washable” and “non-toxic.” If your child has sensitive skin, test a small dab on the arm first.
How long does the paint take to dry?
A thin coat dries in 15 to 20 minutes. A thick coat can take 30 minutes or more.
What if my baby keeps their fist closed?
Gently stroke the back of the hand to open it. You can also press the paper up to the palm instead.
What if I miss a year?
Make one anyway and date it. A print from age four is still a print. The series does not need to be perfect to be sweet.
Can I do this in a classroom?
Yes. Use stamp pads or paper cutouts so you don’t need extra sinks. Label each one with a name and date right away.
Start Your First Love Bug Today
Grab some red paint and a sheet of cardstock. Don’t worry if the first print looks like a tomato. Mine did, and it’s still one of my favorites. Write the date on the back and keep it safe. Next Valentine’s Day, you’ll be glad you did.

Sohel Rana is the writer, editor, publisher, and founder of The Tidy Porch. He is the man who is responsible for the craft (my wife created) being converted into a written piece. He also helps her wife (Sumona) by capturing videos of each craft. In short, he brings each craft created by her wife in front of you by transforming it into an article and a video.
