
Leo is four, and he treats every craft like a pet. When we finished our first alligator, he held it up and announced, “He’s hungry.” Then he refused to put it down. He fed it crayons, a sock, and half my grocery list.
I had planned a flat handprint. Instead, I got a roommate with a big mouth. That is why I love this alligator handprint craft.
The jaws come from your child’s own handprints, and they open and close with one small brad. You can make it in about 30 minutes. Your kid will play with it long after the paint dries.
What Is a Snap-Along Alligator Handprint Craft?
It is a green alligator with a mouth that really opens and closes. Two handprints become the top and bottom jaws, and a brass fastener holds them together.
Kids love it because it moves. A flat paper craft goes on the fridge and gets forgotten. This one gets carried around the house. Leo named his gator Chomp, and Chomp has been to dinner twice.
It also solves a parent problem. You are never stuck wondering what to do once the craft is done. The play starts right away.
What Supplies Do You Need?
You need green paint, cardstock, white paper, scissors, glue, a marker, and one or two brass fasteners. Most of it is already in your craft drawer.
Here is what I used:
- Washable, non-toxic green paint
- 2 sheets of white cardstock for the prints
- 1 sheet of white paper for the teeth
- A small scrap of red or pink paper for the tongue
- Kid-safe scissors
- Brass fasteners (brads), 1 or 2
- Glue stick or white glue
- Black marker
- Paper plate and a soft brush
- Wet wipes and an old towel
- Googly eyes (optional)
Here are some easy swaps:
- No brad? Use the paper strip hinge in the step-by-step section below.
- No cardstock? Use a cut-open cereal box. It is stiff and holds the brad well.
- No green paint? Mix blue and yellow. Or paint with a green marker.
How Do You Prep So You Avoid a Mess?
Cover the table and set your wipes within reach before the paint comes out. Two minutes of setup saves twenty minutes of scrubbing.
Last time, I forgot the towel. Leo wiped his hand on the dog. The dog was fine, but the dog was also green.
Try this setup:
- Tape newspaper over your work space.
- Put your child in an old shirt.
- Keep wipes and a damp towel right beside you.
- Work near a sink.
- Set out two sheets of cardstock, plus one spare.
How Do You Make the Snap-Along Alligator, Step by Step?
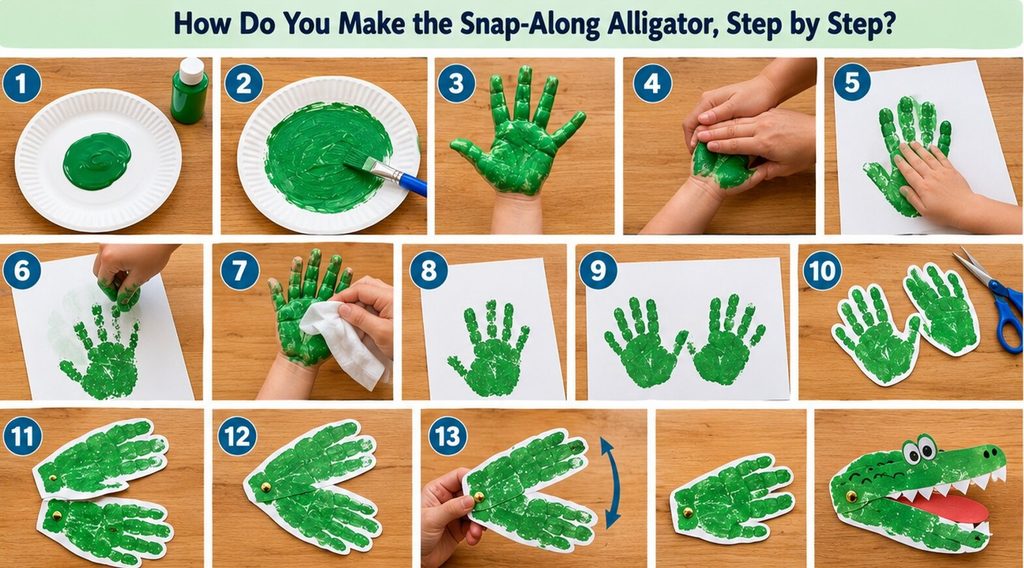
You make two green handprints, cut them out, and join them with a brad at the wrist end. Plan on about 30 minutes of hands-on time, plus drying.
- Pour the paint (1 minute). Squeeze about one tablespoon of green paint onto the plate. That is enough for one hand.
- Spread it thin (1 minute). Brush the paint into a smooth, shiny layer. Thick paint makes blobs.
- Paint the hand (1 minute). Coat the palm and fingers lightly. Skip the wrist.
- Keep the fingers together. Gently hold your child’s fingers side by side. This makes one smooth mitten shape for the jaw.
- Press (10 seconds). Lay the hand flat on the cardstock, with fingers pointing to the top. Press from the palm to the fingertips. Count to five.
- Lift straight up. Do not slide. Sliding causes smears.
- Wipe the hand right away (2 minutes). Do it while the paint is still wet.
- Make the second print. Repeat steps 1 to 7 on a new sheet. Use the same hand, or the other hand if you like.
- Dry (15 to 20 minutes). Lay both prints flat. They are ready when they feel dry, not cool.
- Cut out the jaws (5 minutes). Cut around each print in one smooth mitten shape. Leave a small border of white to the side, or trim it close. Both work. An adult should help with cutting.
- Stack the jaws. Place one on top of the other with fingers pointing the same way. The top one is the upper jaw.
- Add the brad (3 minutes). An adult pokes a small hole about one inch up from the wrist edge, in the center. Push the brad through both layers. Open the prongs flat on the back.
- Test it. Swing the top jaw up like a fan. It should open and close easily. If the jaws feel stiff, wiggle the brad a little to loosen the hole.
If the print smudges, let it dry and cut around the smudge. You can also hide it under the teeth later. Or just make a second print. Spare sheets are your friend.
If the jaws feel loose, add a second brad about one inch above the first. It keeps the top jaw from flopping.
No brad? Cut a strip of paper about one inch wide and four inches long. Fold it in half. Glue one half to the back of the top jaw and the other half to the front of the bottom jaw, at the wrist end. Hold for 30 seconds. It bends like a hinge, but the mouth opens in a narrower way.
My first alligator lost its jaw in five minutes. I had put the brad too close to the edge, and the paper tore right through. One inch in from the edge fixed it.
How Do You Add Teeth, Eyes, and Other Details?
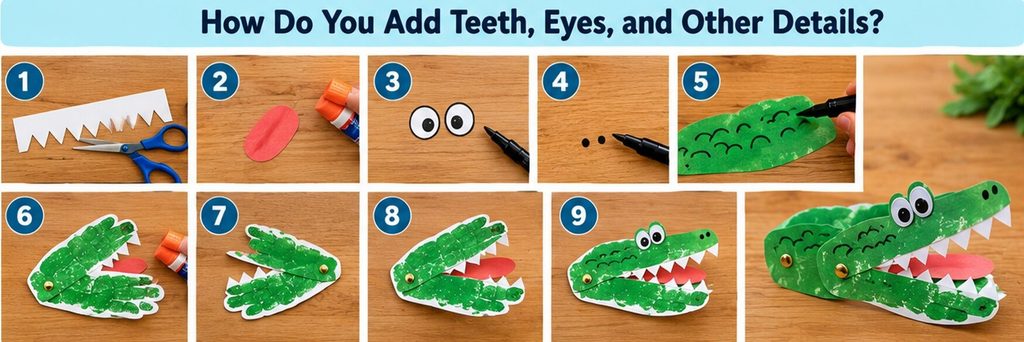
Glue white triangle teeth along the jaw edges, then add eyes, nostrils, and a tongue. These details turn a green mitten into a gator.
Follow this order:
- Teeth: Cut a strip of white paper about one inch wide. Snip small triangles along one side. You need about 8 for each jaw. Glue them along the long straight edge of each jaw so the points stick out a little. When the mouth opens, you see a toothy grin.
- Tongue: Cut a red or pink oval. Glue it to the bottom jaw, between the teeth.
- Eyes: Draw two circles on the top jaw, close to the wrist end. Gators have eyes that sit up high. Add black dots in the middle.
- Nostrils: Make two small dots on the fingertip end of the top jaw.
- Bumps: Draw small curved lines along the back for scaly skin.
Googly eyes are small enough to be a choking risk. I draw the eyes when Leo is at the table. I glue on googly ones after he is done. If you have a toddler, skip them.
What Are Your Best Tips for Wiggly Kids and Safe Cutting?
Keep each step short, and let adults handle the scissors and the brad. Kids can still do the fun parts, like painting, gluing, and naming the gator.
These tips worked for me:
- Split it into two sessions. Paint one day. Cut and build the next day. Leo has about 20 minutes of patience, and that is plenty.
- Give a job. Let your child pick the green paint, choose where the eyes go, or glue on the tongue.
- Use a helper. One adult holds the hand. The other holds the paper.
- Try a quick song. Sing a silly song during the five-second press.
- Use child-safe scissors. Cut curves slowly. Cardstock is thick, so little hands may need help.
- Keep brads away from small kids. The sharp ends can scratch. Fold them flat and cover the back with a piece of tape.
- Stop when it stops being fun. An unfinished gator is still a gator.
How Do You Play With Your Alligator?
Feed it paper fish and count each one. It turns the craft into a toy and a quick math game.
Start by cutting out 10 small fish from scrap paper. Draw a face and a tail on each one. Now try these games:
- Count and feed: Hold up the gator and say, “I’m hungry!” Your child feeds it one fish at a time. Count out loud together up to ten. Leo does it twice.
- How many are left? Hide five fish under the gator’s chin. Open its mouth and ask, “How many fish did he eat?” Then count the ones still on the table.
- Color fish: Make fish in two colors. Ask for the blue ones first. This builds color words.
- A silly rhyme: Here is one I made up:
Chomp the gator, big and green,
snaps his jaws at the fish he’s seen.
One, two, three, he eats them all,
open wide, then he takes a stall! - Story time: Ask, “What does Chomp do at the swamp?” Let your child tell the story. You may hear some wild ideas.
Store the fish inside a small envelope taped to the back of a box. Chomp’s snack stays in one place.
What Are Some Easy Variations?
You can skip the paint with crayon rubbings or cut paper. For a class, a short prep checklist keeps things running smoothly.
No-paint version: Place the paper over your child’s hand and trace around it. Then rub the side of a green crayon over the paper. A hand shape appears. Cut it out and use it as a jaw. Or trace the hand on green construction paper and cut it out directly. This takes five minutes and has zero mess.
Class-friendly version: For a group of 20 kids, do the prep ahead of time:
- Pre-cut white teeth, tongues, and fish.
- Punch the brad holes in advance.
- Label each child’s cardstock with a name before painting.
- Set up one paint station with a few plates, and have a wipe station next to it.
- Dry the prints on a drying rack or a table.
- Build the jaws in a second session.
Teachers can use the finished alligators for a swamp display. They also work for the letters A and G.
FAQs
What age can kids make this craft?
Kids ages 2 and up can join in with help. Toddlers can paint and glue. Adults should cut and set the brad.
What paint should I use?
Choose paint labeled “washable” and “non-toxic.” If your child has sensitive skin, test a small dab on the arm first.
How long does the paint take to dry?
A thin coat dries in 15 to 20 minutes. A thick coat can take 30 minutes or more.
What if the brad keeps tearing the paper?
Move it farther from the edge, about one inch in. You can also add a small piece of tape over the hole on the back.
Can I use one handprint instead of two?
Yes. Print once, cut out the shape, and trace it on green cardstock for the second jaw. The gator looks the same.
Can I make this in a classroom?
Yes. Use the class-friendly steps above. Prep the pieces ahead of time, and the kids can finish in about 30 minutes.
Time to Make Your Own Chomp
Grab some green paint and two sheets of cardstock. Your first print may come out a little blobby, and that is okay. Leo’s did, and he still calls it the best gator ever. Then let your kid feed it. You may never get your socks back.

Sohel Rana is the writer, editor, publisher, and founder of The Tidy Porch. He is the man who is responsible for the craft (my wife created) being converted into a written piece. He also helps her wife (Sumona) by capturing videos of each craft. In short, he brings each craft created by her wife in front of you by transforming it into an article and a video.
