
Last spring, my niece stared at a big letter C on the table. She said it looked like a banana. Then she tilted her head and gasped. “It’s a caterpillar!” she said.
We grabbed green paper and started gluing. Ten minutes later, her C was crawling across the page. She traced it with her finger, again and again, and said the letter’s sound out loud. That one moment taught me more than any worksheet could.
In this post, you will do the same thing. You will turn a paper letter C into a fuzzy, smiling caterpillar. It takes basic supplies and about 30 minutes.
What Is the C for Caterpillar Craft, and What Do Kids Learn?
It is a flat paper craft where the letter C becomes the caterpillar’s body. Kids cut a big C, glue round segments along its curve, and add a face and antennae.
The letter is the star, so your child builds its shape with their own hands. They also practice cutting, gluing, and counting.
I like that this one craft teaches letter shape, fine motor skills, and a bit of the caterpillar life cycle. It pairs well with a caterpillar storybook, too.
What Age Is This Craft Best For?
Ages 3 to 6 work best. Three-year-olds need help with the scissors, while five- and six-year-olds can do nearly everything alone.
Here is what I have seen in my own sessions. Threes love the gluing. Fours can cut the circles with a little guidance.
Fives and sixes enjoy extra details, like stripes or a name tag. If your child still struggles with scissors, cut the shapes ahead of time and let them glue.
What Materials Do You Need for a Paper Caterpillar C?
You need colored paper, scissors, a glue stick, a pencil, and a marker. Everything is flat paper, so cleanup takes two minutes.
- 1 sheet of white paper, 8.5 x 11 inches, for the base
- 1 sheet of green paper for the big C
- 1 sheet each of light green and yellow paper for the body circles
- 1 small scrap each of white, pink, and black paper for eyes, cheeks, and antennae
- A small plate, about 7 inches wide
- A cup, about 3.5 inches wide
- A small lid, about 1.5 inches wide
- A pencil, a black marker, child-safe scissors, and a glue stick
I use a glue stick only. Liquid glue soaks flat paper and makes it curl. A glue stick keeps everything smooth and gives kids more control.
How Do You Make a C for Caterpillar Craft Step by Step?
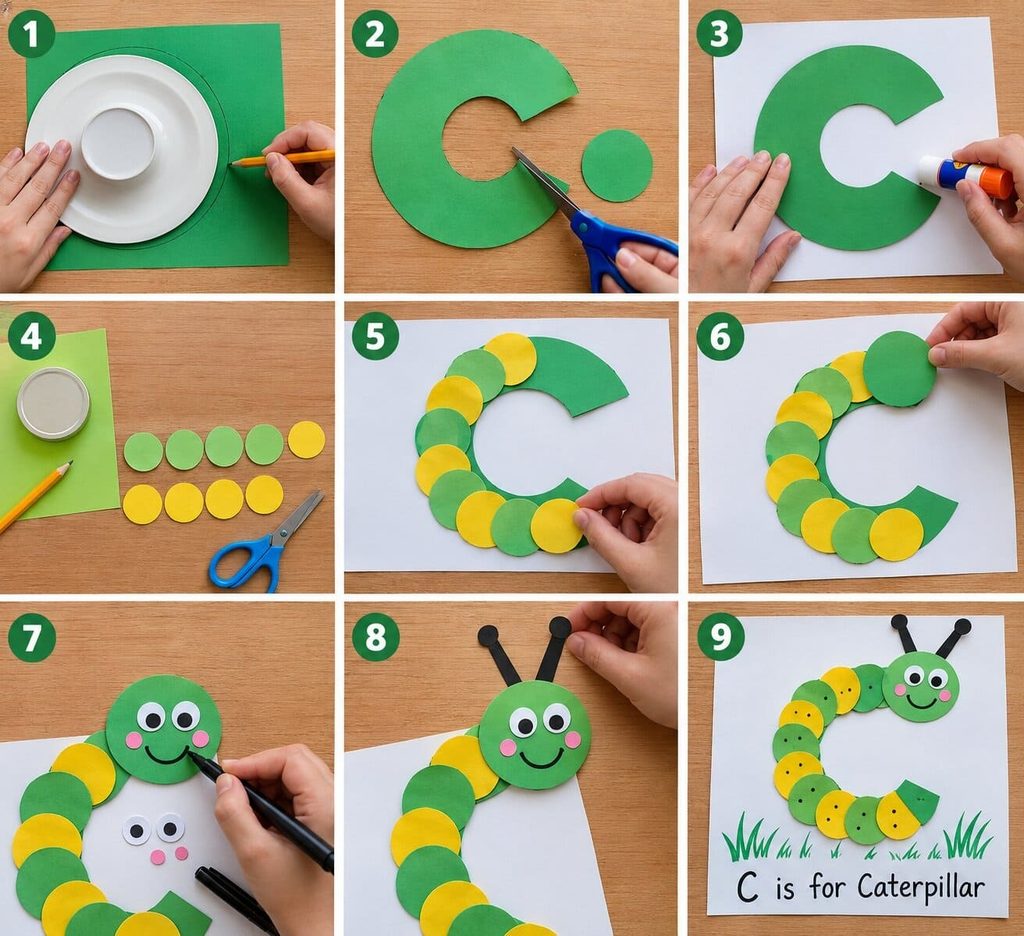
You trace a ring, cut it into a C, glue on body circles, then add a face and antennae. The whole project takes about 30 minutes.
- Trace the big C. Set the plate on the green paper and trace around it. Place the cup in the middle of that circle and trace it, too. You now have a thick ring. Tip: Eyeball the cup’s spot. It does not need to be perfect.
- Cut out the C. Cut along the outer line first. Fold the paper in half through the inner circle, snip a small slit on the fold, then open it and cut along the inner line. Save the middle circle for the head. Next, cut a wedge about 2 inches wide out of the right side. Now it looks like a letter C. Tip: Hold the paper steady with your other hand and turn it as you cut.
- Glue the C to the base. Swipe the glue stick over the back of the C. Press it onto the white paper with the opening facing right. Leave about 2 inches of space above it for antennae. Smooth it with your palm.
- Make the body circles. Trace the small lid on the light green and yellow paper. Draw ten circles in all, five light green and five yellow. Cut them out. Tip: Stack two sheets and cut both at once.
- Glue the circles along the curve. Start at the bottom tip of the C. Glue one circle on the tip, then follow the curve upward. Alternate the colors. Overlap each circle by about a quarter inch. Leave the top end open for the head. Tip: Let a bit of green peek out around the circles so the C shape stays clear.
- Make the head. Cut a circle about 2 inches wide from the leftover green middle. Glue it on the top end of the C, overlapping the last body circle slightly.
- Add the face. Cut two white circles about 3/4 inch wide for eyes. Glue them on the head. Draw a black dot in each one. Cut two tiny pink circles for cheeks and glue them below the eyes. Draw a big smile with the marker. Tip: Sketch the smile in pencil first.
- Add the antennae. Cut two black strips about 3 inches long and 1/2 inch wide. Glue one end of each strip behind the top of the head, angled out like a V. Cut two tiny black circles and glue one on each tip. Tip: Keep the strips thin so they look like antennae, not horns.
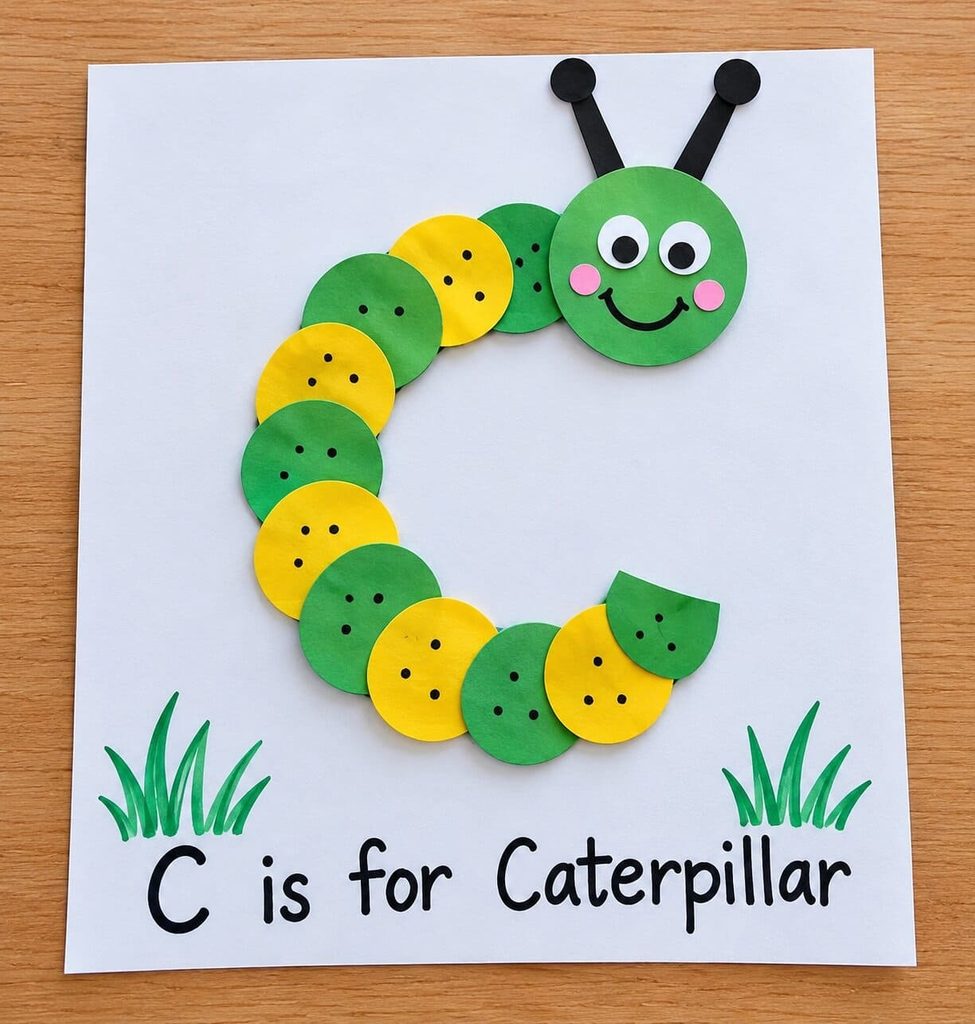
- Add details and check your C. Draw tiny dots or stripes on the body circles. Draw a few grass blades along the bottom. Write “C is for Caterpillar” at the bottom. Then step back. Can you still see the letter C? If the circles hide it, peel one up and trim it. A glue stick lets you move pieces.
How Can You Adapt the Craft for Younger and Older Kids?
For younger kids, pre-cut every shape and let them glue. For older kids, add writing and patterns.
Young threes can place circles on a C you already cut. Use only six circles and leave small gaps. Older kids can cut every piece alone. Ask them to make a color pattern, like red, blue, red, blue. Kindergartners can write a C word under the picture, such as cat, cup, or cow.
How Can You Turn It Into a Letter C Lesson?
Have your child trace the C with a finger, say its sound, and count the circles. These three small steps turn a craft into a lesson.
I always trace the paper C with a finger first. We say “cuh” together, the hard sound heard in cat. Then we hunt for C words around the room, like cup, cap, and car. While gluing, we count each circle out loud. Keep it short and playful. Five minutes of fun sticks better than a long drill.
How Can You Display It in a Classroom or Homeschool Unit?
Hang the finished caterpillars in a row on a bulletin board or wall. A line of crawling Cs looks great and shows off every child’s work.
For a life-cycle unit, add a cocoon craft and a butterfly craft later in the week. At home, tape it to the fridge. You can also punch two holes and keep it in a binder of alphabet crafts.
What Common Mistakes Should You Avoid, and How Do You Fix Them?
The most common problems are curling paper, a hidden C, a lopsided ring, and tricky cutting. Each one has a quick fix.
- Curling paper: Too much glue is the cause. Use one thin swipe, then press the page under a book for a minute.
- A hidden C: The circles are covering the green. Trim them or leave small gaps.
- A lopsided ring: The cup slipped. Trace slowly and hold it flat with two fingers.
- Frustrated cutters: The inner circle is the hardest part. Start that cut for your child.
I have made every one of these mistakes myself. They never ruin the craft.
Frequently Asked Questions About the C for Caterpillar Craft
How long does this craft take?
About 30 minutes. Cutting takes the longest. Pre-cut shapes bring it down to 15 minutes.
Can I make a lowercase c caterpillar?
Yes. The shape is the same, just smaller. Use a plate about 5 inches wide and a cup about 2.5 inches wide. Cut nine circles about 1 inch wide.
What paper works best?
Plain construction paper works best. It is sturdy, cheap, and easy for small hands to cut. Cardstock is stiffer and harder for little scissors.
Do I need a printer?
No. You trace a plate and a cup, so no template is needed. Tracing also builds hand control.
What if my child cannot cut circles yet?
Let them tear the paper instead. Torn circles look fuzzy, like a real caterpillar. Tearing also strengthens little fingers.
Ready to Make Your Own Crawling C?
Now you have everything you need to make a C that crawls. Gather your paper, trace your plate, and let your child do the gluing. If this helps, save the pin so you can find it again next letter week.

Sohel Rana is the writer, editor, publisher, and founder of The Tidy Porch. He is the man who is responsible for the craft (my wife created) being converted into a written piece. He also helps her wife (Sumona) by capturing videos of each craft. In short, he brings each craft created by her wife in front of you by transforming it into an article and a video.
