
Nothing happened. I opened the folded page and found a blank, empty puddle. The red paint had dried before I closed the paper. Omar, age 4, looked at me and waited.
It was a rainy afternoon, and we had one more sheet of cardstock. This time I folded fast. The page opened with a pale red umbrella floating in the puddle. “There’s another one!” Omar shouted.
He made five more before the rain stopped. That moment turned an ordinary umbrella handprint craft into something kids ask for again. You will make a bright umbrella with its own reflection.
What You Need for an Umbrella Handprint Craft
You need cardstock, washable paint, and a few basic tools. Most of it is probably on your craft shelf already.
- White cardstock, one sheet per child
- Kids’ non-toxic, washable paint in red and blue
- Two paper plates
- A sponge brush
- A pencil and a ruler
- A black marker
- A light blue crayon
- Wet wipes
- A plastic tablecloth and an old shirt
I use cardstock because thin paper wrinkles when it gets wet. Cardstock also keeps a crisp fold, which matters for the reflection.
A sponge brush spreads paint evenly across the whole hand, and even paint transfers better in the fold.
Red looks great, but any bright color works. Choose paint labeled non-toxic and stay close while your child works, since little ones sometimes taste things.
How to Set Up the Puddle Page
Draw the puddle line first, and let the adult do it. It takes about two minutes.
Lay the cardstock in portrait position. Use the ruler to draw a light pencil line across the middle. That line is the edge of the puddle.
Fold the page along the line, crease it with your thumb, and open it flat again. The crease makes the fold quick later, and speed matters because wet paint dries fast.
Now plan where the hand goes. The heel of the palm should sit about 2 inches above the line. That gap leaves room for the handle. It also gives the reflection space to appear below the line.
How to Make a Puddle Reflection Umbrella Handprint Step by Step
Print the umbrella above the line, fold the page right away, and open it to reveal the reflection. The whole craft takes about 25 minutes, plus drying time.
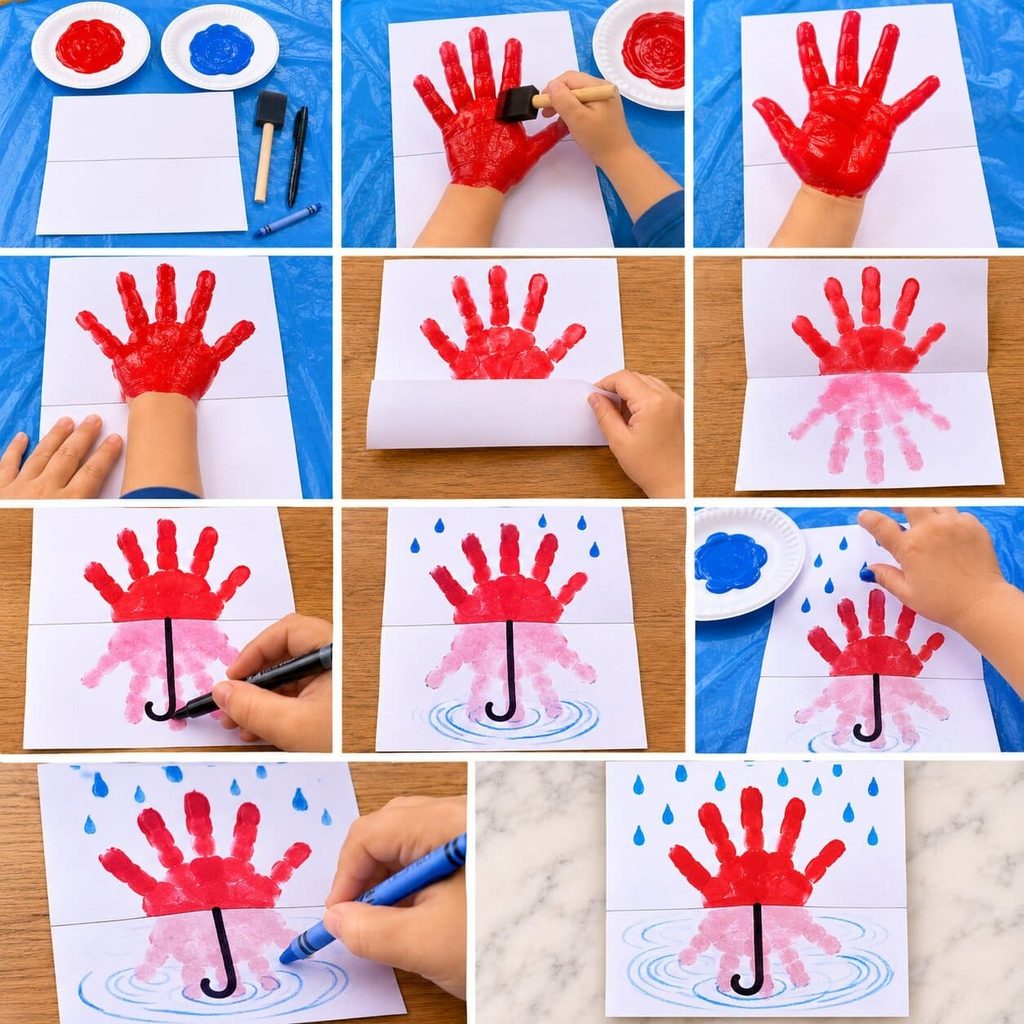
- Cover the table with the plastic cloth and put the old shirt on your child. Squeeze a thin layer of red paint on one plate and blue paint on the other.
- Set the creased page in front of your child with the pencil line across the middle. Keep the wet wipes within easy reach.
- Use the sponge brush to cover the palm and all five fingers with red paint. Aim for a medium layer. It should look wet and even, not goopy.
- Ask your child to spread the fingers wide, then press the hand above the line with the fingers pointing up. The heel of the palm sits about 2 inches above the line. The spread hand looks like an umbrella canopy.
- Press down for a count of three. Rest your hand lightly on the back of theirs so it does not slide.
- Lift the hand straight up. Wipe it with a wet wipe right away.
- Fold the lower half of the page up along the crease while the paint is still wet. Do it within about ten seconds. Press gently with a clean palm for five seconds.
- Open the page slowly, starting at one corner. A paler, upside-down umbrella appears in the puddle. Pause and let your child say what they see.
- Lay the page flat and let it dry for about 20 minutes.
- Draw the handle with the black marker. Start at the middle of the palm print and draw a straight line down to the puddle line. Finish with a small hook. Add a faint matching handle to the reflection.
- Dip one fingertip in blue paint and press raindrops in the sky area above the umbrella. When they dry, draw light blue ripple rings around the reflection with the crayon.
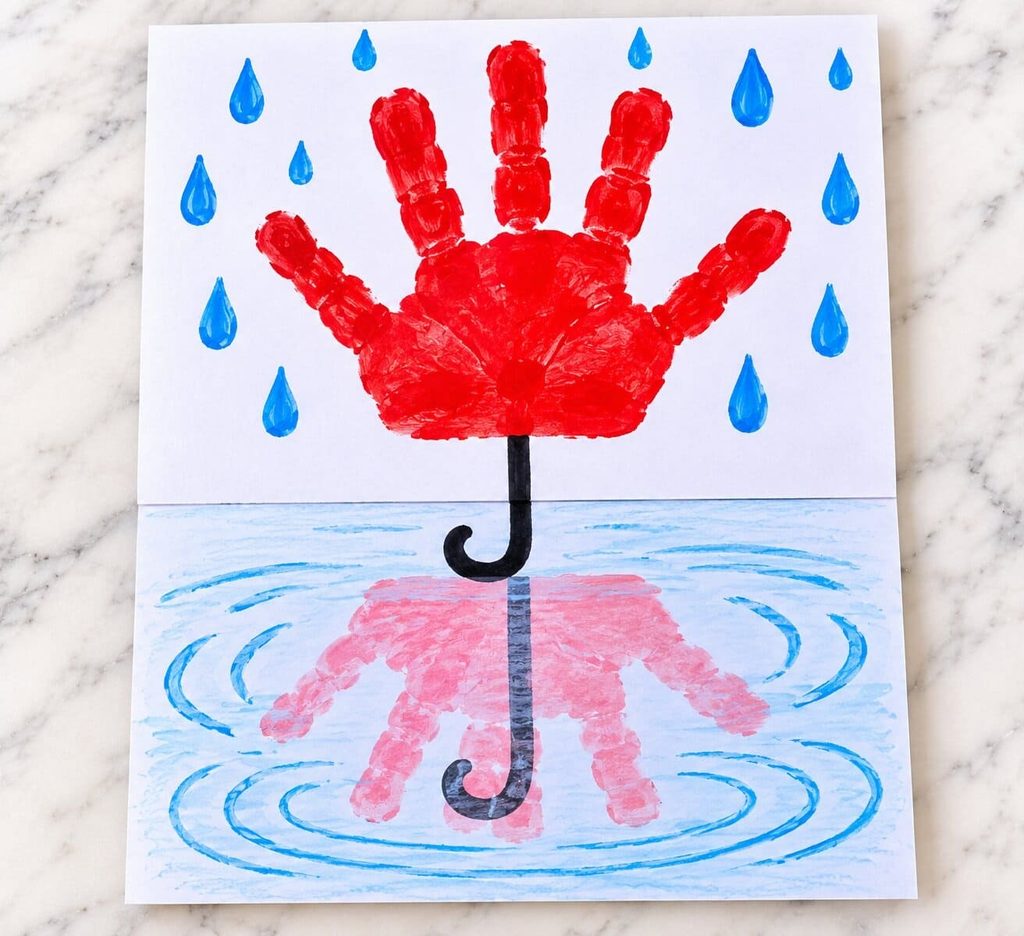
If no reflection shows up, the paint dried before the fold. Use a little more paint and fold faster on the next try. That is exactly what happened to me.
How to Get a Clear Reflection
A medium layer of paint and a fast fold give the clearest reflection. Too little paint leaves nothing to transfer. Too much paint turns into a smear.
Press from the crease outward so the paper meets the paint evenly. Open the page slowly, because a quick tug can pull the paint. Then lay it flat to dry.
The reflection will always look paler than the umbrella above it. That is normal, and it looks a lot like a real puddle. If your first page goes wrong, try again. Kids rarely mind making a second one.
Rainy-Day Talk to Have With Your Child
Ask short, playful questions while the page opens. Let your child look closely and answer in their own words.
- What do you see in the puddle?
- Which way is the puddle umbrella pointing?
- Is the puddle umbrella darker or lighter than the real one?
- Where else have you seen your reflection?
Omar went quiet for a second, then shouted that there was another umbrella. That tiny pause is the best part. Do not rush to explain. Let your child spot the surprise first, then talk about it together.
Make a Class Umbrella Parade and a “U Is for Umbrella” Page
Each child makes one umbrella in a different color, and the class hangs them together. It makes a bright weather board.
Cut a large cloud from gray paper and tape it at the top of the board. Hang the finished pages in a row beneath it. Before class, draw the puddle lines and pre-crease every page. Set up one paint station for every three or four children, and dry the pages flat.
For alphabet units, add a “U is for umbrella” label. Write a big capital U and a small u beside the board. Ask children to listen for the “u” sound at the start of the word.
Easy Ways to Change It Up
Small changes make each page feel new. Pick one or two.
Make a rainbow set with a different color for each umbrella. Print a family set, using hands of different sizes for big and little umbrellas. Draw yellow rain boots beside the puddle.
Add a gray paper cloud above the umbrella. Press a few extra blue fingerprints as puddle splashes. Each idea uses supplies you already have.
Ways to Display Your Puddle Umbrella
Write your child’s name and the date on the back before you display it. A few words turn a craft into a keepsake.
Tape the page to a window on a rainy day. Hang several pages from a string with clothespins. Slide your favorite into a simple frame. Keep one from each rainy season in a folder, and compare the hand sizes later.
FAQs
Is an umbrella handprint craft safe for kids?
Yes, with the right paint and close supervision. Choose paint labeled non-toxic and washable. Wipe your child’s hand right after the print so paint stays away from mouths and sleeves.
Why did no reflection show up?
The paint likely dried before the fold. Use a medium layer and fold within about ten seconds. My first try failed for exactly that reason.
Can toddlers make this?
Yes, with help. You paint the hand, guide the press, and do the fold. Let your toddler watch the page open, since that part is the fun.
What paper works best?
White cardstock is the best choice. It stays flat and folds crisply. Thin printer paper wrinkles and can tear when wet.
How do I run it with a group?
Draw the lines and pre-crease every page before class. Set up one paint station for every three or four children. Dry the pages flat on a table or shelf.
You now have an umbrella handprint craft with a surprise inside. Save this pin for your next rainy day. Then grab red paint, draw a puddle line, and let your child fold and open the page.

Sohel Rana is the writer, editor, publisher, and founder of The Tidy Porch. He is the man who is responsible for the craft (my wife created) being converted into a written piece. He also helps her wife (Sumona) by capturing videos of each craft. In short, he brings each craft created by her wife in front of you by transforming it into an article and a video.
