
Last December, my kitchen table vanished under green paper. My niece wanted a tree for her room.
I wanted a craft with no glitter and no printer. So we tried a folded paper Christmas tree craft with plain paper and a ruler.
Her first tree flopped on its face. Mine did too. Then we found a simple fix. Soon three little trees stood in a row on her shelf. They looked like real decor, not a school project.
You can make the same set today. It takes paper, scissors, glue, and about thirty minutes.
What You Need for a Folded Paper Christmas Tree
You need paper, a ruler, scissors, a stapler, and glue. Most of it is already in your craft drawer. Here is the full list for a set of three trees:
- Two sheets of green paper, 8.5 x 11 inches (cut one in half)
- One sheet of patterned scrapbook paper, 12 x 12 inches
- Scraps of brown paper for trunks
- Scraps of yellow or gold paper for stars
- A ruler and a pencil
- Scissors
- A stapler
- Craft glue
- Three clothespins
- Stickers, markers, or tiny pom-poms for decorating
Plan about 10 minutes for your first tree. The next two go faster. The whole set took us about 30 minutes, with decorating.
Kids need a grown-up for the scissors and the stapler. Set everything on a tray before you start. A tray keeps tiny stars from rolling off the table.
Folded Paper Christmas Tree Craft Step by Step
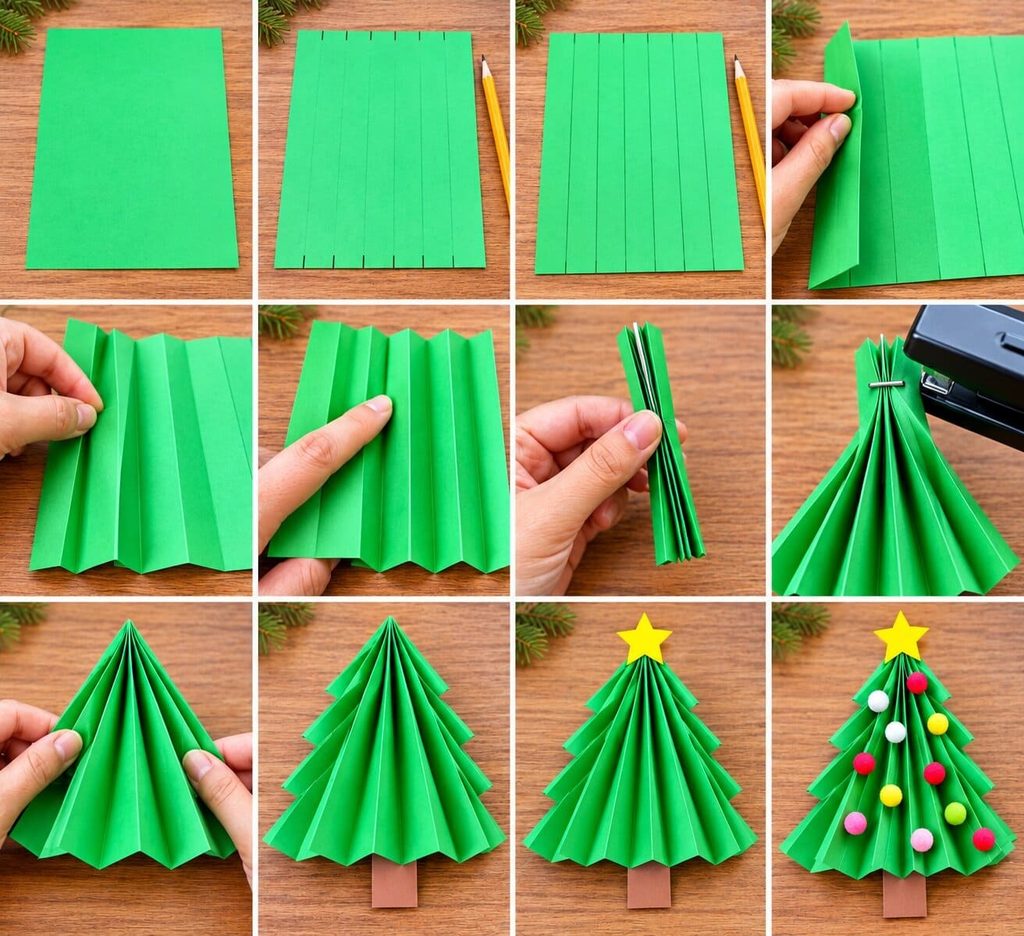
Pleat the paper, fold the strip in half, staple the top, and fan it open. These steps make the medium tree. The small and large trees use the same moves. The pleats do most of the work, which is why even young kids can finish one.
- Place an 8.5 x 11 sheet in front of you. Keep the long side facing you.
- Mark every 1 inch along the top edge and the bottom edge. You will make 10 marks on each edge.
- Connect each top mark to the mark below it with a light pencil line.
- Fold the first strip forward on the first line. Press the crease flat.
- Fold the paper backward on the second line. Keep switching directions, like a paper fan.
- Run your fingernail along every crease. You should now hold a stiff strip about 1 inch wide and 8.5 inches long.
- Fold the strip in half so the two short ends meet. The fold is the top of your tree.
- Staple through all the layers, about half an inch below the fold. Stay in the center of the strip.
- Hold the top and pull the layers apart at the bottom. Open one pleat at a time. Stop when the tree looks full, with a pointed top and a wavy bottom edge.
- Cut a brown trunk, 1 inch wide and 1.5 inches tall. Glue it behind the bottom center so half an inch peeks out.
- Cut a yellow star about 1.5 inches wide. Glue it to the top so it covers the staple.
- Add stickers, dots, or pom-poms. Use small dabs of glue so the pleats stay clean.
How to Make Your Paper Tree Stand Up
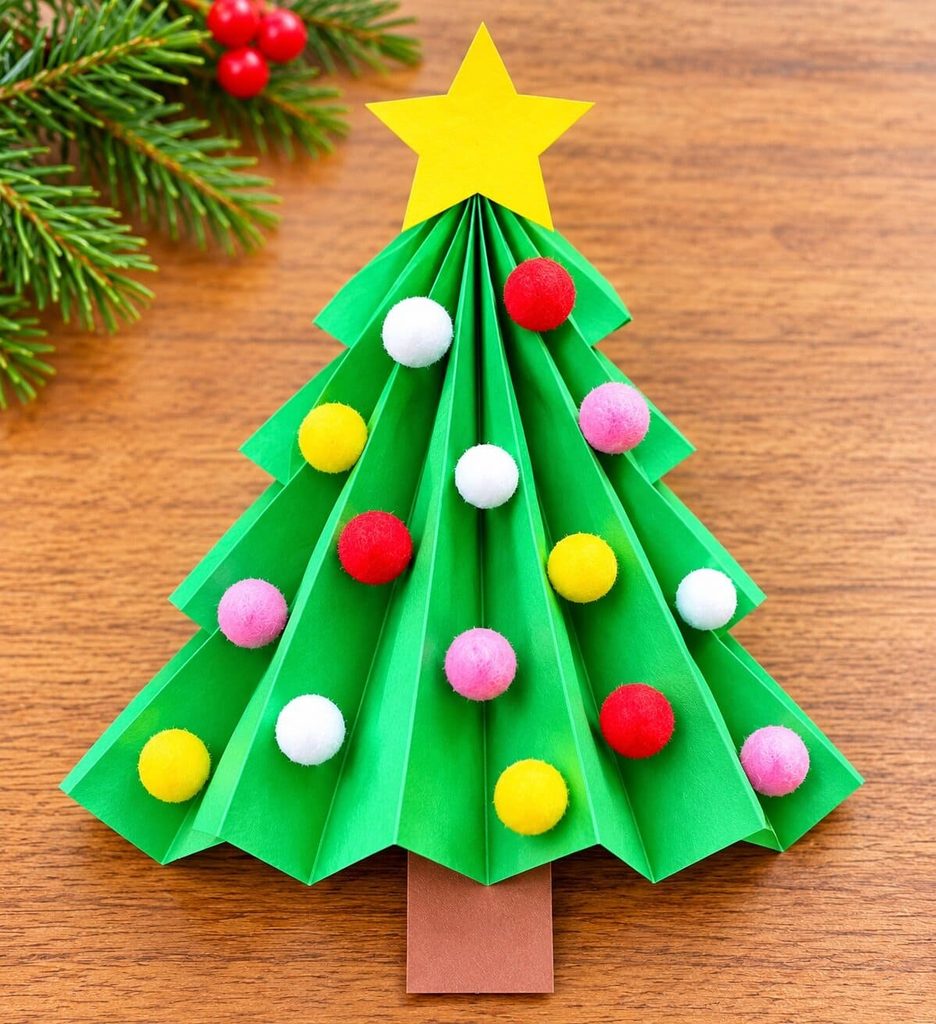
Clip a clothespin to the back of the tree. It works like the leg of a picture frame. Slide the clip onto the back pleat near the bottom. Lean the clothespin backward and set the tree on a flat surface. Nudge it until it holds steady.
No clothespins? Cut a strip of cardstock, 1 inch by 3 inches. Fold up 1 inch at one end. Glue the long part to the back of the tree. The folded end becomes a small foot. The clothespin gave us the steadiest stand on a smooth mantel. The paper foot looked neater on a bookshelf.
Make the Mantel Forest With Three Tree Sizes
Make one small, one medium, and one large tree. Then line them up from tallest to shortest. Different heights are what turn a kid craft into a decorating idea.
Here is how each size works:
- Small: Cut an 8.5 x 11 sheet in half. Mark 1-inch pleats along the 8.5-inch side. The tree stands about 2¾ inches tall.
- Medium: Use a full 8.5 x 11 sheet. The tree stands about 4¼ inches tall.
- Large: Use a 12 x 12 sheet of scrapbook paper. Pleat it the same way. The tree stands about 6 inches tall.
Put the tallest tree in the middle. Leave about 2 inches between the trees. Groups of three look balanced on a mantel or windowsill. Try patterned paper for the large tree and solid green for the other two. The mix adds interest without looking busy. A few tiny paper stars scattered between the trees finish the scene.
Best Paper for Folded Paper Christmas Trees
Medium-weight paper works best, such as construction paper or scrapbook paper. It holds a crease and still folds easily for small hands.
Thin printer paper folds fine, but the tree droops after a day. Cardstock stands tall, yet it cracks at the creases and tires little fingers. If you use stiffer paper, press each crease with the edge of a ruler. Choose double-sided scrapbook paper when you can. One-sided paper shows a white back inside every pleat. You can color the white back with a green marker if that’s all you have.
Age Guide: What Kids Can Do at Each Age
Ages 3 to 4 can fold with your help and decorate on their own. Ages 5 to 7 can do the whole craft themselves, except the stapling.
For ages 3 to 4, draw the pencil lines ahead of time. Let them press each crease flat. You staple the top. Then hand over the stickers and a big glue stick for the star. Drawn lines make folding easy for small hands.
For ages 5 to 7, let them measure with the ruler and fold every pleat. Kid scissors can cut the trunk and star. This folded paper Christmas tree craft also works for a classroom. Pre-fold a few strips for the youngest kids. Set up one stapling station with an adult.
Fixes for Common Folded Tree Problems
Most problems come from uneven pleats or a loose top. Each one has a quick fix.
The tree flops over. Add a clothespin or a paper foot. Also open the bottom wider, so the tree has a broader base.
The pleats look uneven. Redo the folds along ruler lines. Even 1-inch pleats make a neat, full fan.
The folds got crushed. Don’t press the tree flat once it’s open. Gently lift each pleat with the tip of a pencil.
The glue is showing. Use tiny dots, not lines. Cover any spots with the trunk or star.
The stapler won’t go through. Wrap a rubber band around the top. Or press a dab of tacky glue between the two halves and hold it for one minute. Then cover the top with the star.
FAQs About Folded Paper Christmas Trees
How do you make a folded paper Christmas tree stand up?
Clip a clothespin to the back, or glue on a small paper foot. Either one steadies the tree on a flat surface. The clothespin is faster.
What paper works best?
Construction paper or double-sided scrapbook paper works best. It’s stiff enough to hold pleats and soft enough for kids to fold.
How long does it take?
Plan about 10 minutes for the first tree. The next ones take 5 to 7 minutes each. Decorating adds a little more time.
Can toddlers make this?
Toddlers under 3 can decorate a finished tree with stickers. Folding takes finger strength and patience. Keep staples out of reach.
How do you store paper trees after Christmas?
Press the pleats closed and slide each tree into a flat box. Keep the box dry. Next year, fan the trees open again.
You now have a tiny forest made from a few sheets of paper. Pin this craft to your Christmas board so you can find it again. Then come back and tell me which paper you picked. I’m always curious.

Sohel Rana is the writer, editor, publisher, and founder of The Tidy Porch. He is the man who is responsible for the craft (my wife created) being converted into a written piece. He also helps her wife (Sumona) by capturing videos of each craft. In short, he brings each craft created by her wife in front of you by transforming it into an article and a video.
