
Last January, a snowstorm closed school. By 10 a.m., my kids were bouncing off the couch. I did not want to drive anywhere. So I dug through the kitchen and the recycling bin.
I found paper plates, cotton balls, and an old coffee filter. An hour later, we had a snowman, a snowy tree, and a quiet living room.
Those are my favorite winter craft ideas for kids because you probably own everything already. Below are 7 crafts. Each one lists age, prep time, mess level, and full steps.
What Do You Need for Easy Winter Crafts With Kids?
You need about ten cheap basics. Most are already in your kitchen, recycling bin, or junk drawer.
- White school glue and glue sticks
- Safety scissors
- Paper plates
- Cotton balls
- Washable paint
- Construction paper
- Coffee filters
- Cardboard tubes
- Markers or crayons
- Tape
Keep these in one box. A bored afternoon turns into a craft afternoon in minutes. One set of basics also beats buying a new kit for every project. I toss empty toilet paper rolls and coffee filters into a bin all year.
7 Easy Winter Craft Ideas for Kids You Can Make With Stuff You Already Have
Pick the craft that fits your child’s age and your mood. Every one lists its age range, prep time, and mess level. Each has full steps, so you can finish from this page alone.
Puffy Snow Paint: A Squishy Craft for Ages 2 to 4
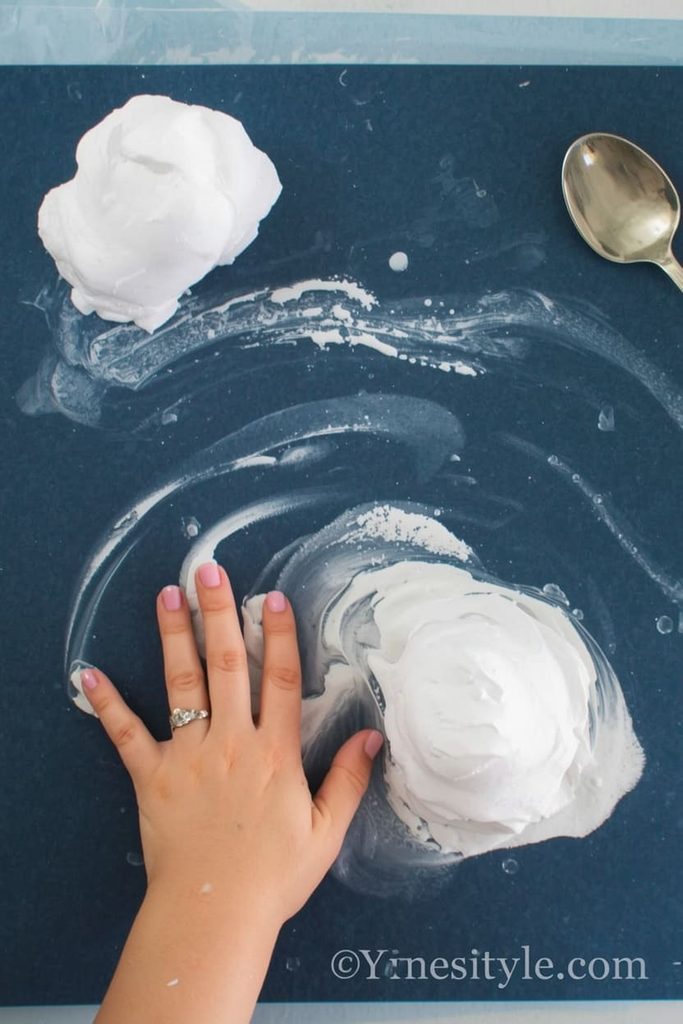
Ages 2 to 4 | 5 minutes | Medium mess | Practices finger painting
Puffy snow paint is a fluffy white paint made from two kitchen items. Toddlers love the soft, squishy feel.
Supplies: 1 cup plain shaving cream (foam, not gel), 1 cup white school glue, mixing bowl, spoon, dark blue paper, painter’s tape
Steps:
- Cover the table with a plastic tablecloth or newspaper.
- Put an old shirt on your child. Roll up their sleeves.
- Squirt 1 cup of shaving cream into the bowl.
- Add 1 cup of white school glue.
- Stir slowly for one minute. The paint is ready when it looks thick and fluffy, like whipped cream.
- Tape a sheet of dark blue paper to the table so it won’t slide.
- Let your child dab the paint on with their fingers. Show them how to make snowballs, hills, or a snowman.
- Let the picture dry flat overnight. It stays puffy and feels firm by morning.
Watch closely. This paint is not food. Keep it away from mouths.
My tip: Use plain foam, not gel. Gel does not puff up. Keep wipes next to you for sticky hands.
Cotton Ball Snowy Pine Tree: A Quick Craft With Little Mess
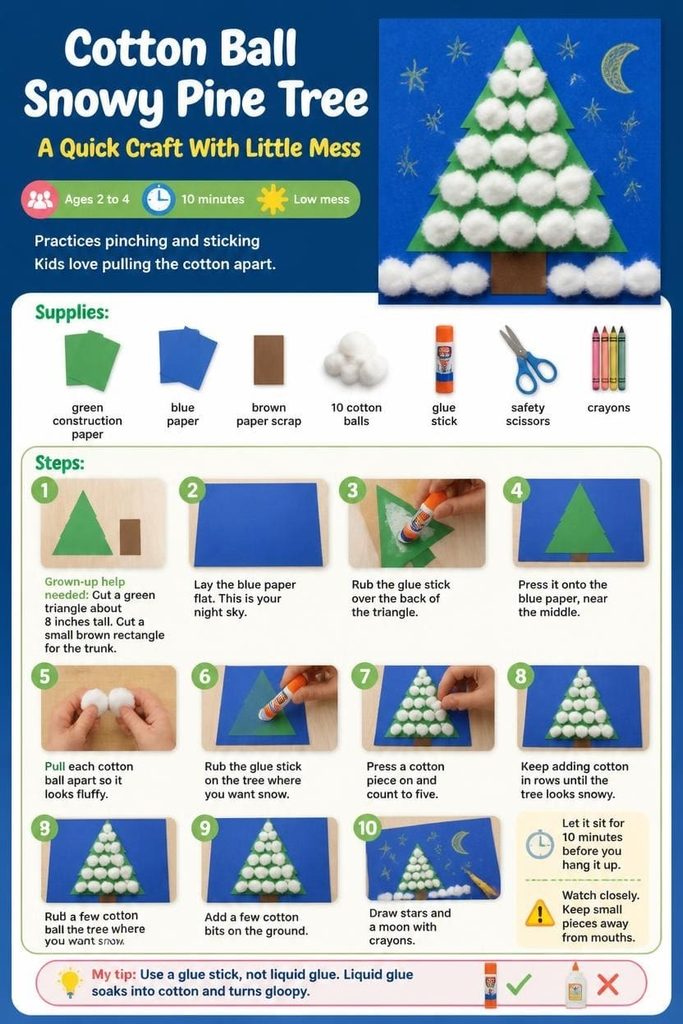
Ages 2 to 4 | 10 minutes | Low mess | Practices pinching and sticking
This craft is a green paper tree covered in fluffy cotton “snow.” Kids love pulling the cotton apart.
Supplies: green construction paper, blue paper, brown paper scrap, 10 cotton balls, glue stick, safety scissors, crayons
Steps:
- Grown-up help needed: Cut a green triangle about 8 inches tall. Cut a small brown rectangle for the trunk.
- Lay the blue paper flat. This is your night sky.
- Rub the glue stick over the back of the triangle. Press it onto the blue paper, near the middle.
- Glue the trunk under the tree.
- Pull each cotton ball apart so it looks fluffy.
- Rub the glue stick on the tree where you want snow. Press a cotton piece on and count to five.
- Keep adding cotton in rows until the tree looks snowy.
- Add a few cotton bits on the ground. Draw stars and a moon with crayons.
- Let it sit for 10 minutes before you hang it up.
Watch closely. Keep small pieces away from mouths.
My tip: Use a glue stick, not liquid glue. Liquid glue soaks into cotton and turns gloopy.
Paper Plate Snowman: A Classic for Ages 5 to 7
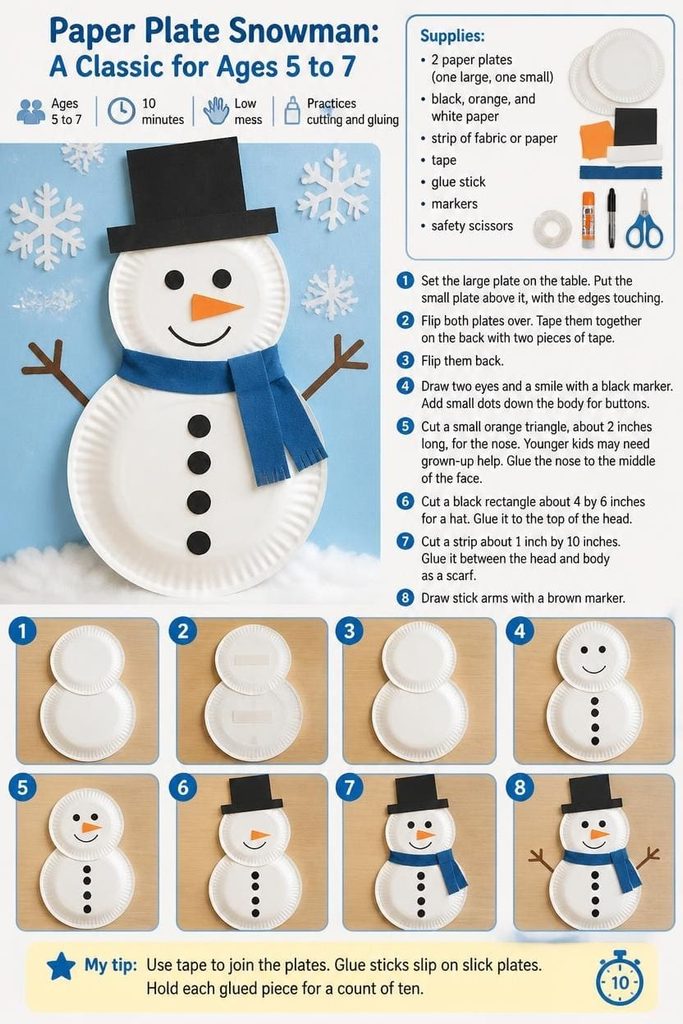
Ages 5 to 7 | 10 minutes | Low mess | Practices cutting and gluing
A paper plate snowman is two plates stacked into a body and head. Kids get to choose the face and hat.
Supplies: 2 paper plates (one large, one small), black, orange, and white paper, strip of fabric or paper, tape, glue stick, markers, safety scissors
Steps:
- Set the large plate on the table. Put the small plate above it, with the edges touching.
- Flip both plates over. Tape them together on the back with two pieces of tape.
- Flip them back. Draw two eyes and a smile with a black marker.
- Add small dots down the body for buttons.
- Cut a small orange triangle, about 2 inches long, for the nose. Younger kids may need grown-up help.
- Glue the nose to the middle of the face.
- Cut a black rectangle about 4 by 6 inches for a hat. Glue it to the top of the head.
- Cut a strip about 1 inch by 10 inches. Glue it between the head and body as a scarf.
- Draw stick arms with a brown marker.
My tip: Use tape to join the plates. Glue sticks slip on slick plates. Hold each glued piece for a count of ten.
Toilet Paper Roll Penguins: A Cute Craft From Recycling
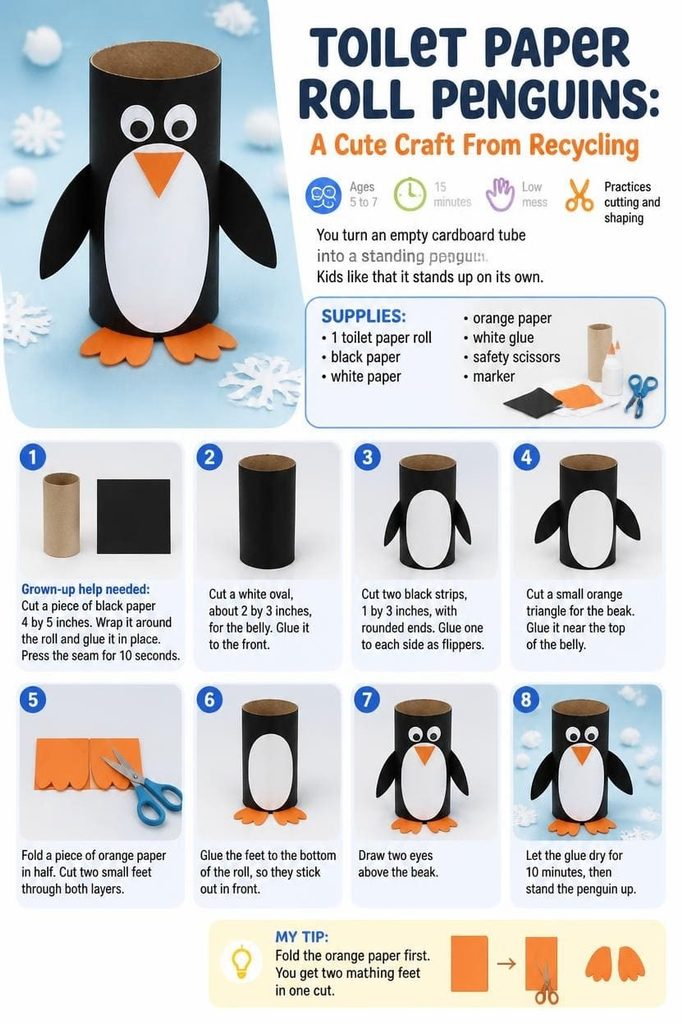
Ages 5 to 7 | 15 minutes | Low mess | Practices cutting and shaping
You turn an empty cardboard tube into a standing penguin. Kids like that it stands up on its own.
Supplies: 1 toilet paper roll, black paper, white paper, orange paper, white glue, safety scissors, marker
Steps:
- Grown-up help needed: Cut a piece of black paper 4 by 5 inches.
- Wrap it around the roll and glue it in place. Press the seam for 10 seconds.
- Cut a white oval, about 2 by 3 inches, for the belly. Glue it to the front.
- Cut two black strips, 1 by 3 inches, with rounded ends. Glue one to each side as flippers.
- Cut a small orange triangle for the beak. Glue it near the top of the belly.
- Fold a piece of orange paper in half. Cut two small feet through both layers.
- Glue the feet to the bottom of the roll, so they stick out in front.
- Draw two eyes above the beak.
- Let the glue dry for 10 minutes, then stand the penguin up.
My tip: Fold the orange paper first. You get two matching feet in one cut.
Coffee Filter Snowflakes: A Lacy Craft for Ages 7 to 10
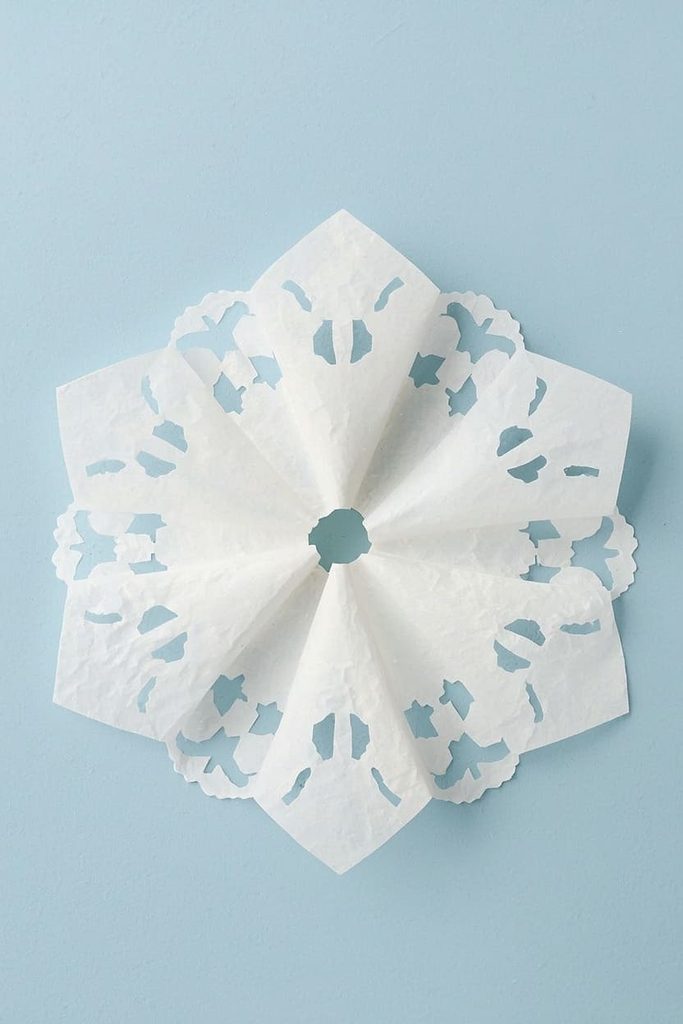
Ages 7 to 10 | 15 minutes | Low mess | Practices folding and cutting
You fold a round coffee filter, snip shapes, and open it up. The result looks like lace.
Supplies: 3 white basket-style coffee filters, safety scissors, tape or string
Steps:
- Lay a coffee filter flat. Press out the wrinkles with your hand.
- Fold it in half to make a half circle.
- Fold it in half again to make a quarter circle.
- Fold it once more, so it looks like a thin cone.
- Snip small triangles, half circles, and slits along both sides. Do not cut all the way across.
- Cut off the pointed tip if you want a hole in the middle.
- Open the filter slowly, one fold at a time.
- Press it flat under a heavy book for 10 minutes.
- Tape it to a window or hang it with string.
My tip: Make fewer, bigger cuts. Coffee filters are thin, and tiny cuts make them tear.
Pinecone Bird Feeders: A Nature Craft for Ages 6 to 10
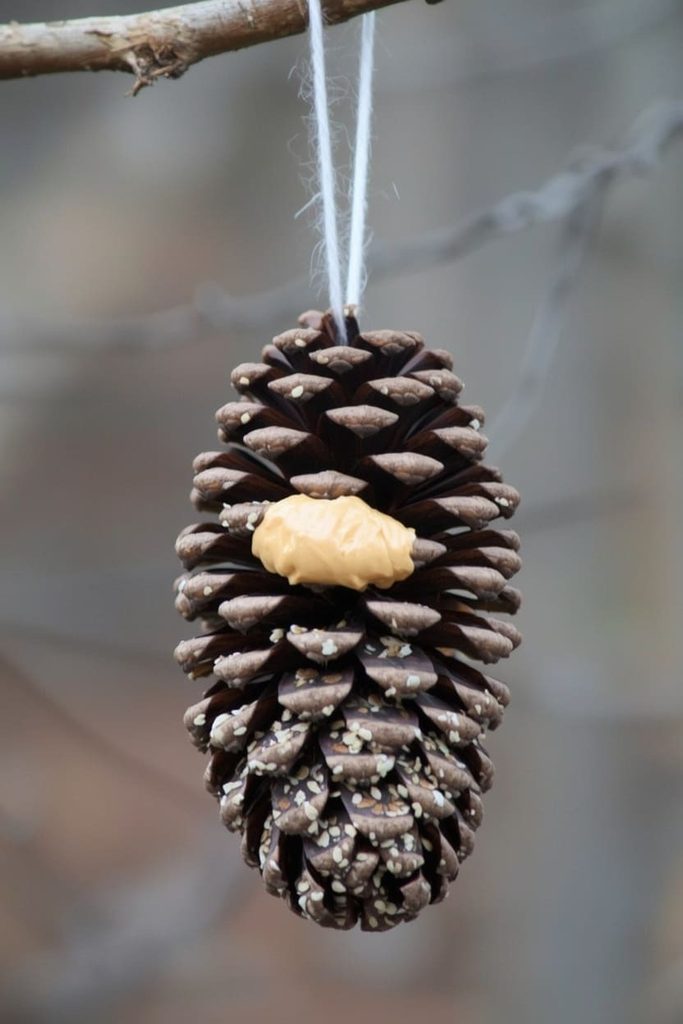
Ages 6 to 10 | 10 minutes | Medium mess | Practices spreading and tying
A pinecone covered in seed makes a snack for outdoor birds. Kids get to watch their craft get used.
Supplies: 3 dry pinecones, peanut butter or sunflower seed butter, 1/2 cup birdseed, butter knife, 3 pieces of string (2 feet each), paper plate
Steps:
- Shake each pinecone well to get rid of dirt and bugs.
- Grown-up help needed: Tie a string around the top of each pinecone, under the first layer of scales. Knot it twice, then tie the ends into a loop.
- Pour the birdseed onto a paper plate.
- Spread a thin layer of peanut butter on one pinecone with the butter knife. Push it between the scales.
- Roll the pinecone in the birdseed. Press gently.
- Look for bare spots and add more seed.
- Chill the finished pinecones in the fridge for 20 minutes so the seed holds.
- Hang them outside on a branch you can see from a window.
- Wash hands well with soap.
My tip: Spread the peanut butter thin. A thick layer slides off. Use sunflower seed butter if anyone nearby has a nut allergy.
Salt Painting Snowflakes: A Group Craft for Classrooms and Parties
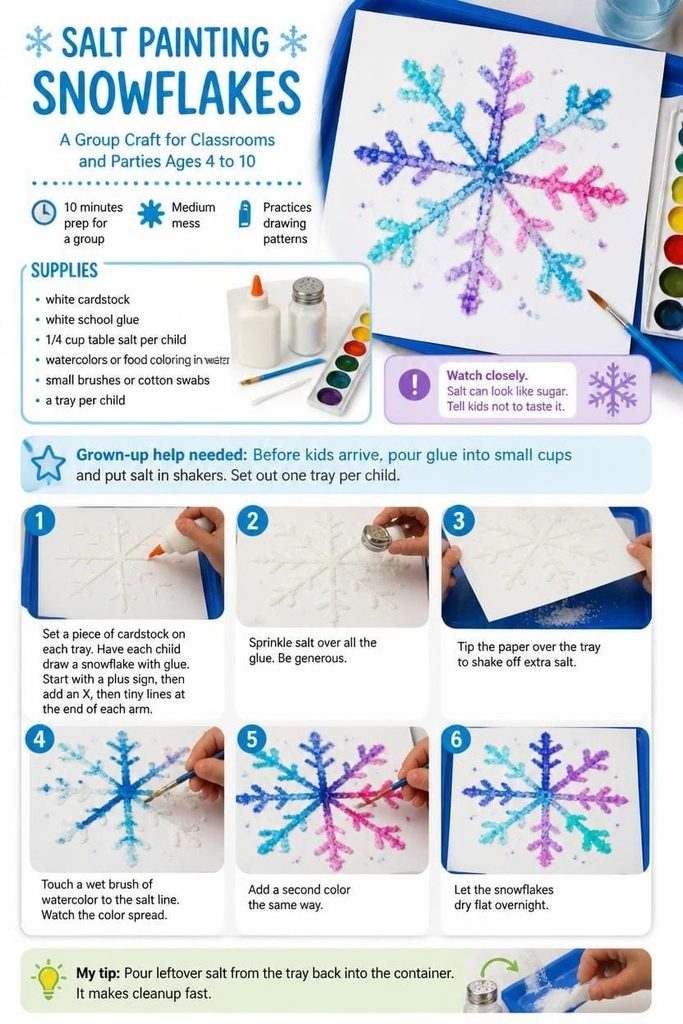
Ages 4 to 10 | 10 minutes prep for a group | Medium mess | Practices drawing patterns
You draw a snowflake in glue, cover it in salt, and drip watercolor on top. The color travels along the salt like magic.
Supplies: white cardstock, white school glue, 1/4 cup table salt per child, watercolors or food coloring in water, small brushes or cotton swabs, a tray per child
Steps:
- Grown-up help needed: Before kids arrive, pour glue into small cups and put salt in shakers. Set out one tray per child.
- Set a piece of cardstock on each tray.
- Have each child draw a snowflake with glue. Start with a plus sign, then add an X, then tiny lines at the end of each arm.
- Sprinkle salt over all the glue. Be generous.
- Tip the paper over the tray to shake off extra salt.
- Touch a wet brush of watercolor to the salt line. Watch the color spread.
- Add a second color the same way.
- Let the snowflakes dry flat overnight.
Watch closely. Salt can look like sugar. Tell kids not to taste it.
My tip: Pour leftover salt from the tray back into the container. It makes cleanup fast.
How Do You Pick the Right Winter Craft for Your Child’s Age?
Match the craft to what your child’s hands can do. Big, simple moves work best for little ones, and older kids can handle cutting and folding.
- Ages 2 to 4: puffy snow paint, cotton ball pine tree
- Ages 5 to 7: paper plate snowman, toilet paper roll penguins
- Ages 7 to 10: coffee filter snowflakes, pinecone bird feeders
- Mixed ages or a group: salt painting snowflakes
- Very short on time: cotton ball tree, puffy snow paint
Not sure? Start with the cotton ball tree. It is quick, cheap, and easy to clean up.
How Do You Keep Winter Crafts From Making a Huge Mess?
Set up your space before you start. A few simple steps save you the most cleanup.
- Put a baking sheet or tray under each craft.
- Cover the table with a plastic tablecloth.
- Dress kids in an old shirt.
- Choose washable paint and glue.
- Keep a bowl of warm water and a towel nearby.
[ADD YOUR OWN MESS STORY.] A little prep makes the craft calm, and cleanup takes minutes.
Frequently Asked Questions
What winter crafts can toddlers do?
Puffy snow paint and the cotton ball pine tree work well for toddlers. They use big, simple moves. A grown-up should cut the shapes. Watch closely, and keep small pieces away from mouths.
What are easy winter crafts for preschoolers?
Preschoolers can do the cotton ball tree, puffy snow paint, and salt painting snowflakes. These need gluing, dabbing, and sprinkling. A grown-up can cut shapes and set up supplies. Most take under 15 minutes, so little attention spans can finish them.
What winter crafts can I do with things I already have at home?
Try the paper plate snowman, toilet paper roll penguins, or coffee filter snowflakes. They use paper, glue, tubes, and filters. Check your kitchen and recycling bin before you shop. You may not need to buy anything.
What are good winter crafts for a classroom?
Salt painting snowflakes and coffee filter snowflakes work well for groups. Supplies are cheap, and you can set them up in bulk. Pour glue into cups, put salt in shakers, and give each child a tray before the craft starts.
How do I keep kids busy indoors on a snow day?
Plan two crafts. Start with a quick one, like the cotton ball tree. Take a snack break, then do a longer one, like the snowman or penguins. Short bursts keep kids interested, and you get a break between messes.
Which Craft Will You Try First?
Pick one craft and set up a tray. You do not need fancy supplies or a free afternoon. Twenty minutes is enough for most of these. I’d start with the cotton ball tree. Then hang your finished pieces on the fridge.

Sohel Rana is the writer, editor, publisher, and founder of The Tidy Porch. He is the man who is responsible for the craft (my wife created) being converted into a written piece. He also helps her wife (Sumona) by capturing videos of each craft. In short, he brings each craft created by her wife in front of you by transforming it into an article and a video.
