
Last April, my niece pressed her tiny yellow hand onto the paper and squealed. “It’s a baby!” she said. I had just printed my own hand above it, brown and spread wide like tail feathers.
Then she wanted more babies. Her little brother added one. So did a cousin. By lunch, one hen had a whole flock marching behind her.
That messy afternoon became my favorite handprint chicken craft. It takes about 30 minutes and needs only paint and paper. Here is how you can make a mother hen with one chick for every child.
What You Need for a Handprint Chicken Craft
You need washable paint, heavy paper, and a few small supplies. Most of it is likely in your craft drawer already.
- Paper: One sheet of 18 x 24 inch heavy paper or poster board. It fits one hen and three toddler chicks in a row. For four to seven chicks, use a 24 x 36 inch sheet turned sideways.
- Paint: Washable, non-toxic paint. Plan on 3 tablespoons of brown, 1 tablespoon of yellow per chick, 1 teaspoon of red, and 1 tablespoon of orange. Orange paper scraps and a glue stick can replace the orange paint.
- Plates: Two paper plates, one for brown and one for yellow.
- Brush: A flat 1-inch brush or a foam sponge.
- Details: Googly eyes or a black marker, plus a thin brush for the legs.
- Cleanup: Baby wipes, a damp towel, and newspaper.
Pick a bright, opaque yellow. Pale yellow fades on white paper and looks like a smear.
How to Make the Mother Hen and Her Chicks Step by Step
Plan for about 30 minutes of work and 30 minutes of drying. Follow these ten steps in order.
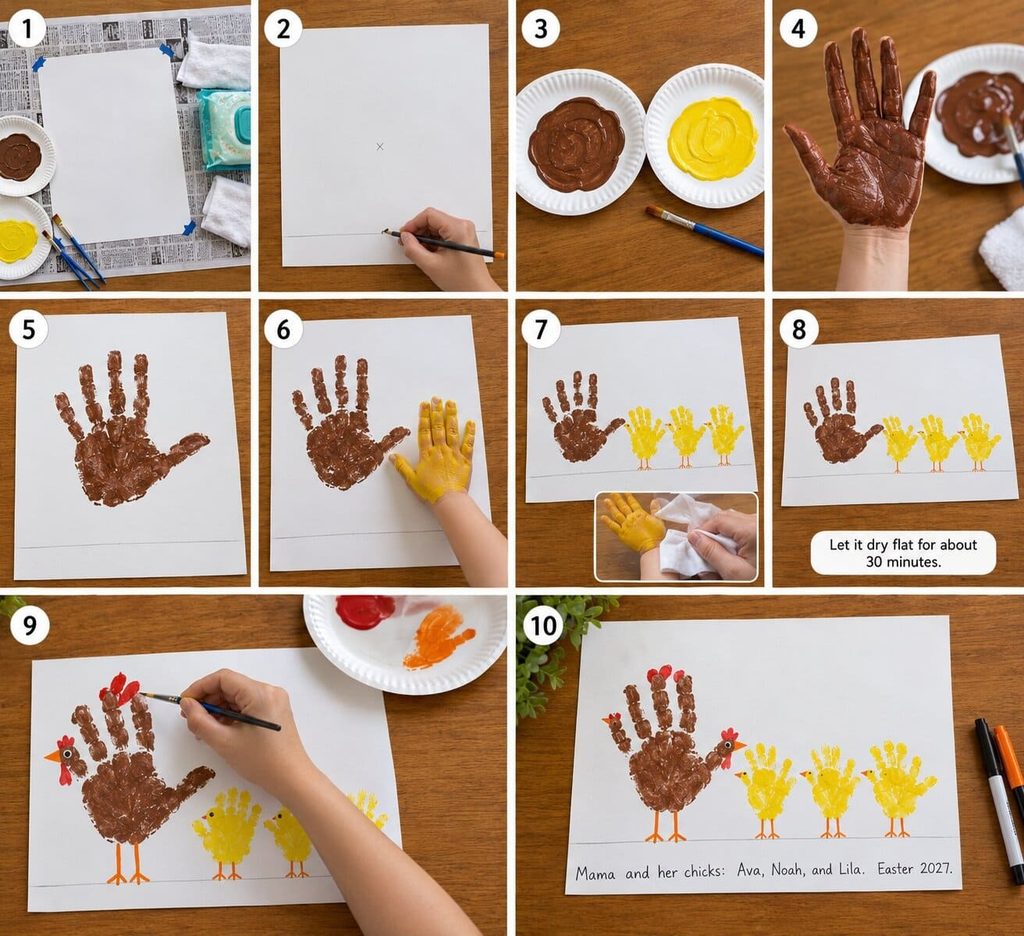
- Set up your space. Cover the table with newspaper. Tape the paper’s corners down so it stays flat. Keep the wipes and damp towel within reach before you open any paint.
- Mark your layout. Place the paper upright. Draw a light pencil line 6 inches above the bottom edge. This is the ground where the chicks stand. Then make a small X in the center of the paper, 16 inches up from the bottom. The X marks the middle of the hen’s palm.
- Spread the paint. Squeeze the brown paint onto one plate. Brush it into a thin, even layer about the size of your hand. Do the same with yellow on the second plate. A thin layer gives crisp prints. A thick layer makes blobs.
- Paint your hand. Brush brown over your palm, all five fingers, and your thumb. Use light strokes. You should see color, not drips.
- Press the hen. Hold your hand over the paper with your fingers spread and pointing up. Angle your thumb out to the side. Lower your palm onto the X. Press the palm first, then the fingers, then the thumb. Count to three, then lift straight up. Your fingers are her tail feathers. Your thumb is her head. A left hand makes her face right. A right hand makes her face left. Wipe your hand clean right away.
- Press the first chick. Brush yellow over the child’s palm, fingers, and thumb. Hold the hand the same way as the hen, with fingers spread and pointing up and the thumb out to the side, facing the same direction. Set the heel of the palm 1 inch above the pencil line. Press the palm, then the fingers, then the thumb. Count to three and lift straight up. The fingers become soft wing and tail fluff.
- Add the other chicks. Wipe the first child’s hand. Repeat step 6 for each child, leaving 1 inch between chicks. Add fresh yellow to the plate when it gets thin. Line them up in a row, all facing the same way, as if they follow their mother. A note for babies and toddlers: Lay the paper on the floor and have a helper hold the child’s wrist. Brush the paint on slowly. The tickle often opens tiny fingers. Press the palm down, then flatten each finger with your own fingertip. A sponge works well for children who dislike brushes.
- Clean up and let it dry. Wipe each hand with a baby wipe. Then wash at the sink with soap. Lay the paper flat for about 30 minutes. Do not hang it or stack anything on top.
- Add the hen’s details. Paint a small orange triangle at the tip of the thumb for the beak. Add a googly eye or black dot just behind it. Paint three small red bumps on top of the thumb for the comb. Add a red teardrop under the beak for the wattle. Then paint two thin orange legs, about 2 inches long, down from the heel of her palm. Give each foot three small toes.
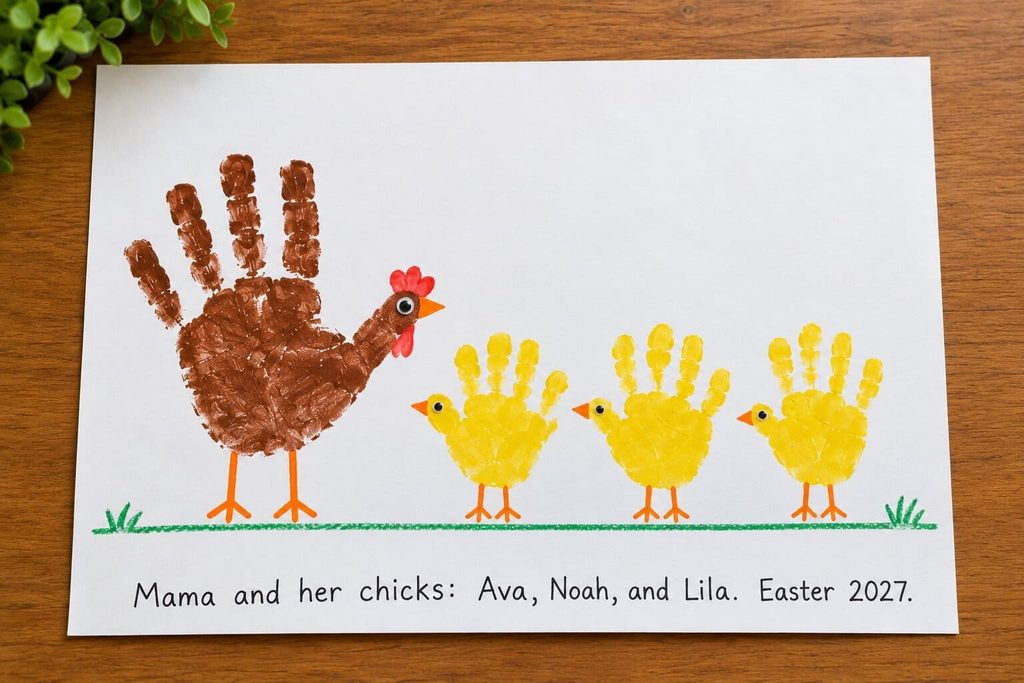
- Add the chick details and caption. Give each chick a tiny orange beak and a dot eye. Draw two short orange legs, about 1 inch long, in the gap above the ground line. Last, write the names and date along the bottom edge. Use pencil first, then trace with a marker. For example: “Mama and her chicks: Ava, Noah, and Lila. Easter 2027.”
How to Fix Muddy, Crowded, or Smudged Prints
Most problems come from too much paint, leftover brown on a hand, or a sliding press. Each one has a quick fix.
- Muddy yellow chicks: Brown paint stayed on a hand or brush. Wash hands well, and use a clean brush and plate for the yellow.
- Blobby fingers: The paint layer was too thick. Blot the painted hand on a paper towel once before pressing.
- Smudged prints: The hand slid. Press straight down and lift straight up. Once dry, cover small smudges with a thin brush.
- Chicks that look like blobs: Add the beak and eye. These two details make a chick look like a chick.
- Crowded chicks: Mark each chick’s spot with a pencil dot next time. Leave 1 inch between them.
Ways to Give, Display, or Expand This Handprint Chicken Craft
You can gift it, frame it, or grow it over time. Frame it with a white mat for a Mother’s Day gift. Tape it to the front door for Easter. Write the names and date in the corner, since grandparents treasure that detail.
For a yearly keepsake, add one chick whenever the family grows. Want a full barnyard? Pair this with my [link to cow handprint craft] and [link to pig handprint craft] to complete the farm set.
A Classroom Flock Version for Teachers
Let the teacher be the hen and let every child add a chick. Use a long strip of bulletin board paper and print your hen at the top. Set up two paint stations with one yellow plate for every four children, and put a helper at each one.
Send small groups at a time while the others listen to The Little Red Hen. Afterward, count the flock by fives. Ask which chick went first, second, and last. It builds counting and sequencing skills.
Frequently Asked Questions
What paint is safe for toddlers?
Choose paint labeled washable and non-toxic. Check the age range on the label. Keep paint away from mouths and wash hands right after printing. If your child has sensitive skin, ask your pediatrician first.
How many chicks fit on one page?
An 18 x 24 inch sheet fits three toddler chicks in a row. A 24 x 36 inch sheet turned sideways fits up to seven. Older children have larger hands, so plan one fewer.
Can I make the chicks with footprints instead?
Yes. This helps with babies who cannot open their hands. Press the foot with the toes pointing up. Add the beak, eye, and legs the same way. The shape will look rounder and softer.
How do I keep yellow paint from looking muddy?
Use a clean plate and brush for yellow. Wash brown paint off every hand first. Paint on white paper, and use a thin, even coat.
What paper works best?
Heavy white cardstock, watercolor paper, or poster board works best. It holds paint without wrinkling. Printer paper curls and tears.
Final Thoughts
A handprint chicken craft takes only an afternoon, but small hands do not stay small for long. Press yours beside theirs, write the date, and tuck the picture somewhere safe. Next spring, bring out the paint again and add a new chick.

Sohel Rana is the writer, editor, publisher, and founder of The Tidy Porch. He is the man who is responsible for the craft (my wife created) being converted into a written piece. He also helps her wife (Sumona) by capturing videos of each craft. In short, he brings each craft created by her wife in front of you by transforming it into an article and a video.
