
My first layered paper tree looked flat and sad. I cut five green triangles and glued them down. They sat on the page like stickers. Then my nephew asked, “Why doesn’t it pop?”
So I tried something new. I glued only the tops. The bottoms lifted, and tiny shadows appeared. The tree suddenly looked 3D. He grinned and grabbed the scissors.
You can do this too. You don’t need a template, a printer, or a machine. Today, you’ll make a layered paper Christmas tree craft with five folded cuts and one glue stick.
What Supplies Do You Need for a Layered Paper Christmas Tree Craft?
You need paper, scissors, a ruler, and a glue stick. Here’s my full list:
- 1 sheet of cardstock, 8.5 x 11 inches, for the base (white, kraft, or navy)
- 3 sheets of green paper, 8.5 x 11 inches: 1 dark, 1 medium, 1 light
- 1 piece of brown paper, about 1 x 1.5 inches
- 1 piece of yellow paper, about 2 x 2 inches
- Red or gold paper strips for ornaments (optional)
- Scissors, a pencil, and a ruler
- 1 glue stick
- 1 damp cloth or a few wipes
Cardstock holds its shape best. Foam adhesive squares are an optional upgrade. The main method needs only paper and glue.
How Big Should Each Layer Be?
Cut five layers, each 1 inch narrower than the one below. Each layer’s height is half its width.
- Layer 1: 7 x 3.5 inches, dark green
- Layer 2: 6 x 3 inches, dark green
- Layer 3: 5 x 2.5 inches, medium green
- Layer 4: 4 x 2 inches, medium green
- Layer 5: 3 x 1.5 inches, light green
I call this the size ladder. It also quietly practices measuring and ordering. The half-width rule keeps every triangle the same shape, so the tree looks tidy. Dark green goes at the back and light green on top. That builds a shadow effect with no extra work.
How Do You Cut Matching Layers Without a Template?
Fold each rectangle in half and cut one diagonal line. The fold makes both sides match, because both halves are the same piece of paper. Follow these steps for every layer:
- Measure and cut the rectangle to size.
- Fold it in half with the fold on the left.
- Draw a line from the top of the fold to the bottom outer corner.
- Cut along the line.
- Shape the bottom edge while the paper is still folded. For scallops, cut a row of round bumps about a quarter inch deep. Space them 1 inch apart on big layers and three-quarters of an inch on small ones. For zigzags, snip small V shapes the same way.
- Unfold. You have a symmetrical triangle.
How Do You Make a Layered Paper Christmas Tree Step by Step?
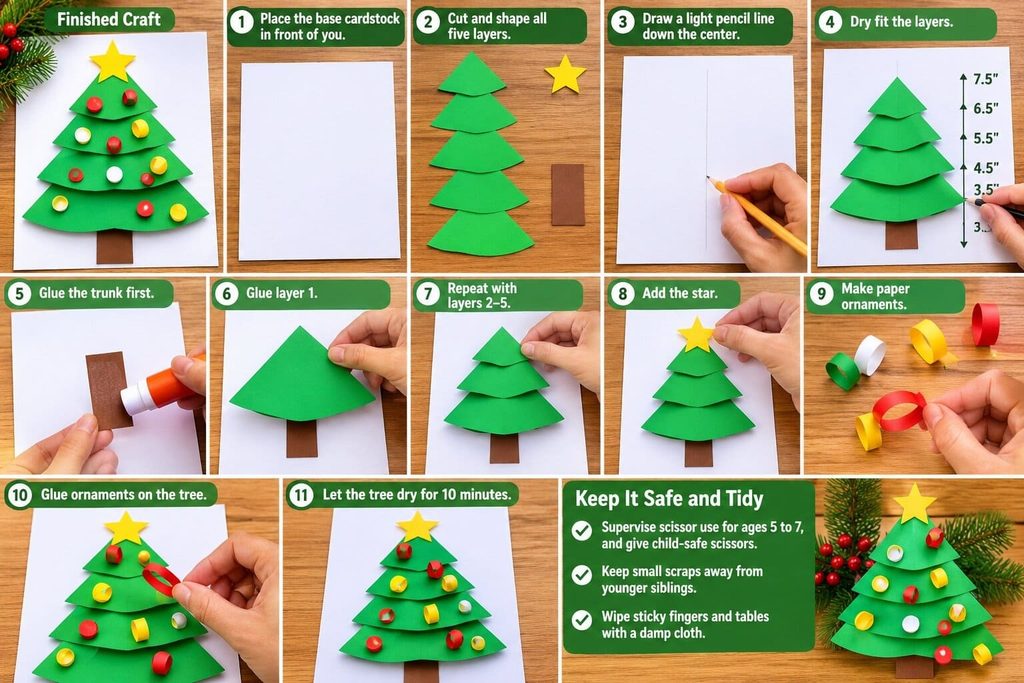
Cut five layers, dry fit them, then glue from largest to smallest. The whole project takes 30 to 45 minutes. The finished tree is about 5.5 inches tall and 7 inches wide, plus the trunk and star.
Cut and Dry Fit
- Place the base cardstock in front of you, tall side up.
- Cut and shape all five layers, as shown above.
- Draw a light pencil line down the center of the base. Run it from 3.5 inches above the bottom edge to 9 inches.
- Dry fit the layers without glue. Layer 1’s bottom edge sits 3.5 inches above the page bottom. Each next layer sits 1 inch higher: 4.5, 5.5, 6.5, and 7.5 inches. Line each tip up with the center line. A dry fit saves you from peeling off crooked paper.
Glue the Layers
- Glue the trunk first. Swipe glue on the brown piece. Press it on the center line, with its bottom edge 2.5 inches above the page bottom. Layer 1 will cover its top half inch, so no gap shows.
- Lift layer 1. Swipe glue only on the upper third of its back. Press it into place. Never glue the bottom edge. The loose bottom lifts and casts a thin shadow. That shadow makes the tree look 3D.
- Repeat with layers 2, 3, 4, and 5, from largest to smallest. Each smaller layer covers the glued top of the one below.
- Press each glued area for 10 seconds.
Add the Star and Ornaments
- Cut a freehand star about 1.5 inches across from the yellow paper. Glue its bottom point just over the tip of layer 5.
- Optional: cut 5 to 7 strips, each 0.75 x 3 inches. Overlap the ends by a quarter inch and glue them into loops. Glue each loop near the bottom of a layer.
- Let the tree dry flat for 10 minutes. Skip the heavy book this time. It would flatten the lift.
Keep It Safe and Tidy
Supervise scissor use for ages 5 to 7, and give them child-safe scissors. Keep small scraps away from younger siblings. Wipe sticky fingers and tables with a damp cloth.
How Do You Make the Layers Look 3D?
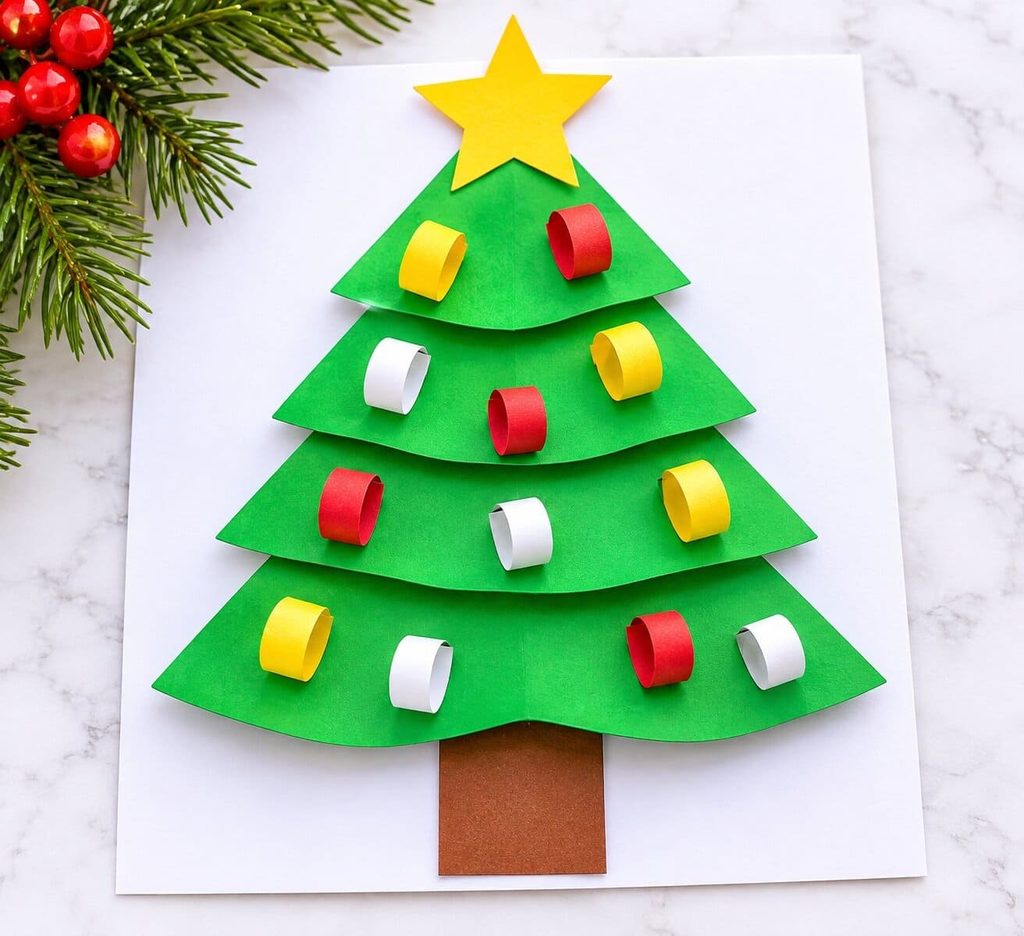
Glue only the top of each layer and let the bottoms lift. A few small choices add even more depth:
- Scalloped or zigzag edges catch light and add shape.
- Dark layers at the back and light layers on top deepen the shadows.
- Paper loops add real height.
How Do You Fix Crooked Layers, Sagging Edges, and Glue Marks?
Most fixes are quick. Here’s what to try:
- Crooked layers: Peel gently while the glue is fresh. Re-glue along the center line.
- Uneven scallops: Trim the bumps to match, or hide them with a loop ornament.
- Sagging edges: Switch to cardstock. Or tuck a foam square under the drooping corner.
- Glue marks: Dab them with a damp cloth right away. Next time, glue only the back.
- A leaning tree: Check your center line, then shift the layers to match it.
How Can You Make This Craft for Kids vs. Adults?
Kids use four straight layers. Adults add scallops and ornaments. The base technique is the same.
Kid Version (Ages 5 to 7)
Use layers 2 through 5, which are 6, 5, 4, and 3 inches wide. Skip the scallops. Use dark, medium, medium, and light green. Set the bottom edges at 3.5, 4.5, 5.5, and 6.5 inches. Help your child draw the diagonal lines. This makes an easy layered Christmas tree craft with no template. It’s a great layered paper Christmas tree for kids who love to cut.
Showpiece Version (Ages 8 and Up, and Adults)
Use all five layers in three greens. Try scallops on the dark layers and zigzags on the light ones. Add the paper loops. A 3D paper Christmas tree craft looks best when the layers sit evenly on the center line.
How Do You Run This Craft With a Whole Class?
Make a layer kit for each child, then let them fold, cut, and glue. Cut the rectangles on a paper cutter ahead of time. Put each child’s rectangles in a labeled envelope. Draw the center line on every base sheet. Tape a size strip reading 7, 6, 5, 4, 3 to each table. Allow 45 minutes. Finished trees look great hung side by side as a paper forest.
How Can You Turn the Tree Into a Card or Keepsake?
Scale the tree down for a card or tag, or frame the full tree. Write the year on the back first. Then pick one:
- Mini card: Make three layers, 4, 3, and 2 inches wide, with heights of 2, 1.5, and 1 inch. Set each layer’s bottom edge 1 inch above the one below. Glue it on a 5 x 7 inch folded card.
- Gift tag: Use two layers, 2.5 and 2 inches wide, on a 3 x 5 inch tag. Punch a hole at the top and tie on ribbon.
- Framed print: Use a shadow box frame for the full tree. Regular glass presses the layers flat.
Ready to Make Your Own Layered Paper Christmas Tree Craft?
Yes. You need five rectangles, one fold each, and a glue stick. The fold does the matching. The glue does the lifting.
FAQs About Layered Paper Christmas Trees
Do I need a template for a layered paper Christmas tree?
No. Fold each rectangle in half and cut one diagonal line. The fold makes both sides match. You only need a ruler and scissors.
What paper is best for a layered paper tree?
Cardstock is best. It holds its shape and lifts nicely.
What glue works best for layered paper crafts?
A glue stick works best. It’s easy to control and won’t wrinkle the paper. Skip liquid glue on thin paper.
How do I keep the layers from sagging?
Use cardstock and glue only the upper third. If a layer still droops, tuck a foam square under the corner.
What age is this craft good for?
Ages 5 to 9 can do it with scissors. Use the four-layer version for ages 5 to 7.
Can I turn the tree into a card?
Yes. Make the mini three-layer tree on a 5 x 7 inch folded card. Use layers 4, 3, and 2 inches wide.

Sohel Rana is the writer, editor, publisher, and founder of The Tidy Porch. He is the man who is responsible for the craft (my wife created) being converted into a written piece. He also helps her wife (Sumona) by capturing videos of each craft. In short, he brings each craft created by her wife in front of you by transforming it into an article and a video.
