
This year, I turned my little one’s tiny handprint into the cutest paper Santa, and honestly, it might be my favorite Christmas craft yet!
It’s simple, budget-friendly, and uses supplies I already had lying around at home. I did the tracing, cutting, and gluing, while my toddler had a blast adding all the fun decorations.
Now we have a sweet handmade keepsake I’ll treasure for years. Grab your supplies and let’s make one together below!
Materials Needed
- Red colored cardstock or construction paper
- White cardstock or construction paper
- Black cardstock or construction paper
- Pink cardstock or construction paper
- Glue stick
- Scissors
- Red or pink pom-pom (optional)
- Santa template
- Pencil
- Black marker
Step-by-Step Instructions For Santa Handprint Craft
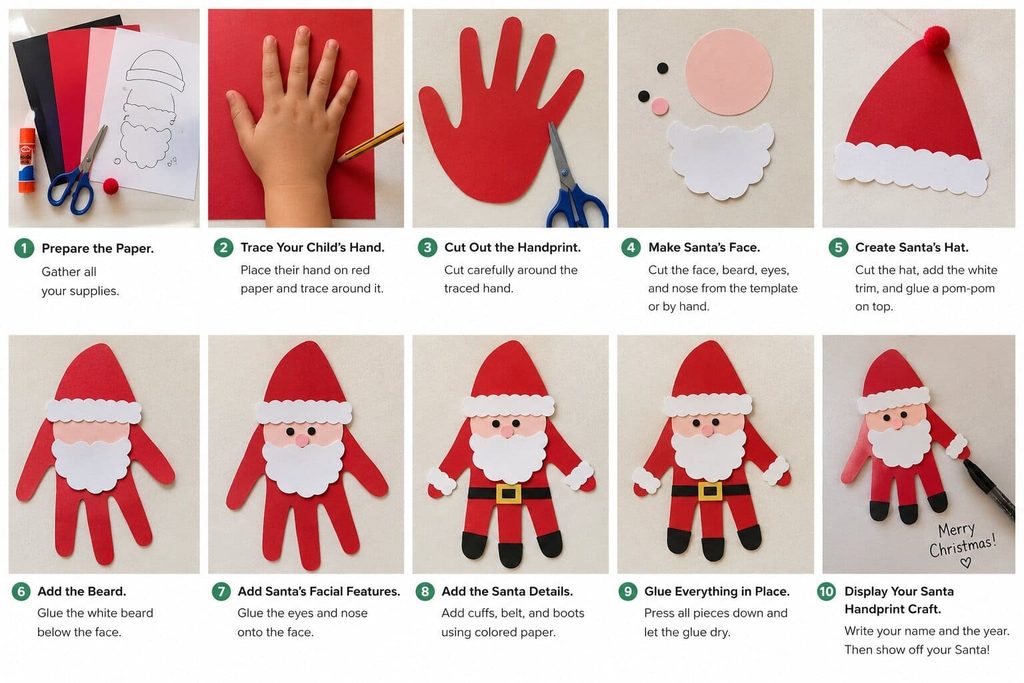
Step 1: Prepare the Paper
Start by gathering all the supplies on a clean, flat work surface. Choose red, white, black, and pink paper for Santa.
Parents should help children choose the paper colors and prepare the pieces before starting. If your child is young, keep the scissors with the adult during the cutting steps.
Step 2: Trace Your Child’s Hand
Place a sheet of red cardstock on the table. Ask your child to place one hand flat on the paper with the fingers spread slightly apart.
Use a pencil to carefully trace around the hand.
Try to keep the pencil close to the fingers and around the thumb. The hand shape will become Santa’s body and arms, while the fingers will help form parts of his design.
Parent tip: If your child finds it hard to keep their hand still, gently hold the paper in place while they spread their fingers.
Step 3: Cut Out the Handprint
Carefully cut around the traced handprint.
For younger children, parents should do the cutting. Older children who can safely use scissors can cut along the pencil line with adult supervision.
Take your time around the fingers. The handprint does not need to be perfect. Small uneven cuts can give the finished craft a fun, handmade look.
Step 4: Make Santa’s Face
Use the Santa template to create the face pieces, or draw simple shapes by hand.
Cut a round or oval face from pink paper. Then cut a white piece for Santa’s beard and mustache.
You can also use small pieces of black paper for Santa’s eyes. A black marker can be used to draw the eyes instead.
Let your child help decide where each facial piece should go before gluing anything down.
Step 5: Create Santa’s Hat
Cut a red triangle or use the hat piece from the Santa template.
Place the hat above Santa’s face. Add a small white strip along the bottom of the hat to make the fluffy trim.
For the top of the hat, glue on a small red or pink pom-pom if you have one.
If you do not have a pom-pom, simply cut a small white circle from cardstock and glue it to the tip.
Step 6: Add the Beard
Place the white beard below Santa’s face. Make sure the beard covers the lower part of the face but does not hide the eyes.
Glue the beard in place with a glue stick.
For a fuller beard, you can gently curl or fluff the edges of the paper before attaching it. Keep the design simple so your child can easily help.
Step 7: Add Santa’s Facial Features
Now it is time to bring Santa to life!
Glue two small black paper circles onto the face for his eyes. Then add a small pink or red circle for his nose.
If you prefer, your child can draw the eyes and other details with a black marker.
Encourage your child to place the features where they look best. They do not need to be perfectly even.
Step 8: Add the Santa Details
Look at your handprint Santa and add any final paper details.
You can use white cardstock to add fluffy cuffs to Santa’s arms. Small black paper shapes can be used to make his belt and boots.
Keep the details simple. The handprint itself should remain the main part of the craft.
Parents can cut the small pieces while children help choose where to place them.
Step 9: Glue Everything in Place
Once your child is happy with the arrangement, glue each piece onto the handprint.
Start with the larger pieces, such as the face, beard, and hat. Then add the smaller details.
Press each piece gently for a few seconds so the glue sticks well.
Give the craft a few minutes to dry before moving it.
Step 10: Display Your Santa Handprint Craft
Your Santa handprint is now finished!
Write your child’s name and the year on the back of the craft. This turns the project into a special Christmas keepsake.
You can display Santa on the refrigerator, bedroom wall, classroom board, or Christmas craft table. You can also make several Santas using different family members’ handprints and create a fun Christmas display.
Give It A Try
This Santa handprint craft is an easy way to enjoy some Christmas crafting time with your child. The best part is that you do not need many supplies or complicated steps. Let your child help with tracing, arranging, gluing, and decorating while you handle the trickier cutting tasks.
Do not worry if the handprint or paper pieces are not perfect. Those little handmade details make each Santa special. Make one this Christmas and save it as a sweet reminder of how small your child’s hand once was!

Sohel Rana is the writer, editor, publisher, and founder of The Tidy Porch. He is the man who is responsible for the craft (my wife created) being converted into a written piece. He also helps her wife (Sumona) by capturing videos of each craft. In short, he brings each craft created by her wife in front of you by transforming it into an article and a video.
