Halloween is here, and it’s pumpkin time! But let’s be honest — plain pumpkins are boring. I’m talking about scary, creepy, spine-tingling pumpkins that grab attention.
From classic jack-o’-lanterns to blood-dripping horrors, creepy clowns, haunted houses, and floating ghosts, there’s a design for every spooky mood.
The best part? You don’t need to carve them. With paint, brushes, and a little creativity, you can turn ordinary pumpkins into Halloween showstoppers. In this post, I’m sharing 13 scary pumpkin painting ideas that are easy, fun, and perfect for beginners.
Ready to freak out your porch and wow your neighbors? Let’s dive in!
13 Scary Pumpkin Painting Ideas for Halloween
Copy these 13 pumpkin painting ideas to create a spooky vibe
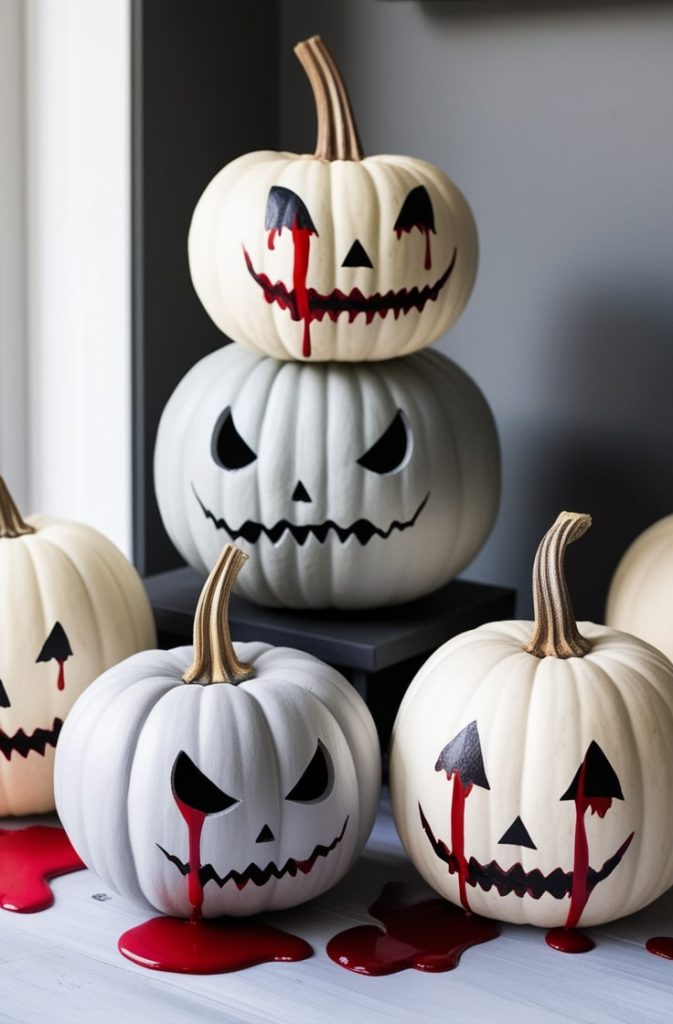
1. Classic Jack-O’-Lantern Faces
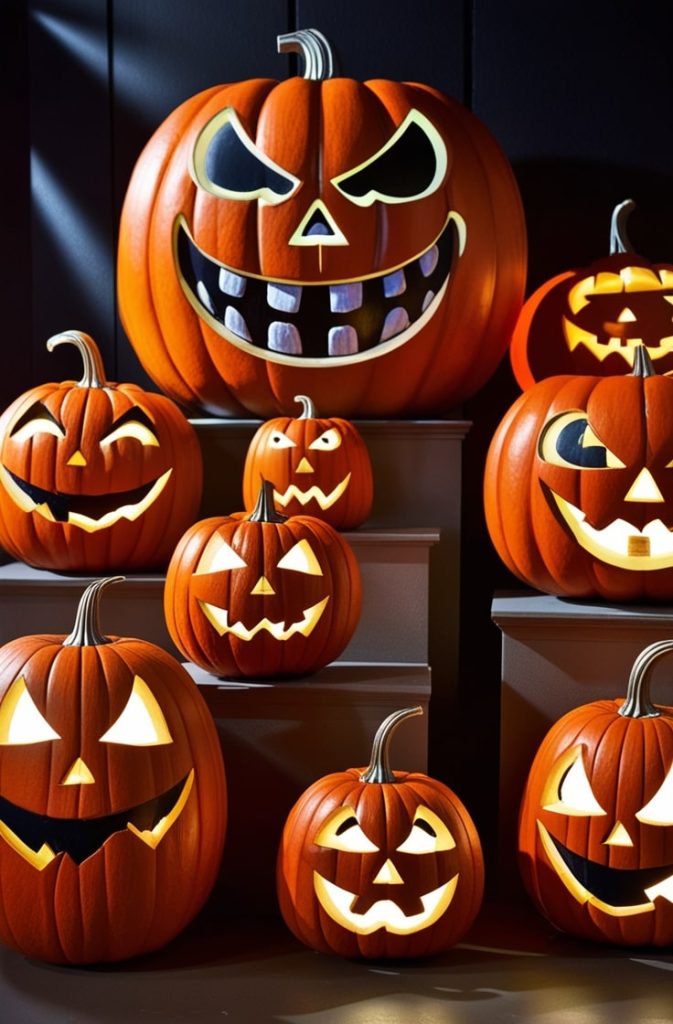
Nothing says Halloween like the classic jack-o’-lantern face. From menacing grins to scary toothy smiles, this timeless pumpkin design immediately brings that spooky atmosphere to your porch, mantel, or Halloween table. I love how versatile it is — you can make it playful for kids or downright terrifying for a grown-up fright night.
How I do it:
I usually start with an orange pumpkin, real or faux. First, I paint the surface with a solid base coat if needed (sometimes the pumpkin’s natural color works). Then I lightly sketch the face with a pencil — jagged teeth, sharp eyes, or exaggerated expressions. Using black acrylic paint and a fine brush, I fill in the features. If I’m feeling extra, I add white highlights to make the eyes or teeth pop.
Pro Tips:
- Glow-in-the-dark paint makes these pumpkins come alive at night.
- Try different expressions across multiple pumpkins for a dynamic display.
- Mini pumpkins are perfect for creating a whole “jack-o’-lantern family” on a table or steps.
2. Dripping Blood Pumpkin

For a truly gory, horror-movie effect, dripping blood pumpkins are my go-to. They instantly add a creepy factor to any Halloween setup, and I love how realistic and dramatic they look without carving at all. Perfect for spooky tablescapes, haunted porches, or even a centerpiece for a horror-themed party.
How I do it:
I start with a black or dark-colored pumpkin to make the “blood” stand out. Using red acrylic paint, I either pour it slightly thinned over the top near the stem or paint it in thick, uneven drips flowing down the sides. For a wet, realistic look, I mix in a little gloss medium or even a touch of clear glue to give it shine and dimension.
Pro Tips:
- Vary the drip lengths for a more natural, organic effect.
- Use dark red or crimson instead of bright red for a creepier vibe.
- You can add a little black wash to the drips for depth and extra realism.
3. Zombie Pumpkin
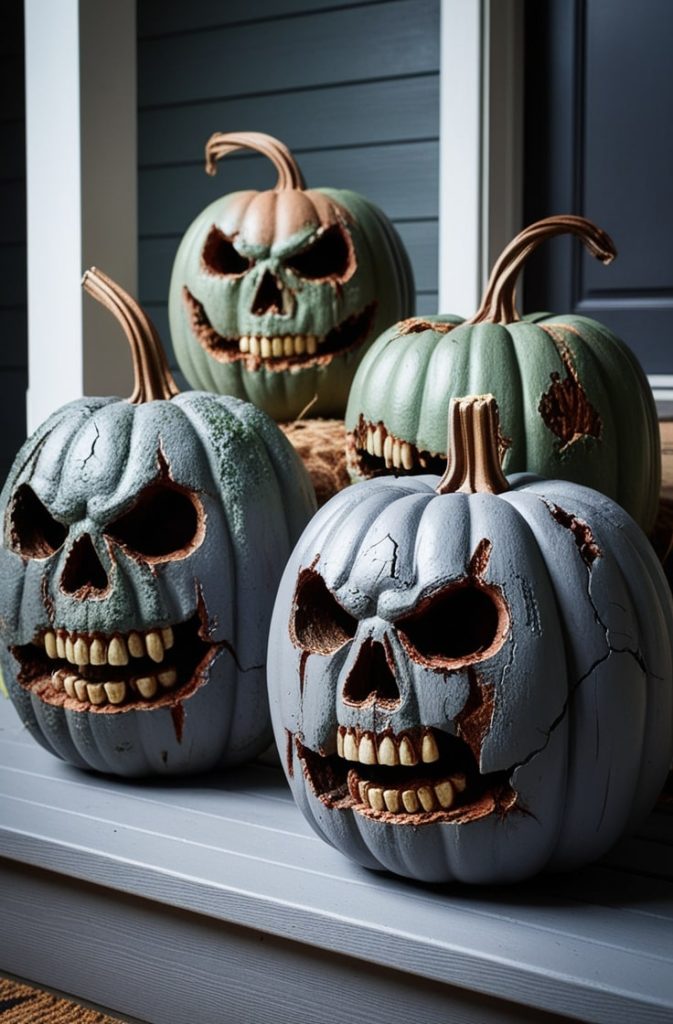
Zombie pumpkins are perfect if you want a truly undead, creepy vibe for Halloween. I love how decayed, rotting effects make a pumpkin look like it just crawled out of a horror scene. This design works amazingly for porches, party displays, or any spot where you want to add a serious scare factor.
How I do it:
I start with a gray, green, or brown base coat to mimic decaying skin. Once dry, I paint cracks, scars, and exposed teeth using darker shades and fine brushes. Highlighting areas with white or lighter tones makes the “rot” look more dimensional. For extra realism, I sometimes use texture paste or a modeling medium to create raised bumps and wounds.
Pro Tips:
- Layer your colors gradually for realistic depth.
- Texture paste or spackle adds a 3D effect that looks like rotting skin.
- Use thin brushes to add fine details like veins or wrinkles for extra creepiness.
4. Skull Pumpkin
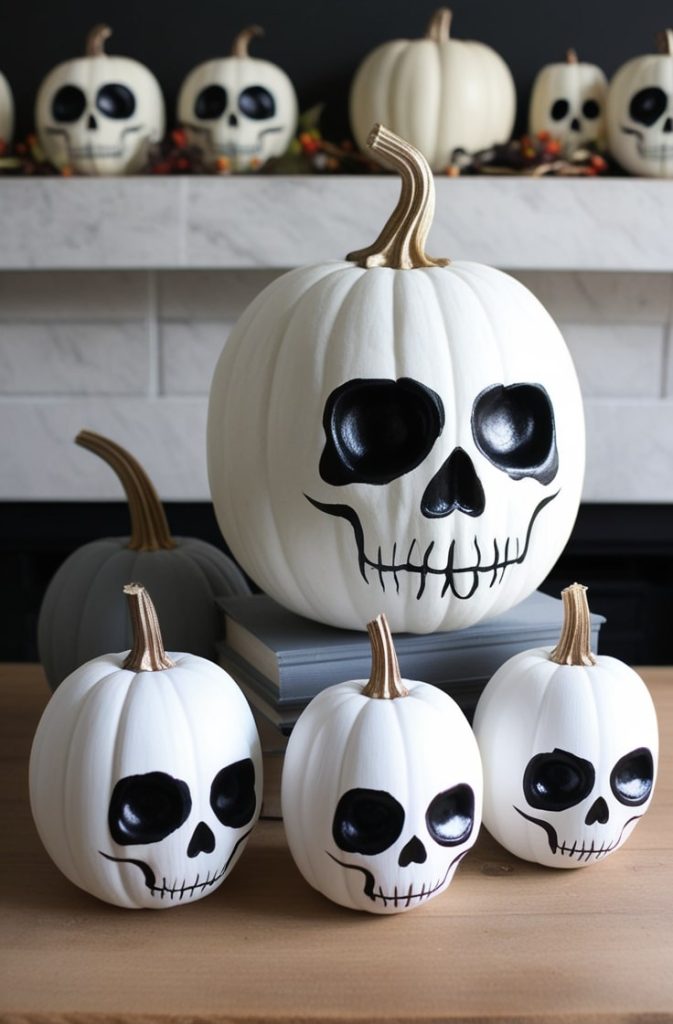
Skull pumpkins are a classic spooky design that instantly adds a haunted vibe to any Halloween setup. I love how they combine eerie and stylish elements — perfect for both creepy and chic displays. You can go simple with bold black features or add metallic details for a more dramatic effect.
How I do it:
I start with a white or light gray base coat on the pumpkin. Once it’s dry, I sketch out the skull features lightly with a pencil — eye sockets, nose cavity, and teeth. Then, I fill them in with black acrylic paint, using a fine brush for precision. For extra impact, I sometimes highlight certain areas with silver or gray for a slightly aged, weathered look.
Pro Tips:
- Metallic paints make skull features pop in low lighting.
- Mini pumpkins are perfect for creating a skull collection on mantels or shelves.
- Use a stencil if you want perfectly symmetrical skull designs.
5. Creepy Eyeball Pumpkin
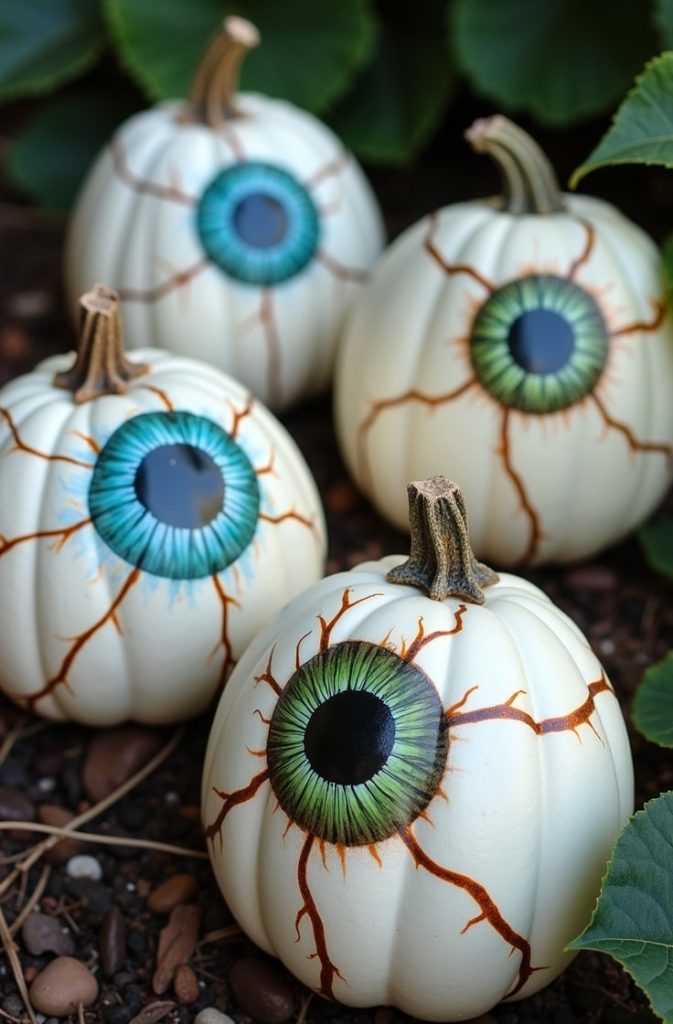
Creepy eyeball pumpkins are a fun, unsettling way to make your Halloween display extra eerie. There’s something about a giant, staring eyeball that instantly grabs attention and gives your porch or table a creepy vibe. I love using them in pairs or groups — it feels like the pumpkins are watching everyone who walks by!
How I do it:
I start by painting the pumpkin white for a clean base. Then I add the iris in a bright or contrasting color — blue, green, or brown — and fill in the pupil with black paint. To make the eye look realistic, I add small white highlights for a “wet” effect. I sometimes outline the iris lightly with a darker shade for depth.
Pro Tips:
- Glossy varnish or a clear coat gives the eye a realistic, wet look.
- Use a fine brush for veins or tiny lines to make the eye extra creepy.
- Mini eyeball pumpkins work well scattered around larger designs for a “haunted garden” effect.
6. Monster Mouth Pumpkin
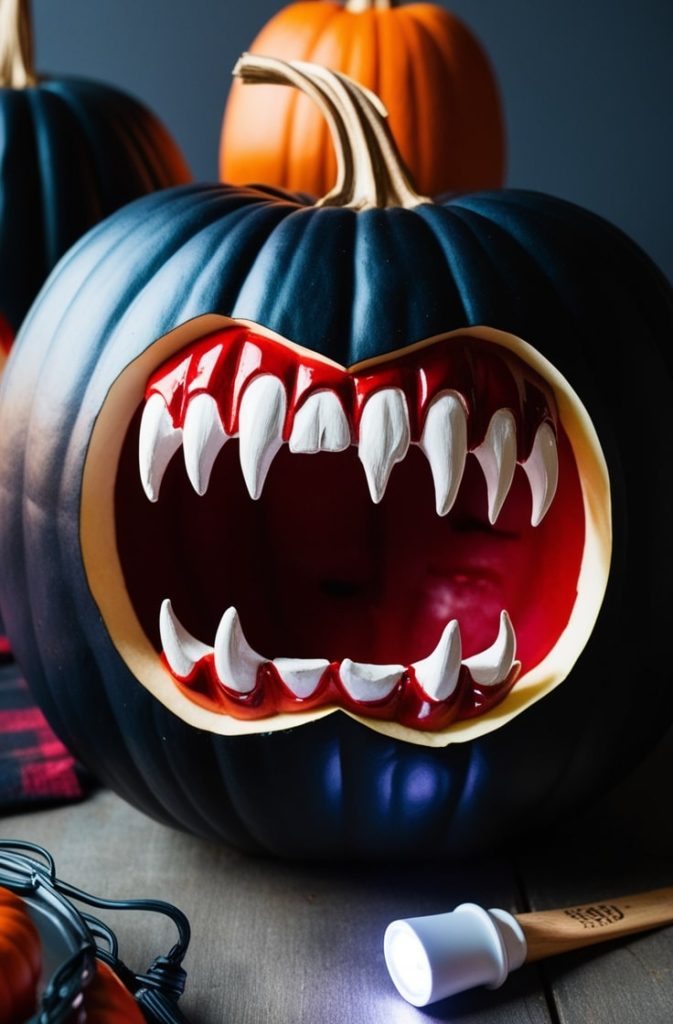
Monster mouth pumpkins are all about bold, scary expressions. Wide, jagged-toothed mouths give the pumpkin a monstrous personality, making it perfect for a spooky centerpiece or porch display. I love how dramatic they look, especially when paired with glowing lights inside or nearby.
How I do it:
I start with a dark base coat, like black or deep purple, to make the teeth and mouth stand out. Then I sketch a gaping, jagged mouth with a pencil. Using white or off-white paint, I fill in sharp teeth, leaving shadows between them using black or dark gray. You can add red highlights around the edges for a “bloody” effect, and glossy medium to make the mouth appear wet and extra menacing.
Pro Tips:
- Vary tooth size and spacing for a more chaotic, monster-like appearance.
- Add subtle red highlights for a gory, realistic effect.
- Combine with small LED lights for glowing, terrifying results.
7. Spider Pumpkin
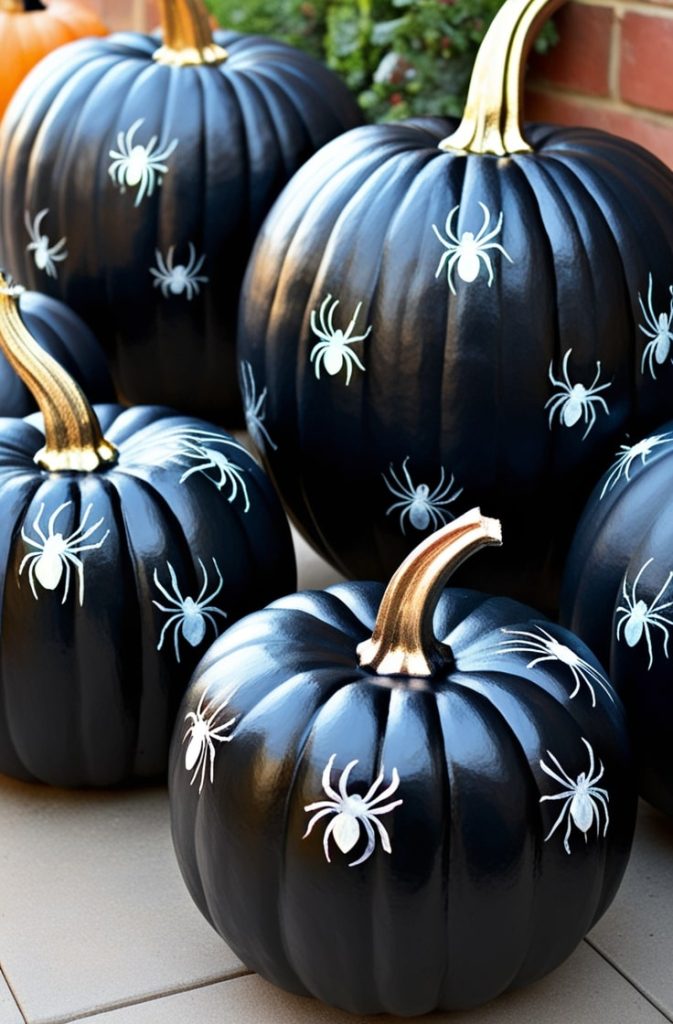
Spider pumpkins bring an instant creepy-crawly vibe to your Halloween decor. I love how adding spiders crawling over the surface makes a pumpkin feel alive — like it belongs in a haunted house! It’s great for porch setups, party tables, or even as part of a larger spooky display.
How I do it:
I start with a black or dark-colored pumpkin for contrast. Then I paint small spiders with black acrylic paint, adding tiny legs using a fine brush. For extra realism, I sometimes add metallic highlights or tiny white dots to give the illusion of eyes. You can vary the size of the spiders for a dynamic, lifelike effect.
Pro Tips:
- Use a fine-tipped brush for realistic, delicate spider legs.
- Add gloss varnish on the spiders to make them look shiny and lifelike.
- Group multiple spider pumpkins together for a “creepy crawl” effect.
8. Vampire Pumpkin
Vampire pumpkins are perfect for adding a classic horror twist to your Halloween decor. Think pale faces, sharp fangs, and dark, brooding eyes — instantly giving your pumpkin a bloodthirsty personality. I love how dramatic these pumpkins look, especially when paired with candlelight or other spooky accents.
How I do it:
I start by painting the pumpkin a pale, almost white or light gray base. Once dry, I sketch the fangs and mouth lightly with a pencil. Using red acrylic paint, I create dripping “blood” along the edges of the mouth, then paint the fangs white or off-white. I finish with dark, shadowed eyes for that mysterious vampire look. Adding a bit of gloss medium to the fangs makes them appear sharp and realistic.
Pro Tips:
- Use red gloss medium for realistic, shiny blood effects.
- Black or dark purple shadows around the eyes enhance the vampire vibe.
- Mini vampire pumpkins grouped together make a fun, eerie display.
9. Witches’ Cauldron Pumpkin
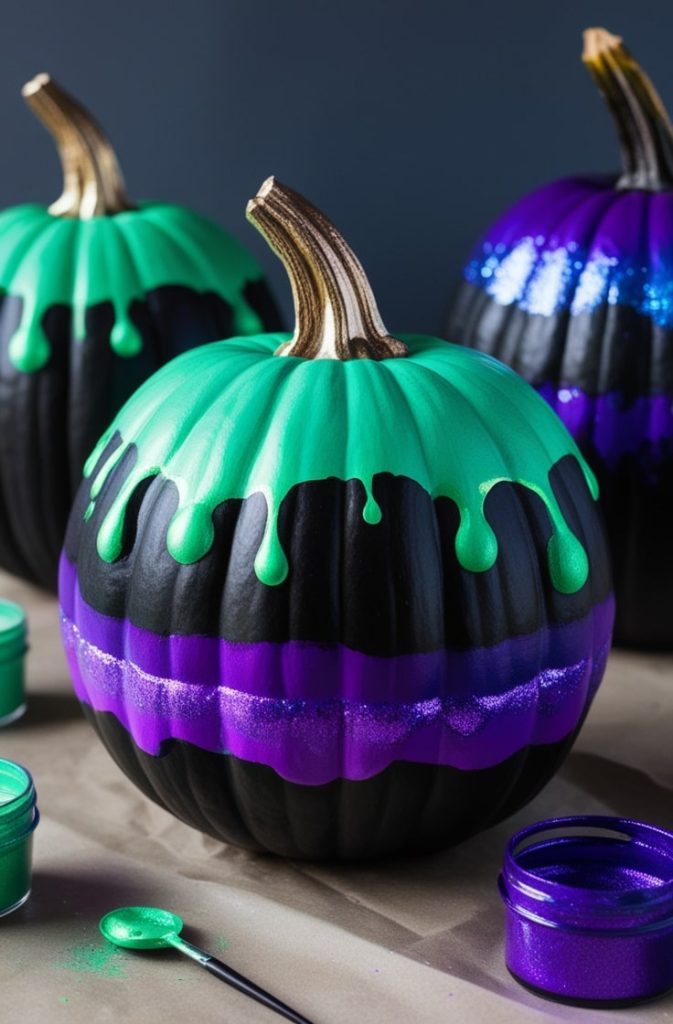
Witches’ cauldron pumpkins bring a magical, spooky effect to Halloween decor. I love how they look like they’re bubbling with a mysterious potion — perfect for adding a touch of enchantment to porches, mantels, or party tables. The vibrant “potion” colors really make the design pop.
How I do it:
I start by painting the pumpkin black or dark gray. Once dry, I paint a “bubbling potion” using bright colors like green, purple, or neon blue. I layer the paint in small, round shapes to mimic bubbles and add highlights with white or metallic paints for dimension. For an extra magical effect, I sometimes use glow-in-the-dark paint so the bubbles glow at night.
Pro Tips:
- Layer colors for depth and make the bubbles appear 3D.
- Glow-in-the-dark paint makes it extra spooky at night.
- Use metallic or glitter paints on some bubbles for a magical shimmer.
10. Haunted House Pumpkin
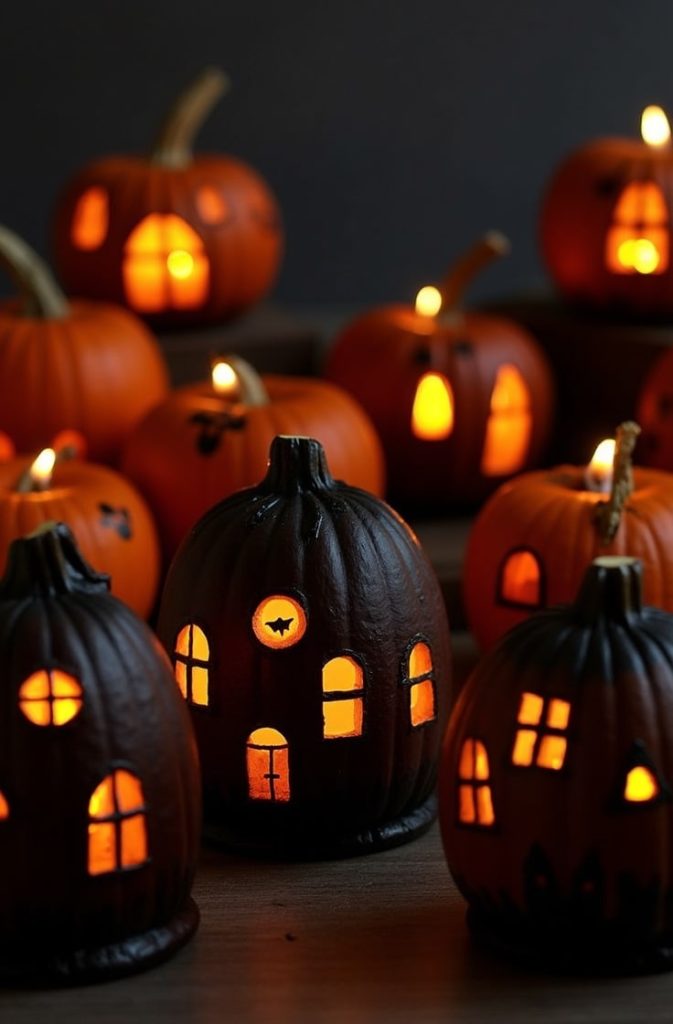
Haunted house pumpkins are a spooky, detailed way to tell a story with your decor. I love how tiny silhouettes of haunted houses, eerie windows, and glowing moons instantly create a creepy, atmospheric vibe. They’re perfect for tabletops, mantels, or as a centerpiece for a Halloween display.
How I do it:
I start with a dark base coat — black or deep purple works best. Once dry, I lightly sketch haunted house silhouettes and details like windows, doors, and rooftops with a pencil. Then I paint the shapes using gray, black, or metallic colors. For windows or moonlit effects, I add small white or yellow highlights to make them glow. Layering colors gives depth and makes the haunted scene feel alive.
Pro Tips:
- Use fine brushes or paint pens for crisp details.
- Metallic paints for windows create a realistic glow effect.
- Group multiple haunted house pumpkins with LED candles for a mini spooky village.
11. Mummy Pumpkin
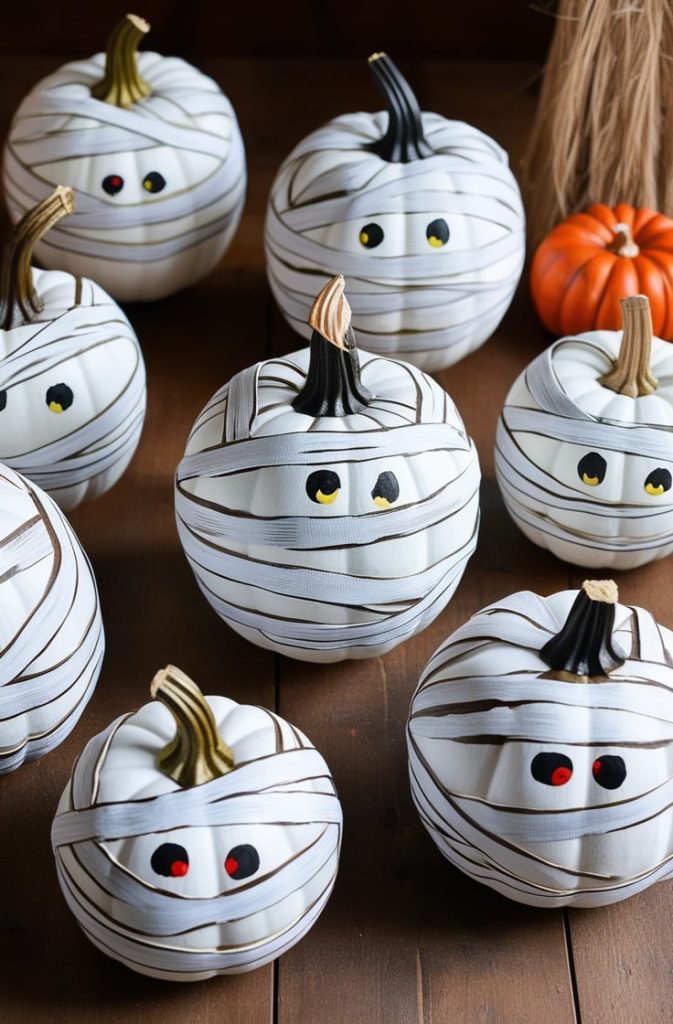
Mummy pumpkins are a fun, creepy-cute design that’s perfect for Halloween. I love how the wrapped “bandages” peek over spooky eyes — it adds personality and a playful haunted vibe. They’re great for tabletops, entryways, or even as a DIY project with kids.
How I do it:
I start with a white or light-colored pumpkin. Using white acrylic paint, I create overlapping strips to mimic mummy bandages. Then, I add dark circles for eyes peeking through the bandages — black or dark brown works best. For extra dimension, I add shadows around the edges of the bandages using gray paint. Layering the strips makes it look more textured and realistic.
Pro Tips:
- Use thin brushes for precise bandage edges.
- Vary strip width and overlap for a natural, chaotic look.
- Add small red or yellow highlights in the eyes for extra creepiness.
12. Scary Clown Pumpkin
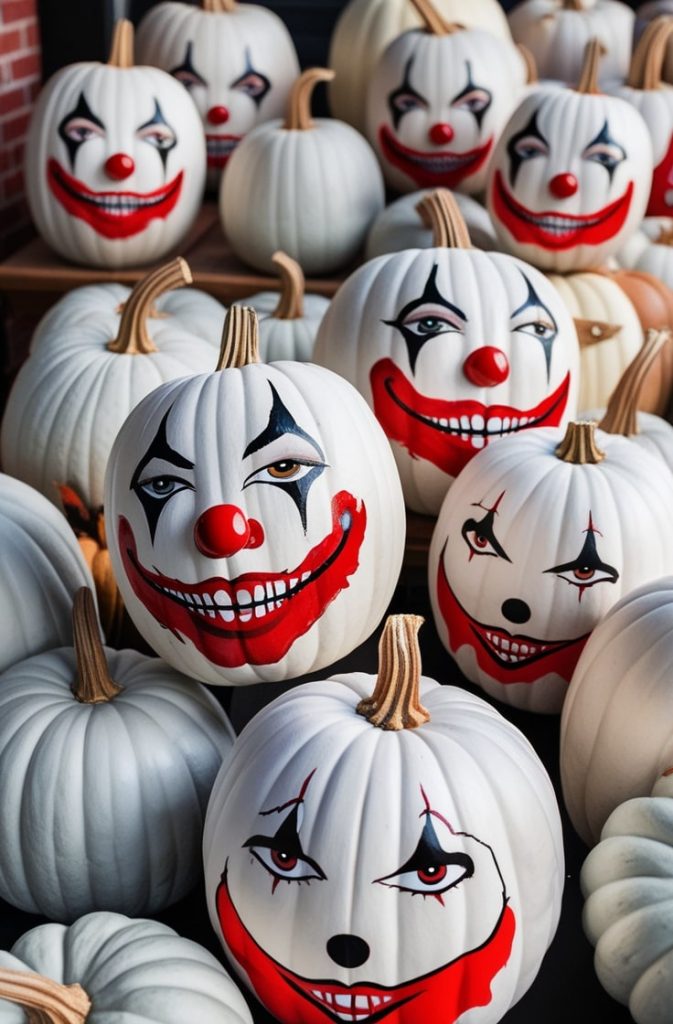
Scary clown pumpkins are a classic horror-inspired design that’s sure to give anyone chills. I love how exaggerated features like wide red lips, sharp teeth, and piercing eyes make the pumpkin instantly unsettling. This design is perfect for Halloween parties, haunted porches, or a spooky centerpiece.
How I do it:
I start with a pale base coat — white or very light gray — to create a ghostly face. Then I sketch the exaggerated facial features: wide red lips, a pointed nose, and large eyes. Using acrylic paints, I fill in the lips with red, the eyes with dark colors, and add sharp teeth with white or off-white. Small black lines or scars can give it extra creepy detail.
Pro Tips:
- Add fake tears, cracks, or scars to make the clown extra terrifying.
- Glossy paint on the lips and eyes gives a wet, lifelike effect.
- Mini versions can be grouped together for a “clown army” display.
13. Ghost Pumpkin
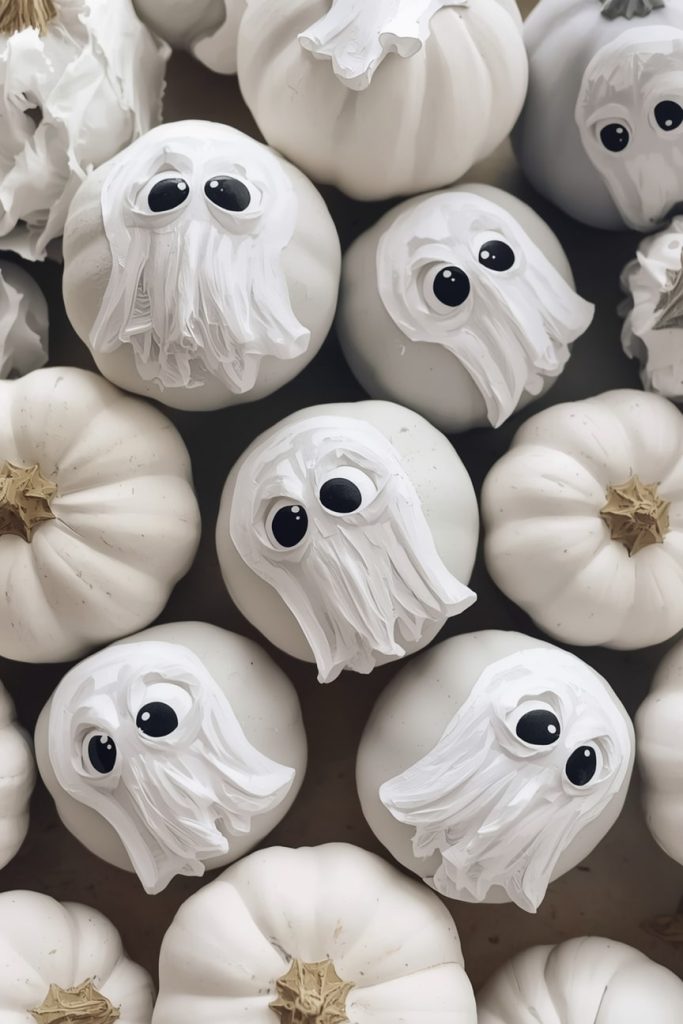
Ghost pumpkins are a spooky yet whimsical design, perfect for capturing that haunted Halloween vibe. I love how the wispy, floating shapes make the pumpkin feel like it’s alive — like a tiny spirit hovering in your decor. They’re great for mantels, porches, or as part of a Halloween tablescape.
How I do it:
I start with a white or light gray base coat. Once dry, I sketch the ghost shapes lightly with a pencil, keeping them flowing and slightly transparent-looking. I then paint the ghost outlines and eyes with a soft gray or black acrylic paint. To add depth, I layer semi-transparent washes of white or gray to create a floating, ethereal effect.
Pro Tips:
- Layer thin washes for a translucent, ghostly appearance.
- Soft, wispy brush strokes make the ghosts look like they’re floating.
- Mini ghost pumpkins scattered among other designs create a hauntingly cute display.
FAQs: Scary Pumpkin Painting Ideas
Q1: Can I use real pumpkins for these scary designs?
Absolutely! Real pumpkins work well, but make sure they’re firm and dry. For intricate designs, you may want to use faux pumpkins, as they last longer and are easier to paint.
Q2: What type of paint works best?
Acrylic paint is ideal for both real and faux pumpkins. It dries quickly, is vibrant, and adheres well. For extra effects, you can mix in metallic paints, gloss mediums, or even glow-in-the-dark paints.
Q3: Do I need to carve the pumpkins to make them scary?
Not at all! All of these scary designs can be painted without carving, which is perfect if you want long-lasting decorations or are avoiding messy pumpkin guts.
Q4: How do I protect my painted pumpkins?
Spray a clear acrylic sealer over your finished pumpkins to prevent chipping, fading, or water damage — especially for outdoor displays.
Q5: Can kids participate in these designs?
Yes! Some designs, like ghost pumpkins, jack-o’-lantern faces, or mummy pumpkins, are kid-friendly. Just supervise when using fine brushes or small details.
Conclusion
From classic jack-o’-lanterns to haunted houses, zombies, and creepy clowns, these 13 scary pumpkin painting ideas give you endless ways to elevate your Halloween decor.
Each design is customizable, beginner-friendly, and perfect for creating a spooky, festive atmosphere.
Grab your paintbrushes, let your creativity run wild, and transform your pumpkins into terrifyingly fun masterpieces that will wow trick-or-treaters and guests alike!
Next Reads:

I’m Sloane Everly, the heart and soul behind TheTidyPorch.com, where I pour my love for home decor, interior styling, and curated living into everything I do.
I’m all about turning houses into homes that feel like you—full of warmth, character, and a little bit of magic.
My style? Think cozy charm with a splash of bold, always designed to make your space feel like a hug you never want to leave.