
Last winter, the first snow came down on a quiet Saturday, and my little one pressed her nose to the window. School was closed. The cocoa was warm. So I pulled out white paint and a blue paper circle.
One painted palm later, a small hand pressed down in the middle of the “glass.” Then I added a tiny black hat and a carrot nose.
She gasped and shouted, “Snowman!” That is why I love this snow globe handprint craft. It is a dated winter memory and a sweet gift for grandma or grandpa. You will make one in about 25 minutes.
What You Need for This Snow Globe Handprint Craft
You need white washable paint, blue and white cardstock, markers, and a few paper scraps. Most of it is probably in your craft drawer already.
- White washable paint (check the label for age guidance)
- One sheet of white cardstock, 8.5 x 11 inches
- One sheet of light or medium blue cardstock
- Black or dark paper for the hat, and a colored paper strip for the scarf
- Orange paper or an orange marker for the nose
- Brown, gray, or red paper for the base
- Black marker, cotton swabs, glue stick, and scissors
- A plate or bowl about 7 inches wide for tracing
- Paintbrush or sponge brush, paper plate, wet wipes, and old newspaper
Here are some easy swaps. No white paint? Mix a little white into light gray, or cut a hand shape from white paper. No blue cardstock? Paint or color a circle blue on white paper. No cotton swab? Use a fingertip dab or a hole-punched paper dot for snow.
Age range: 1 to 6, with a grown-up helping. Time: about 25 minutes, plus drying. Mess level: low to medium.
How to Make a Snow Globe Handprint Craft Step by Step
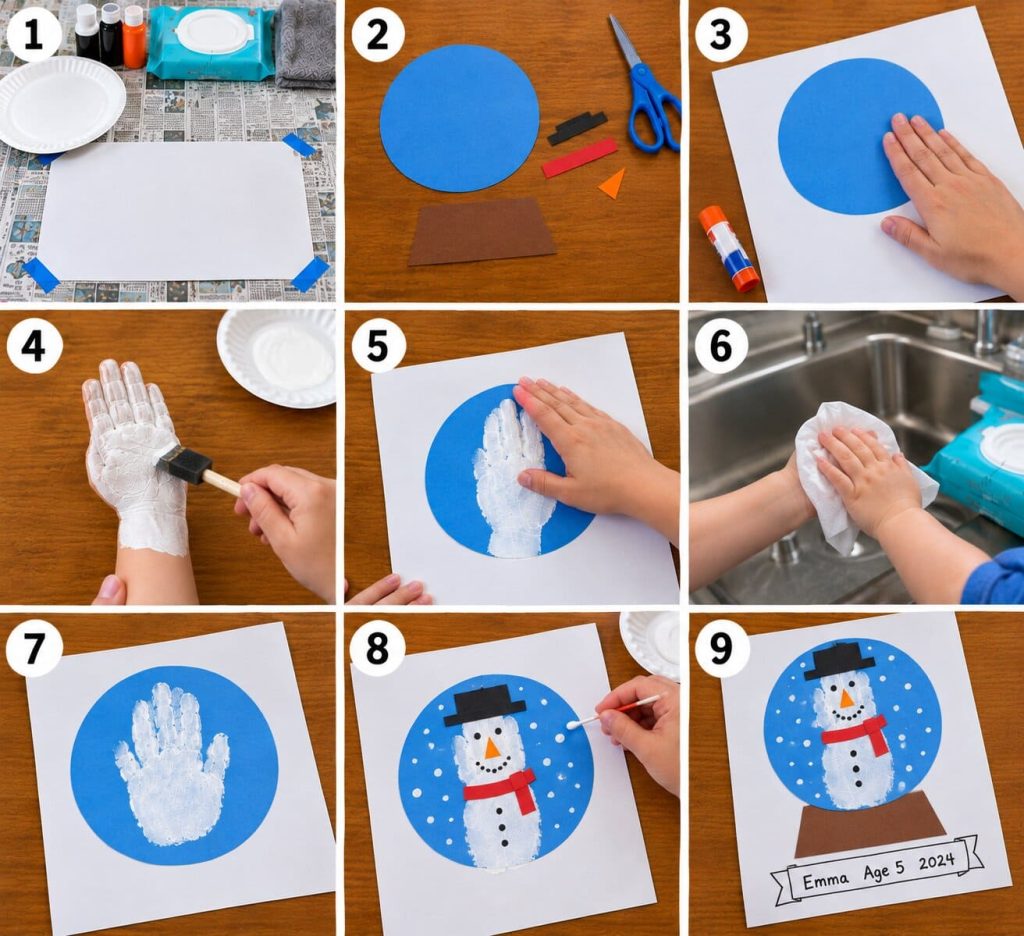
You can finish this snow globe handprint craft in nine steps. Do all the cutting first, so the paint steps stay quick and calm.
1. Protect Your Space
Cover the table with newspaper and tape down the corners. Set out the paint plate, wipes, and paper where you can reach them. Little hands move fast, so keep wipes close.
2. Trace and Cut the Circle and Base
Trace the plate on the blue cardstock and cut out the circle. Then cut a brown, gray, or red base, about 4 inches wide and 1 inch tall. Make the bottom edge a little wider than the top, like a trapezoid. Cut a small black hat strip, a thin scarf strip, and a tiny orange triangle too.
3. Glue the Circle to the White Paper
Rub glue stick over the back of the blue circle. Place it on the white cardstock, a little above the center. Leave about 2 inches at the bottom for the base and banner. Smooth it flat with your palm.
4. Paint the Hand White
Squeeze a quarter-sized puddle of white paint onto the plate. Brush a thin, even coat over the palm and all four fingers. Press the fingers tightly together and tuck the thumb in toward the palm. This makes a rounded snowman shape.
5. Press the Hand and Lift Straight Up
Place the wrist near the lower middle of the blue circle, with fingers pointing up. Cover the child’s hand with yours and press for about three seconds. Press the fingertips and the palm. Then lift straight up in one smooth move, because sliding smears the edges.
6. Clean Up Right Away
Wipe the hand with a wet wipe before the paint dries. Then wash with warm, soapy water at the sink. Rinse the brush and plate while the paint is still wet.
7. Let the Print Dry
Lay the paper flat for about 15 to 20 minutes. A thin coat dries faster and keeps the paper from curling. Touch a corner lightly to check. If it feels cool or tacky, wait a few more minutes.
8. Add the Hat, Scarf, Face, and Snow
Glue the black strip at the fingertips for the hat. Glue the scarf strip at the wrist end. Add the orange triangle for a nose. Draw two dot eyes, a smile, and three button dots down the palm. Now dip a cotton swab in white paint and dab snow around the snowman. Let the dots dry for a few minutes.
9. Glue the Base and Write the Banner
Glue the base just under the circle, so the globe sits on top of it. At the bottom of the white paper, write the child’s name, age, and year in pencil first. Trace it with marker. Add a short phrase if you like.
For babies, you can use a footprint instead. The heel becomes the snowman’s body, and the toes tuck up.
How to Turn Your Snow Globe Handprint Into a Keepsake, Ornament, or Gift
Add a name, age, and year, and the print becomes a keepsake. Add a short message, and it becomes a gift. Little hands grow fast, so the date matters more than you think.
To make a card, glue the finished print to a folded sheet of cardstock. Write “Warm winter wishes from your little snowman” inside. Grandparents love this one.
To make an ornament, cut out the blue circle with the snowman. Punch a hole at the top and thread a ribbon through it. Hang it on the tree or in a window.
To preserve a print, slide it into a plastic sleeve or a frame with a mat. Keep it out of direct sun. To mail it flat, let it dry fully first. Then sandwich it between two pieces of cardboard and write “Do not bend” on the envelope.
Try a yearly tradition. Make a new snow globe every winter, and keep them together in a folder.
Tips for Getting a Clean White Handprint and Neat Snow
The key is a thin layer of white paint and one confident press. Thick paint turns gray and streaky on blue paper.
- Fingers together: Squeeze them gently before pressing. Gaps make the snowman look like a mitten.
- Thin paint: Brush it on lightly. If the plate looks goopy, blot the brush first.
- A helper: Have someone hold the paper steady so it does not slide.
- Wiggly hands and babies: Count out loud, “one, two, three, up!” A quick press beats a perfect one.
- Smudges and gaps: Let the paint dry, then dab a little more white on top.
- Neat snow: Dab straight down and lift. Dragging the swab makes streaks.
- A neat face: Mark tiny pencil dots first, then trace with marker.
How to Make a Snow Globe Handprint Craft With a Class or Group
Set up three stations so kids move through in small groups. Station one is painting and pressing. Station two is the sink. Station three is the face, snow, and banner. This keeps lines short and paint off the floor.
Cut all the circles, bases, hats, and scarves ahead of time. Glue the circles on before class starts. Write each child’s name on the back of the paper. Each child needs about five minutes at the paint station, so a class of 20 moves along with two helpers.
Lay the wet prints flat on a table or drying rack, in name order. Once dry, finish the details and send them home as winter gifts.
Snow Globe Handprint Craft FAQs
What is the best paint for babies and toddlers?
Choose washable paint made for kids, and read the label for age guidance. Babies often put hands in mouths, so stay close and wipe hands right after.
What age can do this craft?
Babies can do a footprint version with help. Toddlers and preschoolers can make the handprint, and older kids can add their own snowman faces.
How can I make it without paint?
Trace the child’s hand on white paper and cut it out. Glue it onto the blue circle, then add the hat, scarf, and face the same way. Use paper-punch dots for the snow.
How do I keep white paint from looking streaky on blue?
Use a thin coat and press once without sliding. A damp sponge brush spreads paint more evenly than a stiff brush.
How long does it take to dry?
A thin coat usually dries in 15 to 20 minutes. Thicker paint takes longer, so wait before adding the hat and face.
Time to Make Your Snow Globe
Grab the white paint, press one little hand, and watch a snowman appear. It is quick, cozy, and easy to love. Make one on the next chilly day, and tuck it away for someone special.

Sohel Rana is the writer, editor, publisher, and founder of The Tidy Porch. He is the man who is responsible for the craft (my wife created) being converted into a written piece. He also helps her wife (Sumona) by capturing videos of each craft. In short, he brings each craft created by her wife in front of you by transforming it into an article and a video.
