
Late in the afternoon, the sun reached the window and my nephew stopped talking. That was a first. He’d narrated his tissue paper Christmas tree craft nonstop.
Now he just stared at the green glow on the floor. Then he pressed one sticky thumb to the glass and left a print beside the star. “It looks like a church window,” he whispered. I’d planned a quick craft. We made a whole row before dinner.
Nothing needed glue or drying time, and nothing needed a printer. Just clear contact paper, torn tissue, and a window. You can make the same glowing tree today, and I’ll show you every step.
What You Need for a Tissue Paper Christmas Tree Craft
You need clear contact paper, tissue paper, and a few things from your desk drawer. Nothing here needs glue.
- Clear self-adhesive contact paper (shelf liner), enough for two sheets, each 9 x 11 inches
- Tissue paper in greens, yellow, and light blue
- A little red, gold, or white tissue for ornaments
- A little brown tissue for the trunk
- White paper and a dark marker
- A ruler
- Masking tape
- Scissors
- String or painter’s tape
- A hole punch (optional)
Plan on about 25 minutes. Drawing the guide takes five. Pressing on the tissue takes the longest. Sealing and cutting take about five more.
Why Contact Paper Works Better Than Glue for Tissue Paper
Contact paper is already sticky, so the tissue never gets wet. That’s why it beats glue.
Wet glue makes tissue wrinkle, tear, and sometimes bleed its color. It also needs time to dry, which is hard for little kids to wait through.
With a sticky sheet, you can lift a scrap and move it if it lands in the wrong spot. Both sheets are clear, so light passes right through the tissue. That gives you a tissue paper Christmas tree suncatcher that glows like stained glass.
How to Make a Tissue Paper Christmas Tree Craft Step by Step
You draw a tree guide, press tissue onto a sticky sheet, seal it with a second sheet, and trim. Work in this order.
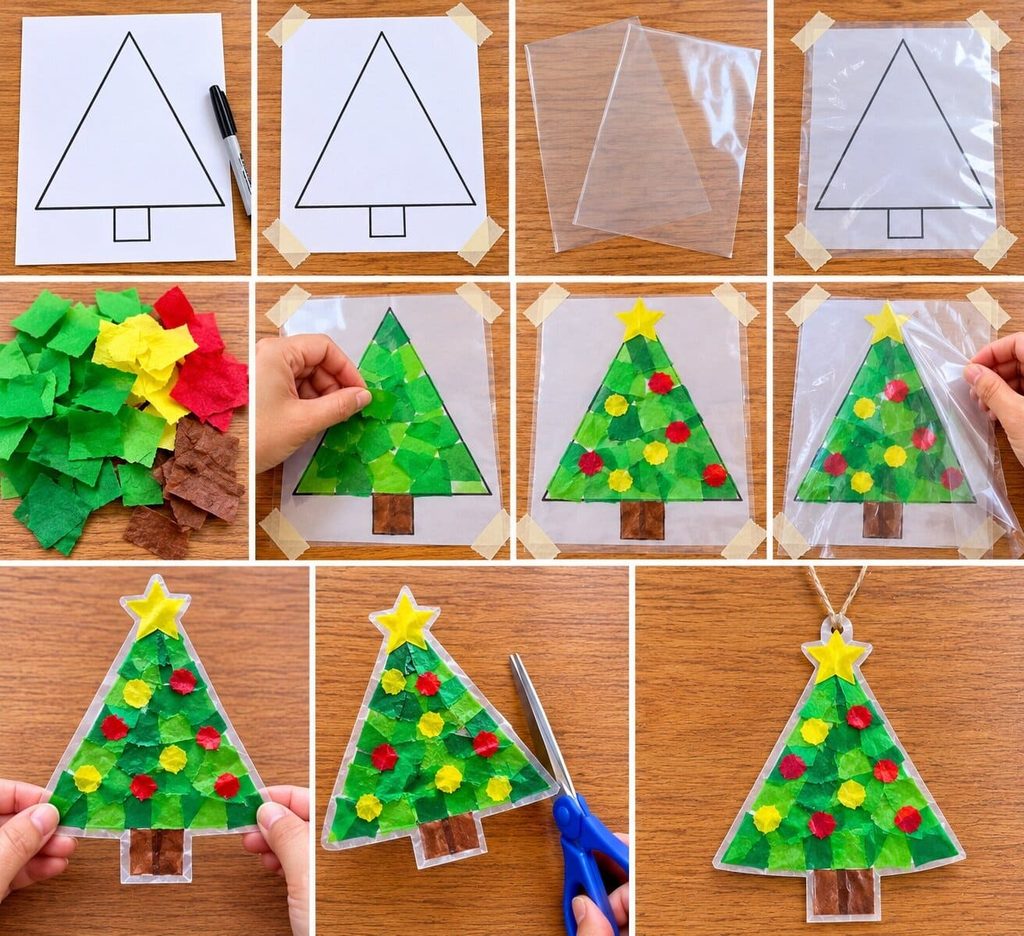
- Draw the guide. On white paper, draw a flat line 6 inches long for the base. Mark the center at 3 inches. Mark a dot 8 inches straight above that center mark. Connect the dot to both ends of the base to make a triangle. Add a trunk under the base: a 1-inch square at the center. Trace the lines with a dark marker so they show through.
- Tape the guide down. Tape the guide to the table with masking tape so it can’t slide.
- Cut two contact paper sheets. Cut each one about 9 x 11 inches. Both should be bigger than the tree guide.
- Set up the sticky sheet. Peel the backing off one sheet. Lay it sticky side up over the guide, so you can see the tree through it. Tape all four corners to the table.
- Tear the tissue. Tear scraps about 1 inch wide. Torn edges blend better than cut ones. Sort the scraps by color.
- Fill the tree. Press green scraps onto the sticky side to fill the triangle. Overlap the edges a little so no white gaps show. Use no more than two layers in any one spot. More than that blocks the light.
- Add the details. Press a yellow tissue star on the top tip. Add small red or gold tissue dots as ornaments. Fill the trunk with brown tissue.
- Seal the tree. Peel the backing off the second sheet. Hold it by two corners with the sticky side down. Lay one edge down first. Then smooth across with your hand, pushing out air bubbles as you go.
- Free the sheet. Peel off the tape. Lift the sealed sheet away from the guide paper.
- Trim the tree. Cut around the tree shape. Leave a clear border about half an inch wide all the way around. The border keeps the edges sealed. Do the same around the trunk.
- Add a hanger. Punch a hole near the top, inside the border. Thread string through it and tie a loop. Or skip the hole and use painter’s tape on the window.
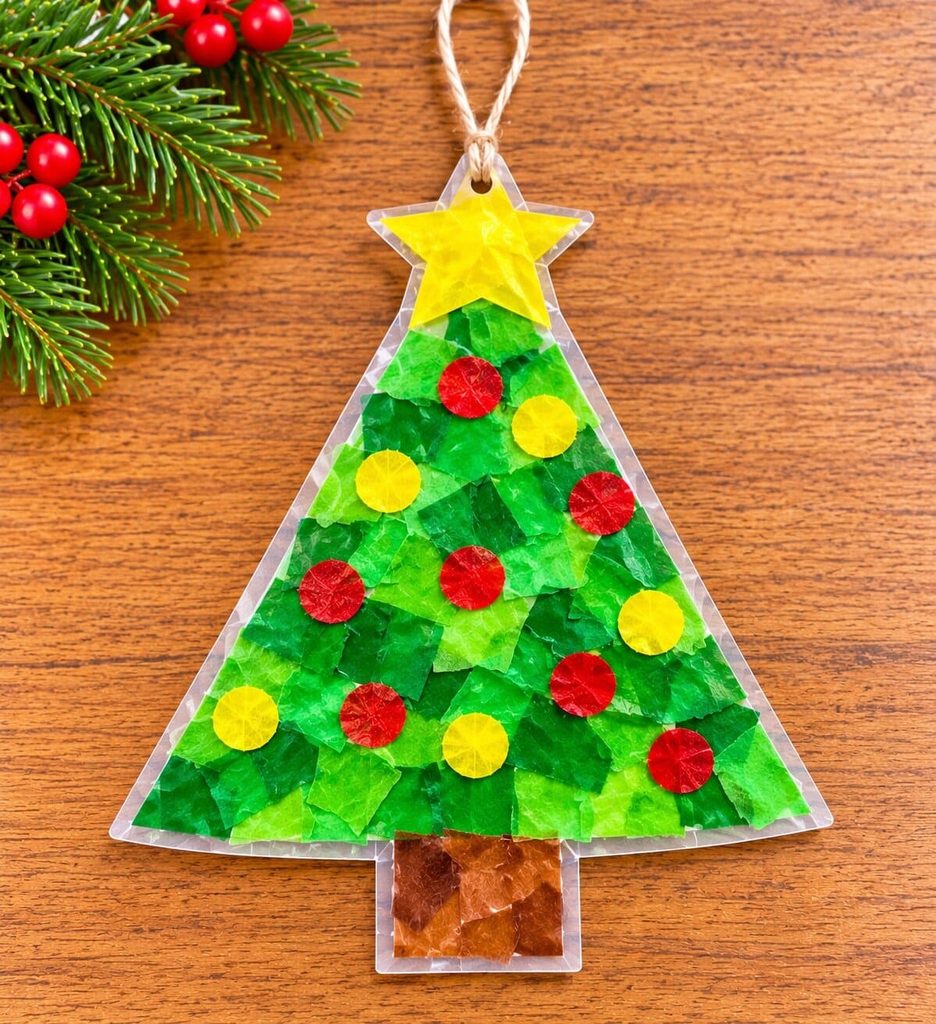
Color and Layering Tips for a Glowing Tree
Mix your greens with a little yellow and light blue, and keep every layer thin. Light shines best through thin tissue.
Overlapping tissue makes new colors. Yellow over blue looks green. Red over yellow looks orange. Let kids test this on a spare scrap before they start. Skip navy and black tissue, since dark colors block the light.
Save brown for the trunk only. Torn edges that overlap create a soft patchwork, like real stained glass. Try one white scrap among the ornaments. It glows like a tiny snowflake.
How to Hang Your Tissue Paper Tree in a Window
Press it to the glass with painter’s tape, or hang it from a string. Both take less than a minute.
Painter’s tape peels off glass cleanly. Put one small piece on each top corner of the border. Wipe the glass dry first, since dust and fingerprints weaken the tape.
A window that gets direct sun makes the colors glow the most. Hang the tree low enough for kids to see it. A row of trees looks even better than one.
Classroom and Group Tips
Prep the sheets ahead of time, then let each child do only the pressing. That keeps the craft fast and the scissors with the adults.
Draw one guide and reuse it for every child. The guide never touches the sticky side, so it stays clean. Before class, cut two sheets per child. Tape each bottom sheet sticky side up to a table or tray.
Put tissue scraps in bowls, one color per bowl, at each table. Kids press on their scraps. An adult runs one sealing and cutting station. Hang all the trees in a row on the classroom window. Your room now has a stained glass forest.
Age Guide: What Kids Can Do at Each Age
Ages 2½ to 3 press scraps, ages 4 to 5 tear and fill, and ages 6 to 7 can draw the guide too. Adults seal and cut at every age.
- Ages 2½ to 3: Hand them pre-torn scraps. Pressing onto the sticky sheet is the whole activity, which makes this a good tissue paper Christmas tree craft for toddlers. Watch closely, since tiny scraps can end up in mouths.
- Ages 4 to 5: They can tear their own scraps and sort them by color. Ask them to name the new colors they make.
- Ages 6 to 7: They can draw the guide with a ruler. They can also place the star and ornaments with care.
Fixes for Common Problems
Most problems come from air, gaps, or dusty glass. Each one has a quick fix.
Air bubbles. Smooth the second sheet from one edge to the other. If a bubble stays, poke it with a pin and press it flat.
White gaps. Press another scrap over the spot before you seal. Gaps are easy to fix while the sheet is still open.
Peeling edges. Rub the border firmly with your thumb. Next time, leave a slightly wider border.
The tree won’t stay on the window. Wipe the glass dry, then use fresh painter’s tape. Or hang the tree from a string.
Dull colors. Too many layers or dark scraps block the light. Next time, use one layer of bright tissue and pick a sunnier window.
FAQs About the Tissue Paper Christmas Tree Craft
Can I make this without glue?
Yes. The sticky side of the contact paper holds the tissue in place. You never need glue.
What can I use if I don’t have contact paper?
Wide, clear packing tape works for a small tree. Lay the strips sticky side up and overlap them by a quarter inch. Add tissue, then cover it with a second row of strips.
How long does it take?
Most people finish in about half an hour, including sealing and cutting. Kids who love tearing tissue may take longer.
Can toddlers make this?
Yes, with help. Toddlers can press pre-torn scraps onto the sticky sheet. An adult should draw the guide, seal the sheet, and cut. Stay close, since tiny scraps are a mouth risk.
How long will it last in the window?
A sealed tree can last the whole holiday season. Strong sun can fade tissue over time. Take the tree down after the holidays and store it flat.
That’s the whole tissue paper Christmas tree craft. No glue, no mess on the table, and one very good reason to look at your window in the late afternoon. Pin it to your Christmas board so you can find it again.

Sohel Rana is the writer, editor, publisher, and founder of The Tidy Porch. He is the man who is responsible for the craft (my wife created) being converted into a written piece. He also helps her wife (Sumona) by capturing videos of each craft. In short, he brings each craft created by her wife in front of you by transforming it into an article and a video.
