
There’s something about a tiny handprint that stops me in my tracks. It’s proof of exactly how small they were, at exactly this moment, and it’s already changing.
That’s why I love turning handprints into keepsakes instead of just crafts that get tossed after the glue dries.
This turtle handprint craft is simple enough for little hands to lead, guided enough that you’ll know exactly what to say at each step.
At the same time, it’s sweet enough to turn into a card, a framed keepsake, or a gift for someone who’ll treasure it as much as you will.
What You’ll Need to Buy (Top 5 Picks)
- Washable kids’ paint set — a basic 6-color washable paint set gives you every shade you need for the shell, head, and feet without worrying about stains on clothes or carpet.
- Foam paint brushes — these make it easy to load an even coat of paint onto a small hand without the bristle marks a regular brush leaves behind.
- Cardstock in assorted colors — sturdier than regular paper, so it holds up as a keepsake and doesn’t wrinkle under wet paint.
- Wiggle eyes variety pack — a range of sizes means you can size the eyes to match your child’s handprint, whether it’s a toddler print or a preschooler’s bigger hand.
- Simple document frame (5×7 or 8×10) — once the paint dries, this turns the craft straight into a giftable keepsake without any extra steps.
Turtle Handprint Keepsake Craft
This craft uses one handprint to build the turtle’s shell, plus a few simple painted or drawn details for the head, legs, and tail. The whole thing takes about 15–20 minutes, most of which is just letting paint dry.
Materials Needed
- 1 sheet of cardstock (light blue, white, or cream works best as a background)
- Green washable paint
- 1 foam paint brush
- A small bowl or paper plate (to hold the paint)
- A damp washcloth or wipes (for quick cleanup)
- 2 small wiggle eyes
- A black fine-tip marker
- Craft glue or a glue stick
- Optional: a paper cutter or scissors (adult step) if you want to trim the cardstock into a card shape afterward
How to Make It
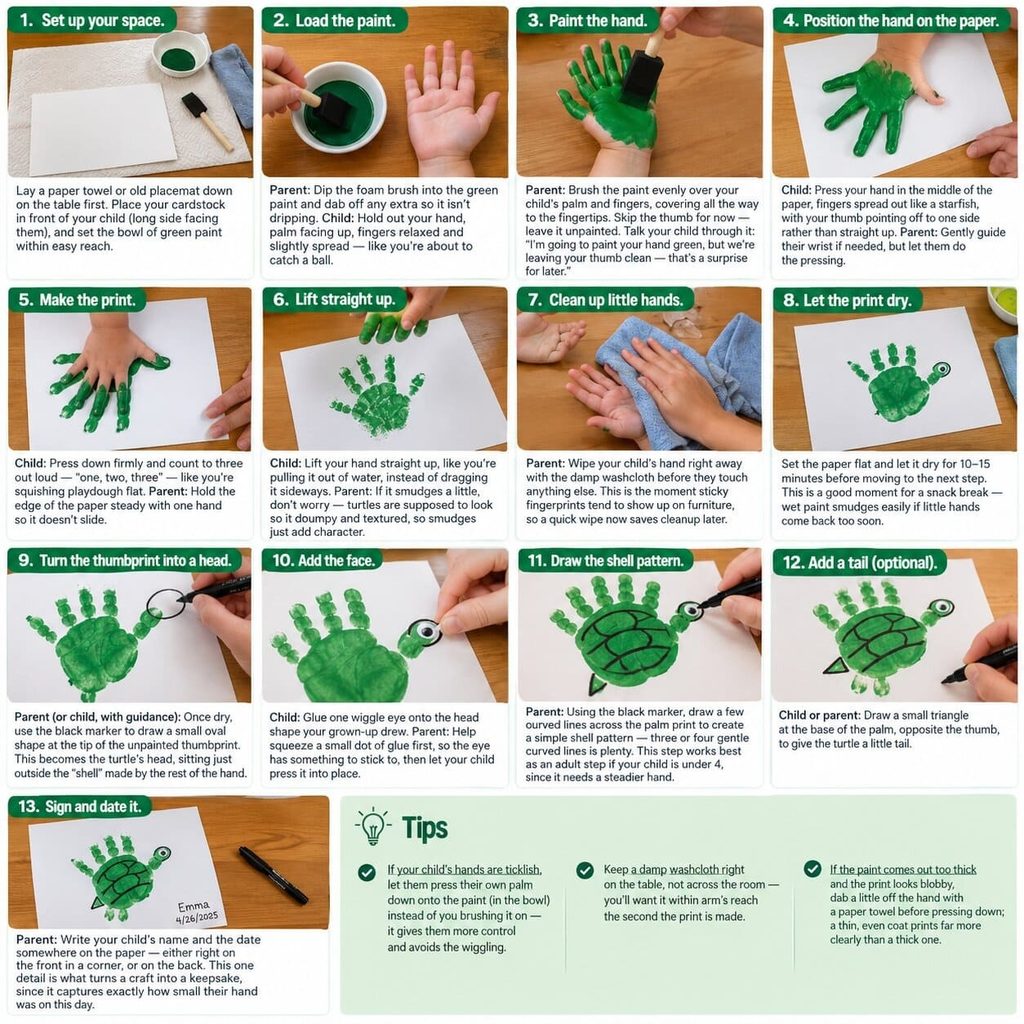
Step 1: Set up your space. Lay a paper towel or old placemat down on the table first — paint has a way of finding its way past the paper. Place your cardstock in front of your child, with the long side facing them, and set the bowl of green paint within easy reach.
Step 2: Load the paint. Parent: Dip the foam brush into the green paint and dab off any extra so it isn’t dripping. Child: Hold out your hand, palm facing up, fingers relaxed and slightly spread — like you’re about to catch a ball.
Step 3: Paint the hand. Parent: Brush the paint evenly over your child’s palm and fingers, covering all the way to the fingertips. Skip the thumb for now — leave it unpainted, since it becomes the turtle’s head in a later step. Talk your child through it: “I’m going to paint your hand green, but we’re going to leave your thumb clean — that’s going to be a surprise for later.”
Step 4: Position the hand on the paper. Child: Press your hand right in the middle of the paper, fingers spread out like a starfish, with your thumb pointing off to one side rather than straight up. Parent: Gently guide their wrist if needed, but let them do the pressing.
Step 5: Make the print. Child: Press down firmly and count to three out loud — “one, two, three” — like you’re squishing playdough flat. Parent: Hold the edge of the paper steady with one hand so it doesn’t slide.
Step 6: Lift straight up. Child: Lift your hand straight up, like you’re pulling it out of water, instead of dragging it sideways. Parent: If it smudges a little, don’t worry — turtles are supposed to look a little bumpy and textured, so smudges just add character.
Step 7: Clean up little hands. Parent: Wipe your child’s hand right away with the damp washcloth before they touch anything else. This is the moment sticky fingerprints tend to show up on furniture, so a quick wipe now saves cleanup later.
Step 8: Let the print dry. Set the paper flat and let it dry for 10–15 minutes before moving to the next step. This is a good moment for a snack break — wet paint smudges easily if little hands come back too soon.
Step 9: Turn the thumbprint into a head. Parent (or child, with guidance): Once dry, use the black marker to draw a small oval shape at the tip of the unpainted thumbprint — this becomes the turtle’s head, sitting just outside the “shell” made by the rest of the hand.
Step 10: Add the face. Child: Glue one wiggle eye onto the head shape your grown-up drew. Parent: Help squeeze a small dot of glue first, so the eye has something to stick to, then let your child press it into place.
Step 11: Draw the shell pattern. Parent: Using the black marker, draw a few curved lines across the palm print to create a simple shell pattern — three or four gentle curved lines is plenty. This step works best as an adult step if your child is under 4, since it needs a steadier hand.
Step 12: Add a tail (optional). Child or parent: Draw a small triangle at the base of the palm, opposite the thumb, to give the turtle a little tail.
Step 13: Sign and date it. Parent: Write your child’s name and the date somewhere on the paper — either right on the front in a corner, or on the back. This one detail is what turns a craft into a keepsake, since it captures exactly how small their hand was on this day.
Tips
- If your child’s hands are ticklish, let them press their own palm down onto the paint (in the bowl) instead of you brushing it on — it gives them more control and avoids the wiggling.
- Keep a damp washcloth right on the table, not across the room — you’ll want it within arm’s reach the second the print is made.
- If the paint comes out too thick and the print looks blobby, dab a little off the hand with a paper towel before pressing down; a thin, even coat prints far more clearly than a thick one.
Make It a Family of Turtles
If you have more than one child — or want to include yourself — repeat the same steps on one larger sheet of cardstock using a different handprint for each turtle, sized smallest to biggest.
Line them up in a row like a little turtle family, and label each one with the name and age of whoever made it.
It’s an especially sweet gift for grandparents, since it captures every grandchild’s hand size in one keepsake.
Turn It Into a Gift
Once the paint is fully dry, slide the finished piece into a simple frame for an instant keepsake gift, or fold a piece of cardstock in half and glue the handprint turtle to the front to make a one-of-a-kind card.
For Mother’s Day, Father’s Day, or a grandparent’s birthday, add a small printed tag that reads “You’re never too old to be my favorite turtle to hang out with” or simply the child’s name and age — it turns a craft into something someone will keep for years.
Frequently Asked Questions
What age is this turtle handprint craft best for? This craft works well for children roughly ages 1 to 6. For babies and toddlers under 2, a parent will need to guide almost every step, including pressing the hand down and lifting it up. Preschoolers and older kids can usually manage the pressing and lifting themselves, with a parent handling the paint and marker details.
Is the paint safe for toddlers? Washable kids’ paint is designed to be non-toxic and safe for skin contact, but it’s still a good idea to do a quick patch test on your child’s wrist beforehand if they have sensitive skin, and to wash hands promptly after the craft is finished.
What if my child’s handprint comes out smudged? A little smudging is normal, especially with wiggly toddlers, and it usually just adds texture to the turtle’s shell. If the print comes out too smudged to recognize, let it dry, then simply do a second print on the back of the paper or a fresh sheet.
Can I do this craft without paint? Yes — you can trace your child’s hand onto green cardstock with a pencil, cut it out, and glue it onto a background instead. It won’t have the same textured look as a painted print, but it works well if you’d rather skip the mess entirely.
How long does the craft take from start to finish? Plan for about 20–30 minutes total, including a 10–15 minute drying period between painting the print and adding the face and shell details. The hands-on portion itself only takes a few minutes.
How do I preserve the handprint so it lasts? Once everything is fully dry, a light coat of clear spray sealant (used outdoors or in a well-ventilated area, away from kids) will help protect the paint and marker from smudging over time, especially if you plan to frame it or handle it often.

Sohel Rana is the writer, editor, publisher, and founder of The Tidy Porch. He is the man who is responsible for the craft (my wife created) being converted into a written piece. He also helps her wife (Sumona) by capturing videos of each craft. In short, he brings each craft created by her wife in front of you by transforming it into an article and a video.
