
I still remember the thrill of tracing my daughter’s tiny hand and watching it magically become a witch this Halloween!
With just some colored cardstock, glue, scissors, and a pencil, this craft came together so easily. I handled the tricky cutting (a witch template made the small pieces a breeze), while she happily arranged and decorated her own spooky little creation.
Now we’ve got the cutest handmade keepsake to hang up every October!
Materials Needed
- Colored cardstock or construction paper
- Scissors
- Glue or a glue stick
- Pencil
- Witch template
- Black marker
- Black, purple, green, orange, and other colored paper for details
How To Make A Handprint Witch Craft
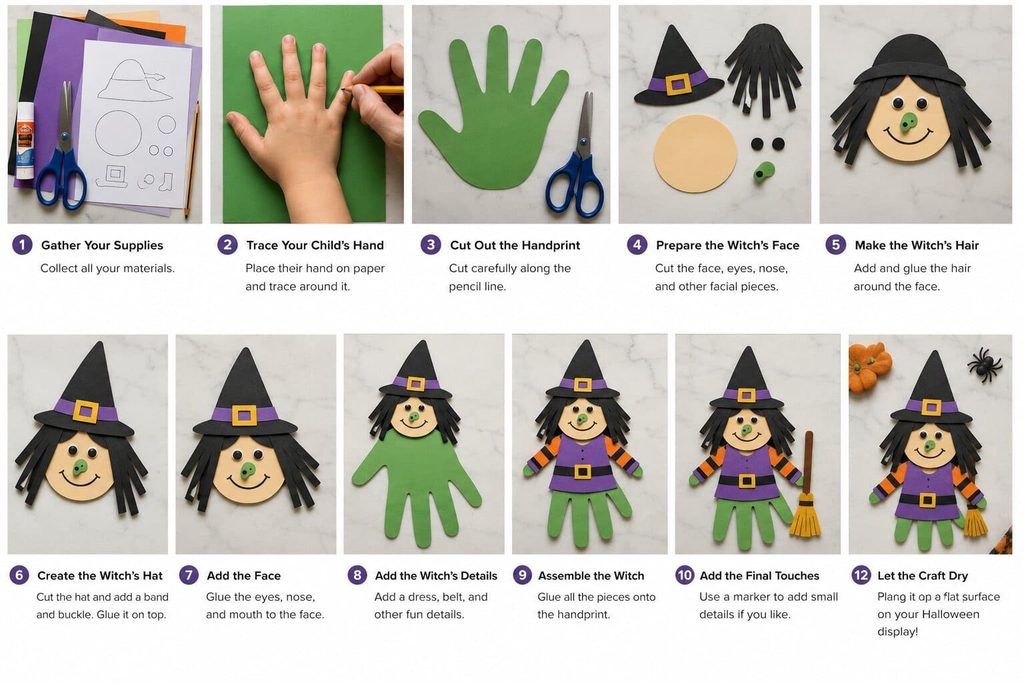
Step 1: Gather Your Supplies
Start by placing all your craft supplies on a clean, flat surface. Choose the colors you want to use for your witch.
Black, purple, green, and orange are great choices for a Halloween theme. You can also let your child pick their favorite colors.
Parent tip: If you are crafting with a young child, keep the scissors in the adult’s hands during the cutting steps.
Step 2: Trace Your Child’s Hand
Place a sheet of colored cardstock on the table. Ask your child to place one hand flat on the paper with the fingers spread apart.
Hold the paper steady and use a pencil to trace around the hand.
Try to follow the shape of each finger carefully. The handprint will become the main part of your witch.
Let your child choose which color they want to use for the handprint. A green handprint can give the witch a classic spooky look, but any color will work.
Step 3: Cut Out the Handprint
Carefully cut around the pencil outline to remove the handprint from the paper.
Parents should handle this step for younger children. Older children can practice cutting with kid-safe scissors while an adult watches.
Do not worry if the edges are not perfectly smooth. Small imperfections give the craft a fun handmade look.
Once the handprint is cut out, set it aside while you prepare the other pieces.
Step 4: Prepare the Witch’s Face
Use the witch template to prepare the face and other small pieces. You can also draw simple shapes yourself.
Cut a round or oval piece for the witch’s face. Choose a color that stands out against the handprint.
Next, prepare small pieces for the eyes, nose, and mouth.
You can use black paper for the eyes or draw them with a black marker. Let your child decide how the witch should look.
Step 5: Make the Witch’s Hair
Cut several strips or simple shapes from black cardstock or construction paper to make the witch’s hair.
Place the hair pieces around the sides and top of the face. You can make the hair long, short, straight, or slightly uneven.
There is no need to make every piece the same. Let your child help arrange the hair before you add glue.
Step 6: Create the Witch’s Hat
A pointed hat is one of the most important parts of a witch craft.
Use the template to cut out a witch hat, or draw a large triangle with a curved brim. Black or purple paper works well for the hat.
Place the hat above the witch’s head. Add a small orange, yellow, or other colored paper strip around the hat for decoration.
You can also add a small paper buckle or a few dots and stars to make the hat more festive.
Step 7: Add the Face
Now it is time to give your witch a funny face.
Glue the eyes onto the face. Then add a small paper nose and mouth. You can also use a black marker to draw the facial features.
For a playful look, make the eyes slightly different sizes or give your witch a big smile.
Encourage your child to make the face in their own style. Every handprint witch can look different.
Step 8: Add the Witch’s Details
Once the main face is ready, add a few extra Halloween details.
You can create:
- A colorful dress
- A belt
- Striped sleeves
- Shoes
- A broomstick
- Stars or dots
- A small buckle on the hat
Use scraps of colored cardstock for these pieces.
Parents can cut the smaller shapes while children choose the colors and decide where each piece should go.
Step 9: Assemble the Witch
Place all the pieces on the handprint before gluing them. This lets you check the design and move anything that does not look right.
Start with the larger pieces. Attach the face, hair, and hat first.
Then add the smaller details, such as the eyes, nose, mouth, belt, and decorations.
Use a glue stick or a small amount of craft glue. Too much glue can make the paper wet or cause the pieces to slide around.
Step 10: Add the Final Touches
Look over your finished witch with your child.
Use a black marker to add small details, such as eyelashes, eyebrows, a smile, or lines on the hat.
You can also write your child’s name and the year on the back of the handprint.
If you are making this craft as a Halloween keepsake, adding the date will help you remember when your child made it.
Step 11: Let the Craft Dry
Place the completed witch on a flat surface and allow the glue to dry completely.
Try not to move the craft while the pieces are still wet. This helps keep the face, hat, and other details in place.
Once it is dry, your child can hold up the finished handprint witch and show off their Halloween creation!
Step 12: Display Your Witch Handprint Craft
Your witch is ready to become part of your Halloween decorations.
Hang it on a wall, place it on the refrigerator, or add it to a Halloween display. You can also make several witches using different handprints from family members.
For a fun activity, make each witch a little different. Try different hat colors, hairstyles, faces, and decorations.
Give It A Try
This witch handprint craft is a simple way to enjoy creative time with your child during Halloween. Parents can handle the tracing and cutting while children choose colors, arrange pieces, and decorate the witch. Do not worry about making every piece perfect.
The little handmade details are what make the craft special. With a few basic supplies and a little imagination, your child can turn a simple handprint into a fun Halloween witch that you can display and enjoy.

Sohel Rana is the writer, editor, publisher, and founder of The Tidy Porch. He is the man who is responsible for the craft (my wife created) being converted into a written piece. He also helps her wife (Sumona) by capturing videos of each craft. In short, he brings each craft created by her wife in front of you by transforming it into an article and a video.
