
It started with a simple question from my daughter: “Can we make something Grinchy this year?”
So we pulled out green cardstock, a scrap of red paper, and our free handprint template, and got to work. I traced her little hand, she picked out the pieces, and together we watched it transform into the grumpiest, most adorable Grinch.
Now it’s officially our favorite ornament — proof that the smallest hands make the sweetest holiday memories.
Materials Needed
Here are the simple supplies you need to make this Grinch handprint craft:
- FREE Handprint Grinch Template – Find the free template at the end of this article.
- Green Cardstock Paper – Use this to make your child’s handprint.
- Red Construction Paper – Use this for the Grinch’s Santa hat.
- Pencil – Use a pencil to trace your child’s hand and template pieces.
- Scissors – Use scissors to cut out the handprint and paper pieces. An adult should help younger children with cutting.
- Glue – Use glue to attach all the Grinch pieces together.
How to Make a Grinch Handprint Craft
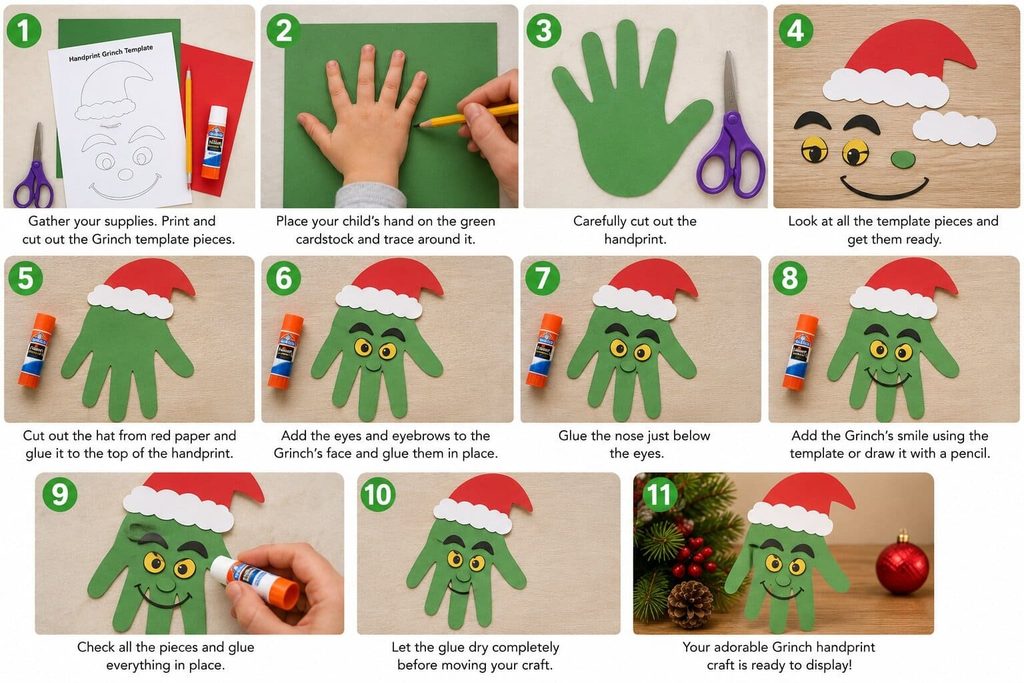
Step 1: Gather Your Supplies
Start by gathering everything you need for the craft.
Place the green cardstock, red construction paper, pencil, scissors, glue, and free handprint Grinch template on a clean table.
Download and print the template before you begin. Cut out the template pieces so they are ready to use.
Keeping everything nearby will make the craft easier for both you and your child.
Step 2: Trace Your Child’s Hand
Place the green cardstock on a flat surface.
Ask your child to place one hand on the paper. Keep the fingers together or close together while keeping the hand relaxed.
Use a pencil to carefully trace around the hand.
Try to keep the pencil close to the hand so you get a clear outline. This handprint will become the Grinch’s face and head.
Let your child enjoy this part. Seeing their own hand turn into a Christmas character makes the activity extra fun!
Step 3: Cut Out the Handprint
Once you finish tracing, carefully cut around the handprint.
For younger children, have an adult do the cutting. Older children can help if they can safely use scissors.
Take your time when cutting between the fingers. You want the handprint to keep its shape.
When you are done, you should have a green handprint ready to become your Grinch.
Step 4: Prepare the Grinch Template Pieces
Now take your Grinch template and look at all the pieces.
Your template may include the Grinch’s hat, eyes, eyebrows, nose, mouth, or other details.
Place the pieces on the table and sort them before you start gluing.
Ask your child to help identify each piece. This is a simple way to keep them involved in the craft.
Step 5: Make the Grinch’s Hat
Place the hat template on the red construction paper.
Trace around the hat shape with a pencil. Then carefully cut it out.
Place the red hat near the top of the green handprint to see where it should go.
Make sure the hat sits above the Grinch’s face before adding glue.
Once the position looks right, put a small amount of glue on the back of the hat and attach it to the handprint.
Step 6: Add the Grinch’s Eyes and Eyebrows
Now it is time to give your Grinch a face.
Take the eye and eyebrow pieces from the template. Arrange them near the top of the palm.
The eyebrows should sit above the eyes. Move the pieces around until your child likes the look.
Once you are happy with the placement, glue the pieces onto the green handprint.
Press each piece gently for a few seconds so it sticks well.
Step 7: Add the Grinch’s Nose
Next, find the nose from the template.
Place it below the eyes, near the center of the palm.
Help your child check the position before adding glue. Then glue the nose into place.
This small detail helps bring the Grinch handprint art to life.
Step 8: Create the Grinch’s Smile
The Grinch needs his famous mischievous expression!
Use the template if it includes a mouth piece. Otherwise, use a pencil to lightly draw a smile on the green handprint.
Once your child likes the shape, you can trace over it with a darker pencil or marker if available.
Keep the smile simple. Your little one’s Grinch does not have to look perfect.
Step 9: Glue Everything in Place
Take one last look at your Grinch.
Check that the hat, eyes, eyebrows, nose, and mouth are in the right places. If anything needs to be moved, do it before the glue dries.
Add glue to any loose pieces and press them down gently.
Avoid using too much glue. A small amount is usually enough to hold paper pieces together.
Step 10: Let Your Grinch Dry
Place the finished craft on a flat surface and let the glue dry completely.
Try not to move the handprint while the glue is still wet. This helps keep all the pieces in place.
You can write your child’s name and the year on the back of the craft. This makes the project a wonderful Christmas handprint keepsake.
Step 11: Display Your Finished Grinch
Your cute Grinch handprint craft is ready!
You can display it on the refrigerator, hang it on a wall, or add it to your child’s Christmas decorations.
You can also make several Grinch handprints with siblings, friends, or classmates. Each child’s handprint will create a slightly different Grinch.
Give It A Try
This Grinch handprint craft is a piece of cake for your child. Just grab the supplies, help your little one trace and cut the handprint, and let them have fun putting the Grinch together.
The free template makes the project even easier, while the handprint gives the craft a personal touch. It is a simple Christmas activity that your child can enjoy and you can keep as a special holiday memory.
We would love to see your little one’s finished Grinch! Share your child’s craft with us on Instagram and tag us using #thetidyporch.

Sohel Rana is the writer, editor, publisher, and founder of The Tidy Porch. He is the man who is responsible for the craft (my wife created) being converted into a written piece. He also helps her wife (Sumona) by capturing videos of each craft. In short, he brings each craft created by her wife in front of you by transforming it into an article and a video.
