
Turn your child’s little handprint into an adorable penguin with this easy penguin handprint craft. It is a fun winter activity that uses simple craft supplies and a free printable template.
Kids can trace, cut, glue, and decorate their own penguin while parents help with the trickier steps. Add colorful pom-pom earmuffs for an extra-cute winter touch.
When finished, this handprint penguin makes a sweet decoration or keepsake to save for later.
Materials Needed
- Free Penguin Template – Print the template and use it as a guide for the different penguin pieces.
- Black cardstock – For the handprint and main penguin body.
- White cardstock – For the penguin’s belly and face.
- Pink cardstock – For the round cheeks.
- Orange cardstock – For the beak and feet.
- Googly eyes – To give your penguin a fun, playful look.
- Pom-poms – Choose any colors you like to make the earmuffs.
- Small pipe cleaner pieces – Use these to create the band for the earmuffs.
- Scissors – For cutting out the handprint and template pieces. Parents can handle detailed cutting for younger children.
- Hole punch – To make neat circles for the penguin’s cheeks.
- Glue – A glue stick or craft glue works well for attaching the paper pieces.
How to Make a Penguin Handprint Craft
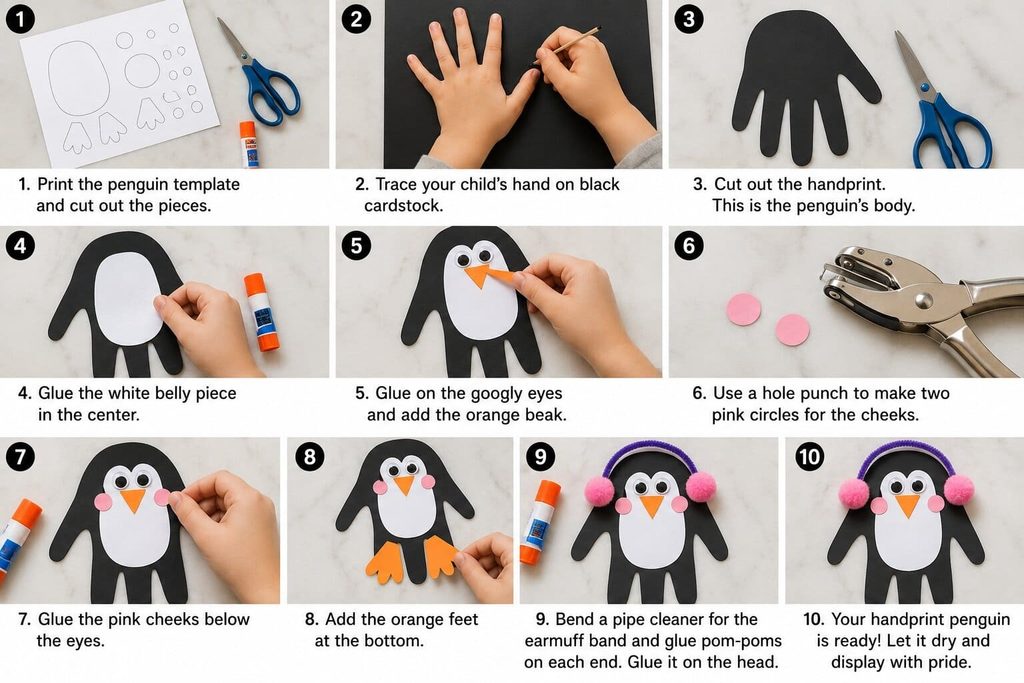
Step 1: Print the Penguin Template
Start by printing the free penguin template on regular printer paper. Cut out the template pieces that you will need.
For younger children, parents can do the cutting ahead of time. Older kids can practice their cutting skills while you guide them.
Parent tip: Place the template pieces in small groups so they are easy to find during the craft.
Step 2: Trace Your Child’s Hand
Place a sheet of black cardstock on the table. Have your child place one hand on the paper with the fingers spread slightly apart.
Carefully trace around the hand with a pencil.
Next, help your child cut around the handprint. This will become the penguin’s body and flippers.
For younger children, it is best for an adult to do this step.
Step 3: Position the Handprint
Turn the black handprint so the fingers point downward and the palm faces up.
The palm will become the penguin’s main body, while the fingers will look like little flippers.
Before using glue, place the pieces on the handprint to see where everything should go. This makes the final assembly much easier.
Step 4: Add the White Belly
Take the white cardstock piece from the template.
Place it in the center of the black palm. Check that it fits nicely inside the handprint.
Once your child is happy with the position, add glue to the back of the white piece. Press it gently onto the black handprint.
Hold it in place for a few seconds so it sticks well.
Step 5: Add the Face
Now it is time to give the penguin a cute face.
Glue the googly eyes near the top of the white face area. Leave enough space between them for the beak.
Next, cut out the orange beak from the template and glue it between the eyes.
Parent tip: Let your child decide where to place the eyes. A slightly silly face can make the penguin even more fun.
Step 6: Make the Pink Cheeks
Use the hole punch to make two small circles from pink cardstock.
These will become the penguin’s rosy cheeks.
Help your child place one pink circle below each eye. Add a tiny amount of glue to the back of each circle and press them into place.
If you do not have a hole punch, you can also draw small circles and cut them out with scissors.
Step 7: Add the Orange Feet
Cut out the penguin’s feet from orange cardstock.
Place them near the bottom of the handprint, underneath the white belly. Once you like their position, glue them down.
Make sure the feet are pointing outward a little so the penguin looks ready to waddle.
Step 8: Make the Earmuffs
Now comes one of the cutest parts!
Take a small piece of pipe cleaner and gently bend it into a curved band. Place the band across the top of the penguin’s head.
Then choose two colorful pom-poms for the earmuffs.
Glue one pom-pom to each end of the pipe cleaner. Allow the glue to dry before moving the penguin.
Parent tip: Let your child choose the pom-pom colors. Mixing bright colors can give each penguin its own personality.
Step 9: Check and Finish the Penguin
Look over the finished handprint penguin together.
Check that all the paper pieces are attached. If a corner is lifting, add a little more glue and press it down.
Let the craft dry completely before picking it up or displaying it.
You can also add a few extra paper snowflakes or draw snow around the penguin if your child wants to create a winter scene.
Step 10: Display Your Handprint Penguin
Once the glue is dry, your cute penguin is ready to show off!
Place it on the refrigerator, hang it on a wall, or add it to a winter craft display.
You can even write your child’s name and the date on the back. This turns the project into a simple handprint keepsake that you can look back on later.
Give It A Try
This penguin handprint craft is a simple way to turn a child’s handprint into a cute winter friend. With a few sheets of cardstock, googly eyes, pom-poms, and glue, your child can create a penguin they will be proud to display.
Let your child make the creative choices while you help with tracing, cutting, and any tricky parts. Most importantly, enjoy the process together and have fun making your little winter penguin!

Sohel Rana is the writer, editor, publisher, and founder of The Tidy Porch. He is the man who is responsible for the craft (my wife created) being converted into a written piece. He also helps her wife (Sumona) by capturing videos of each craft. In short, he brings each craft created by her wife in front of you by transforming it into an article and a video.
