
No paint, no mess, no problem! This Frankenstein handprint craft is the kind of Halloween activity that works just as well in a classroom as it does at your kitchen table.
Grab some colored paper, a few basic supplies, and our free Frankenstein template, and you’re set.
Kids get hands-on practice with tracing, cutting, and gluing, while turning their own handprint into a goofy green monster. Quick, low-prep, and a keepsake worth saving!
Materials Needed
- Colored cardstock or construction paper – Green paper works best for Frankenstein’s face. You can also use black and other colors for the small details.
- Scissors – Use child-safe scissors when appropriate, and help younger children with cutting.
- Glue – A glue stick or school glue works well for attaching the paper pieces.
- Markers – Use black and green markers to add Frankenstein’s facial details.
- Pencil – You will use this to trace your child’s hand.
- Frankenstein Template – Enter your email in the form at the end of this post to have the template link sent to you.
How to Make Frankenstein Handprint Craft
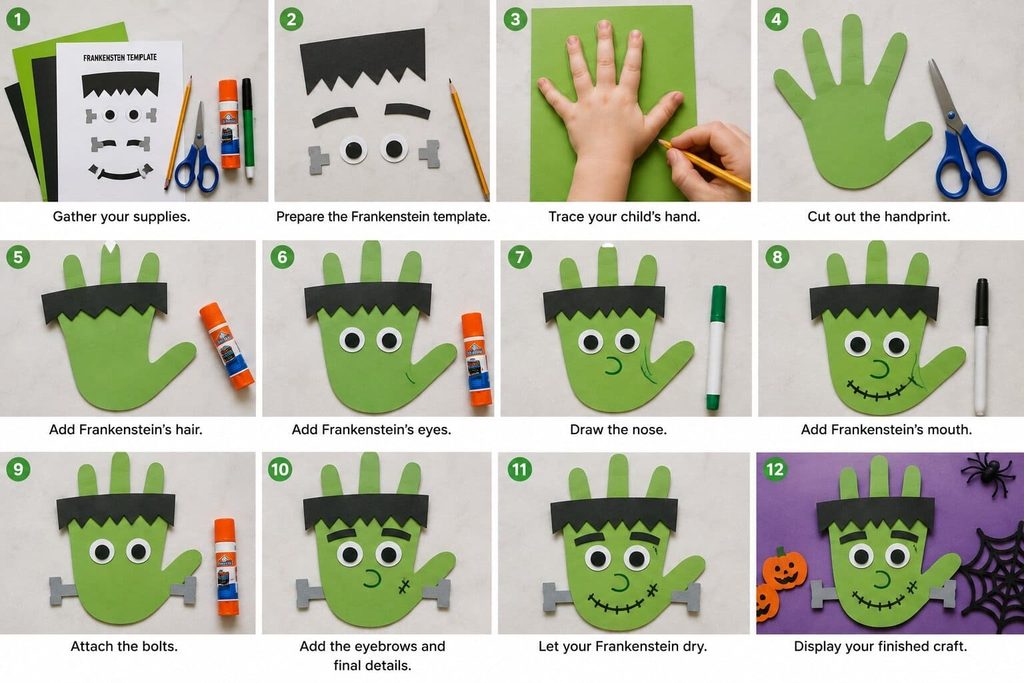
Step 1: Gather Your Supplies
Before you begin, place all your craft supplies on a clean table. Have the colored paper, pencil, scissors, glue, markers, and Frankenstein template ready.
If you are crafting with a young child, keep the scissors with you and help whenever needed. This makes the activity easier and keeps the crafting time safe and relaxed.
Step 2: Prepare the Frankenstein Template
Start by getting your Frankenstein template. Enter your email in the form at the end of this post to have the link sent to you.
Print the template and carefully cut out the pieces you need. Keep the pieces together so they are easy to find when you start assembling your Frankenstein.
Let your child help sort the pieces by size or shape.
Step 3: Trace Your Child’s Hand
Place a sheet of green cardstock or construction paper on the table.
Ask your child to place their hand flat on the paper with the fingers pointing upward. Use a pencil to carefully trace around the hand.
Try to keep the pencil close to the fingers as you trace. This will give you a clear handprint shape for Frankenstein’s face.
Step 4: Cut Out the Handprint
Now it is time to cut out the handprint.
Help your child slowly cut around the pencil lines with scissors. Take your time around the fingers so the handprint keeps its shape.
For younger children, an adult can do the cutting while the child watches or helps with easier parts.
Once finished, you should have a green handprint ready to become Frankenstein.
Step 5: Add Frankenstein’s Hair
Place the green handprint on the table with the fingers pointing upward.
Take the hair piece from the Frankenstein template and place it across the top of the handprint. Make sure it sits where Frankenstein’s hair should be.
Glue the piece in place. If your template uses the fingers as part of the hair design, follow the template lines and carefully trim any extra paper as needed.
Let your child press the paper down gently so it sticks well.
Step 6: Add Frankenstein’s Eyes
Next, find the eye pieces from the template.
Place them near the middle of the palm. Leave a little space between the eyes so Frankenstein’s face looks balanced.
Once you are happy with the placement, add a small amount of glue to the back of each piece and attach them to the handprint.
Encourage your child to decide where the eyes should go. A slightly different position can give Frankenstein a funny expression.
Step 7: Draw the Nose
Now give Frankenstein a nose.
Use a green marker to draw a small nose below the eyes. You can make it round, oval, or slightly funny.
This is a simple step your child can do on their own if they are comfortable drawing.
Remind them that the nose does not need to be perfect. Handmade details make each Frankenstein craft special.
Step 8: Add Frankenstein’s Mouth
Use a black marker to draw Frankenstein’s mouth below the nose.
You can draw a simple smile or give your monster a straight mouth. Add a few small lines to make it look like Frankenstein has stitches.
Let your child choose the expression. A happy Frankenstein can look cute, while a serious one can look a little spooky.
Step 9: Attach the Bolts
Frankenstein would not be complete without his famous bolts!
Find the bolt pieces from the template. Place one on each side of the handprint, near the bottom of the face.
Once they are in the right spots, glue them down.
Help your child press each piece gently for a few seconds so the glue can hold it in place.
Step 10: Add the Eyebrows and Final Details
Finish Frankenstein’s face by adding the eyebrow pieces from the template above the eyes.
Glue them in place and check the whole craft.
If you want, your child can use a black marker to add small stitches, scars, or other simple details. Encourage your little artist to give Frankenstein a personality of their own.
Step 11: Let Your Frankenstein Dry
Before moving the craft, allow the glue to dry completely.
Keep the handprint flat on the table while it dries. This helps the paper pieces stay in place.
Once everything is secure, gently pick up the craft and check your finished Frankenstein.
Step 12: Display Your Finished Craft
Your Frankenstein handprint craft is ready!
You can display it on the refrigerator, hang it on a wall, or use it as part of your Halloween decorations. You can also write your child’s name and the year on the back to turn it into a simple Halloween keepsake.
Give It A Try
The Frankenstein Handprint Craft is a fun and easy Halloween project for your child. Just grab the supplies, help your little one trace and cut their handprint, and let them bring their monster to life.
We would love to see your child’s Frankenstein craft! Share your little artist’s creation with us on Instagram and tag us using #thetidyporch.

Sohel Rana is the writer, editor, publisher, and founder of The Tidy Porch. He is the man who is responsible for the craft (my wife created) being converted into a written piece. He also helps her wife (Sumona) by capturing videos of each craft. In short, he brings each craft created by her wife in front of you by transforming it into an article and a video.
