
My daughter has been obsessed with jellyfish ever since our last aquarium trip, so this craft was basically inevitable.
We grabbed colored cardstock, scissors, glue, and a simple jellyfish template, and got to tracing. She took over from there, picking out colors and arranging the tentacles exactly how she wanted them.
Twenty minutes later, we had a squishy little paper jellyfish worth keeping forever — perfect for any under-the-sea craft day.
Materials Needed
- Colored cardstock or construction paper
- Scissors
- Glue stick
- Jellyfish template
- Pencil
- Black marker
- Extra colored paper for decorating, if desired
Step-by-Step Instructions For Jellyfish Handprint Craft
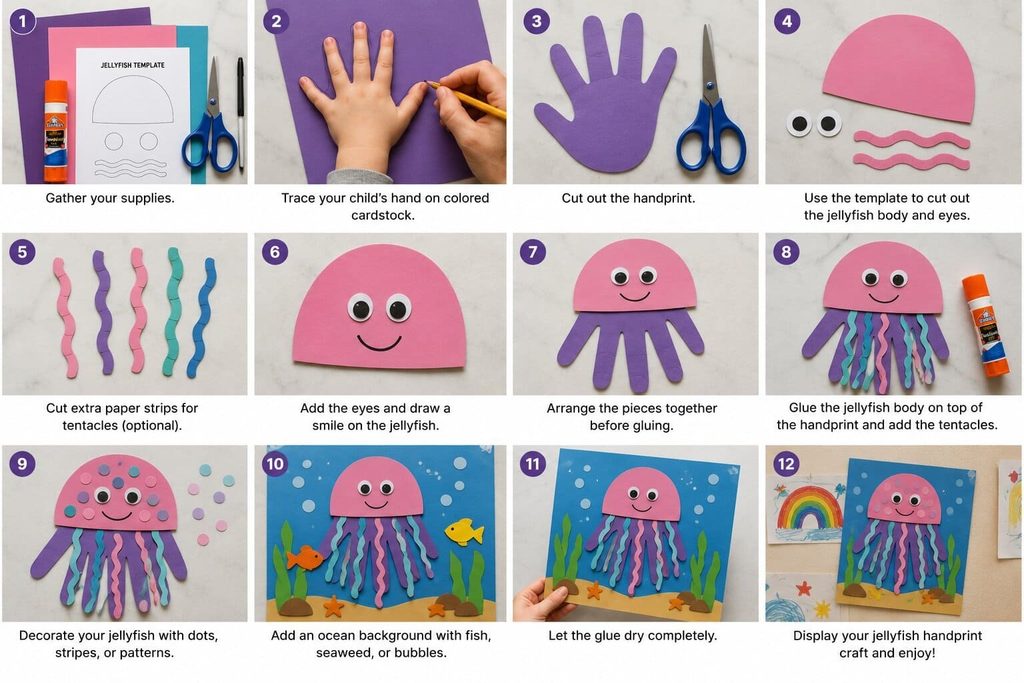
Step 1: Gather Your Supplies
Start by placing all your supplies on a clean, flat work surface. Choose the cardstock colors you want for your jellyfish.
Blue, purple, pink, and turquoise are great choices for an ocean theme. You can also let your child choose their favorite color.
If you are using a jellyfish template, print it before starting.
Parent tip: For young children, keep the scissors with you during the cutting steps. Your child can help choose colors, arrange the pieces, and apply glue.
Step 2: Trace Your Child’s Hand
Place a sheet of colored cardstock on the table.
Ask your child to place one hand flat on the paper. Spread the fingers slightly so there is a little space between them.
Hold the paper steady and use a pencil to trace around the entire hand.
Follow the fingers and thumb carefully. The handprint will become the lower part of the jellyfish, while the fingers will look like its tentacles.
Parent tip: Ask your child to keep their hand still while you trace. This will make the outline easier to cut.
Step 3: Cut Out the Handprint
Carefully cut around the pencil outline to remove the handprint.
Parents should do the cutting for younger children. Older children can use kid-safe scissors with adult supervision.
Do not worry if the edges are not perfectly smooth. Small uneven areas can make the craft look handmade.
Once the handprint is ready, set it aside while you prepare the rest of the jellyfish.
Step 4: Prepare the Jellyfish Body
Use the jellyfish template to make the top part of the jellyfish.
You can also draw a large half-circle or dome shape on colored cardstock and cut it out.
This piece will become the jellyfish’s bell, or rounded body.
Choose a color that looks good with the handprint. You can use the same color for a matching look or choose a contrasting color.
Step 5: Make the Jellyfish Tentacles
The fingers of the handprint will form the jellyfish’s tentacles.
Look at the cutout and check that all five fingers are visible. These long shapes will hang down from the jellyfish’s body.
If you want more tentacles, cut a few thin strips of colored paper. You can make them straight, wavy, or curly.
Let your child choose the colors and patterns for the tentacles.
Step 6: Add the Jellyfish Face
Now it is time to give your jellyfish a friendly face!
Place two googly eyes or small paper eyes on the jellyfish’s body.
If you do not have googly eyes, cut small circles from black or white paper. You can also draw the eyes with a black marker.
Add a small smile underneath the eyes if you want your jellyfish to look extra cheerful.
Let your child decide where to place the eyes and mouth.
Step 7: Arrange the Jellyfish Pieces
Before using any glue, place the pieces together.
Put the rounded jellyfish body near the top of the handprint. The fingers should extend downward from the bottom of the body.
If you made extra paper tentacles, arrange them between or beside the fingers.
Move the pieces around until your child likes the design.
Parent tip: This dry arrangement step makes it easier to fix the design before the glue goes on.
Step 8: Glue the Jellyfish Together
Once the pieces are arranged, start attaching them.
Apply glue to the back of the jellyfish body and place it over the top part of the handprint. Make sure the fingers extend below the body.
Press the pieces gently for a few seconds so they stick.
If you added extra tentacles, glue them underneath the jellyfish body as well.
Use a small amount of glue. Too much can make the paper damp or cause the pieces to slide.
Step 9: Add Colorful Details
Now your child can decorate the jellyfish.
Cut small circles, stars, dots, or strips from extra cardstock. Glue them onto the jellyfish body to create colorful patterns.
You can also add wavy lines to the tentacles or use a marker to draw simple designs.
For an ocean scene, cut out small fish, bubbles, seaweed, or shells and place them around the jellyfish.
Keep the decorations simple so the handprint remains the main feature.
Step 10: Add an Ocean Background
If you want to turn the craft into a larger scene, glue the jellyfish onto a sheet of blue cardstock.
Add green paper seaweed along the bottom. You can also make small paper bubbles and colorful fish.
This creates a fun underwater world around your handprint jellyfish.
Let your child choose where each ocean detail should go. There is no right or wrong way to design the scene.
Step 11: Let the Craft Dry
Place the finished craft on a flat surface.
Give the glue enough time to dry before moving the jellyfish. This will help keep all the pieces in place.
If you added several layers of paper, allow extra drying time.
While you wait, you can make another jellyfish using a different handprint and color combination.
Step 12: Display Your Jellyfish Handprint Craft
Once the craft is completely dry, it is ready to display!
Write your child’s name and the year on the back. This can turn the project into a special handprint keepsake.
Hang the jellyfish on the refrigerator, classroom wall, or bedroom door. You can also add several jellyfish to a large blue poster to create an underwater display.
Give It A Try
This jellyfish handprint craft is a fun and easy way to explore an ocean theme with your child. You only need a few basic supplies, and children can take part in many of the steps.
Let your child choose the colors, arrange the pieces, and decorate the jellyfish while you help with tracing and cutting.
Do not worry about making it perfect. Each handprint is different, which makes every jellyfish unique. Give it a try and turn a little handprint into a fun underwater creation!

Sohel Rana is the writer, editor, publisher, and founder of The Tidy Porch. He is the man who is responsible for the craft (my wife created) being converted into a written piece. He also helps her wife (Sumona) by capturing videos of each craft. In short, he brings each craft created by her wife in front of you by transforming it into an article and a video.
