
Turn your child’s little handprint into a fun and colorful ice cream cone! This ice cream handprint craft is a simple summer activity for kids and makes a sweet keepsake for parents.
With colored cardstock, scissors, glue, and markers, you can create this cute paper craft at home or in the classroom.
Parents can help with tracing and cutting while children enjoy choosing colors, gluing the pieces, and adding their own creative details.
Materials Needed
- Colored cardstock or construction paper – Choose colors for the ice cream scoop, cone, and decorations.
- Scissors – Use child-safe scissors, and let an adult handle cutting if needed.
- Glue – A glue stick or school glue works well.
- Markers – Use markers to draw the cone pattern and add small details.
- Ice cream template – Use a template as a guide for making the ice cream cone and other paper pieces.
- Pencil – Helpful for tracing your child’s hand and marking shapes before cutting.
Step-by-Step Instructions For Ice Cream Handprint Craft
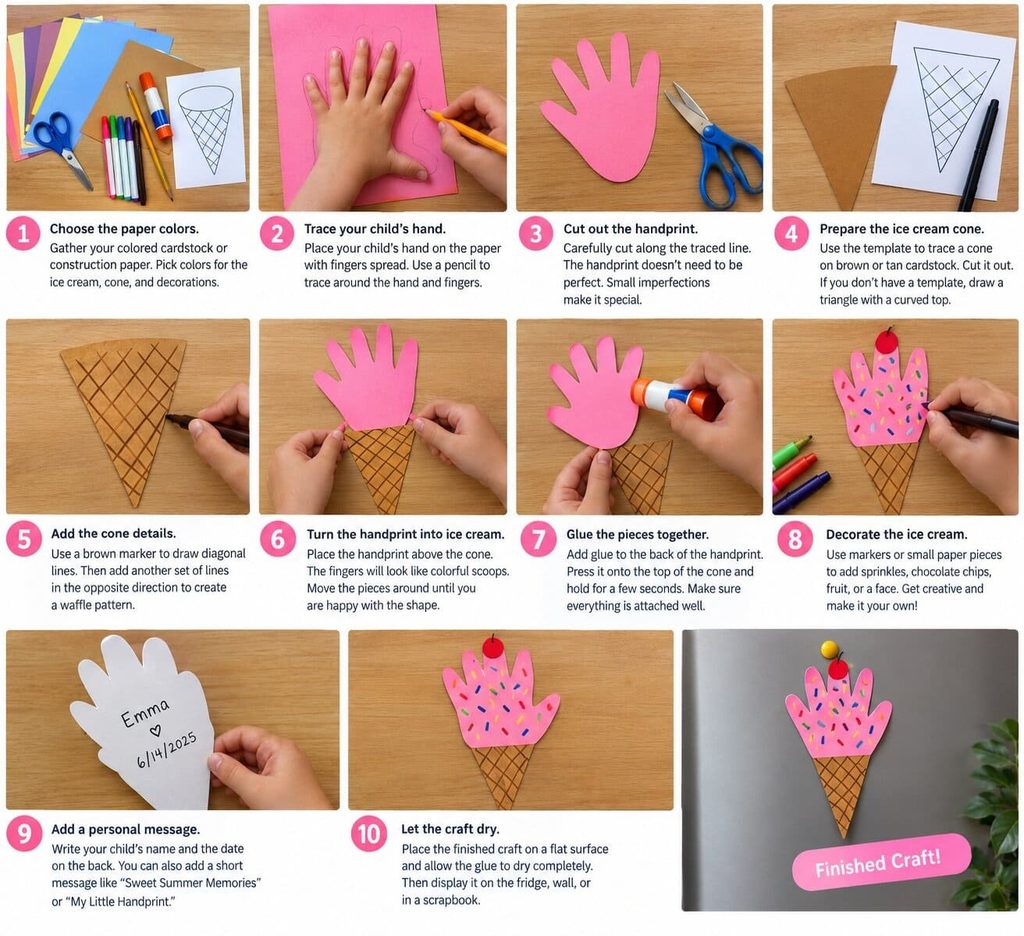
Step 1: Choose the Paper Colors
Start by gathering your colored cardstock or construction paper. Let your child choose the colors they want for the ice cream.
You can use pink, blue, purple, yellow, or any other favorite colors for the ice cream scoop. Choose brown or tan paper for the cone.
Parent tip: Give your child a few color choices and let them make the final decision. This makes the activity more fun and personal.
Step 2: Trace Your Child’s Hand
Place a piece of colored paper on a flat surface. Have your child place one hand on the paper with the fingers spread slightly apart.
Using a pencil, carefully trace around the hand and fingers.
Try to keep the pencil close to the hand so the finished handprint has a clear shape.
Parent tip: Your child can hold the paper still while you do the tracing. For younger children, an adult should handle this step.
Step 3: Cut Out the Handprint
Carefully cut around the traced handprint with scissors.
Take your time around the fingers and curves. The handprint does not need to be perfectly cut. Small imperfections can make the craft look more handmade and special.
Safety tip: Always supervise children when scissors are being used. Adults can do the cutting for toddlers and younger children.
Step 4: Prepare the Ice Cream Cone
Use your ice cream template as a guide to create the cone. Place the template over brown or tan cardstock and trace around it.
Cut out the cone shape.
If you do not have a template, you can make a simple cone by drawing a triangle with a slightly curved top edge.
Step 5: Add the Cone Details
Now it is time to make the cone look like a real ice cream cone.
Give your child a brown marker and help them draw diagonal lines across the cone. Add another set of diagonal lines going in the opposite direction.
The crossed lines will create a simple waffle-cone pattern.
Parent tip: The lines do not need to be perfectly straight. Let your child draw them in their own style.
Step 6: Turn the Handprint Into Ice Cream
Place the paper handprint above the cone. The fingers will look like colorful scoops of ice cream.
Arrange the handprint so the bottom part overlaps slightly with the top of the cone.
Move the pieces around until you are happy with the shape.
Parent tip: Before using glue, let your child try a few different positions. This helps them understand how the separate pieces come together to form the finished craft.
Step 7: Glue the Pieces Together
Once everything is in the right place, add glue to the back of the handprint.
Press it onto the top of the cone and gently hold it for a few seconds.
Make sure the pieces are attached securely.
If you are using several paper pieces for additional decorations, glue those into place one at a time.
Step 8: Decorate the Ice Cream
Now comes the most creative part!
Let your child decorate the ice cream handprint. They can use markers to add sprinkles, small dots, faces, or other fun details.
You can also cut tiny pieces of colored paper to use as toppings.
Try adding:
- Colorful sprinkles
- Chocolate chips
- Small candy shapes
- A cherry on top
- A smiley face
- Extra colorful paper decorations
Parent tip: There is no right or wrong way to decorate the ice cream. Let your child take the lead and create a design they like.
Step 9: Add a Personal Message
For a special keepsake, write your child’s name and the date on the back of the craft.
You could also add a short message such as “Sweet Summer Memories” or “My Little Handprint.”
This simple detail can make the handprint art more meaningful as your child grows.
Step 10: Let the Craft Dry
Place the finished ice cream craft on a flat surface and allow the glue to dry completely.
Once dry, display it on the refrigerator, bedroom wall, classroom board, or craft area.
You can also place it in a scrapbook or save it with other handprint keepsakes.
Give It A Try
This ice cream handprint craft is an easy way to turn a child’s little handprint into a cheerful summer decoration. Parents can handle the tracing, cutting, and tricky parts while children choose the colors, glue the pieces, and decorate their ice cream.
Most importantly, do not worry about making the craft perfect. Your child’s unique handprint and creative choices are what make this project special. Gather a few simple supplies, let your little one get creative, and enjoy making a sweet handprint keepsake together!

Sohel Rana is the writer, editor, publisher, and founder of The Tidy Porch. He is the man who is responsible for the craft (my wife created) being converted into a written piece. He also helps her wife (Sumona) by capturing videos of each craft. In short, he brings each craft created by her wife in front of you by transforming it into an article and a video.
