
My sister runs a home daycare, and every fall she does a week of farm animals. Last year, “Old MacDonald” played on repeat for five straight days.
By Wednesday, the kids had made cows, and by Thursday, it was pig day. Little pink handprints covered her craft table, each one with a curly tail and two triangle ears.
Some kids added mud splatters just for fun. It was loud, it was messy, and every single pig looked a little different. If you’re running a farm unit or just want a simple activity your kids will love, this pig handprint craft is an easy one to add to the week.
5 Supplies That Make This Craft Easier
- Crayola Washable Kids Paint (6-Pack) — Washable pink paint means less worry about stains on clothes and tables.
- Precut White Cardstock Sheets — Sturdy cardstock holds a full handprint better than regular paper, which wrinkles when wet.
- Chubby Kid-Safe Paint Brushes — Wide, easy-grip handles work well for small hands during setup.
- Wiggle Eyes Variety Pack — A couple of glued-on eyes bring the pig’s face together in seconds.
- Baby Wipes Travel Pack — Quick wipe-downs keep hands and tables clean between crafts.
What Is the Pig Handprint Craft?
This craft turns one palm print into a full pig, using the rounded part of the hand as the body and a few extra shapes for the details. It’s built for young kids, ages two to six, and it works just as well for one child at home as it does for a whole classroom during a farm-themed week.
The process is simple. You paint a hand pink. You press it onto paper. Then you add two triangle ears, a round snout, small dot nostrils, and a curly tail. That’s the entire craft. No cutting shapes ahead of time and no folding steps to slow things down.
Teachers like it because it fits perfectly into a farm unit or “Old MacDonald” lesson. Parents like it because it’s quick enough to squeeze into a single afternoon, even with a wiggly toddler.
Why This Craft Fits a Farm Unit So Well
This craft earns its spot in a farm-themed week because it pairs so easily with other animal crafts kids are already making. Pigs show up in almost every farm song and story, so the connection between the craft and the lesson is obvious right away. Kids can talk about how pigs like mud, what they eat, and where they live on a farm, which gives the activity a little more depth than a plain art project.
It also works across a wide age range. A two-year-old can manage a basic palm press with help from an adult. A five- or six-year-old can cut their own ear shapes, add their own mud splatters, and pick the details that make their pig look different from everyone else’s. That range makes it a good fit for mixed-age classrooms, sibling groups, or a homeschool farm week with kids of different ages working side by side.
Materials Needed
- Washable kids’ paint (pink)
- White or light-colored cardstock
- A paintbrush or sponge for applying paint
- Two small wiggle eyes (or a black marker for drawing eyes)
- Glue stick or craft glue
- Baby wipes or a damp cloth
- Black fine-tip marker for details
- Optional: pink or white pipe cleaner for a 3D curly tail
How to Make It
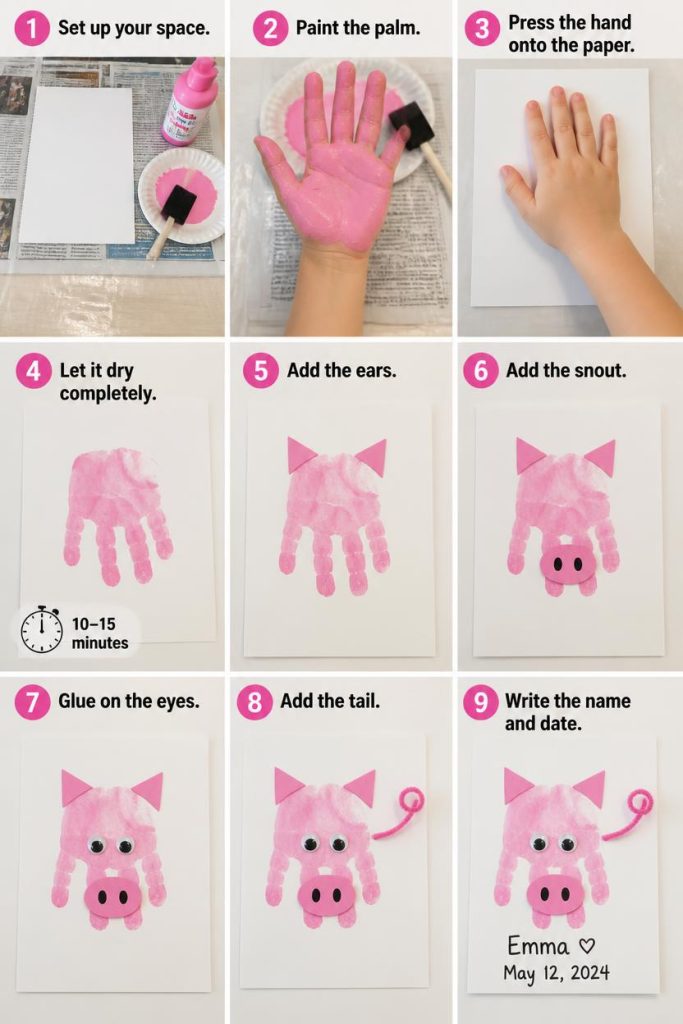
- Set up your space. Lay down a plastic cloth or newspaper before starting. Pink paint shows up fast on light-colored clothing.
- Paint the palm. Cover the palm and fingers with an even coat of pink paint. Keep the layer thin, since a thick coat smears more when it’s pressed down.
- Press the hand onto the paper. Place the palm firmly in the center of the cardstock, fingers curled in slightly. Press down, then lift straight up without dragging.
- Let it dry completely. Give the print about ten to fifteen minutes to dry before adding any extra details. Rushing this step causes smudging.
- Add the ears. Once dry, cut two small triangles from pink paper, or paint two triangle shapes near the top of the print for the ears.
- Add the snout. Paint or glue a small oval near the bottom center of the print, then use a marker to add two dot nostrils inside it.
- Glue on the eyes. Attach two wiggle eyes above the snout, spaced evenly apart.
- Add the tail. Draw a small curly line on the back of the print, or glue on a short curled pipe cleaner for a tail that sticks up off the page.
- Write the name and date. Add the child’s name and the date somewhere on the page. This small step turns the craft into something worth keeping.
Tips for a Clean Handprint
- Use a thin, even coat of paint. A heavy layer pools in the creases of the palm and blurs the round body shape.
- Press without sliding the hand. Any side-to-side movement while pressing smears the edges and makes the shape harder to recognize.
- Keep a damp cloth within reach. Pink paint tends to end up on faces and tables fast, so a quick wipe saves extra cleanup later.
- Work on a flat, hard surface. A soft placemat or wobbly table can shift under the paper mid-press, throwing off the shape.
Make It a Classroom Activity
This craft works well with a small group, especially as part of a farm-themed week, with a little bit of planning.
Set up two or three paint stations. Splitting the class into smaller groups keeps the line short and avoids a long wait for paint.
Assign one adult per station. A helper applying paint and guiding the press keeps the print clean, especially for younger toddlers who need extra support.
Plan for drying space. Lay finished prints flat on a table or drying rack, and avoid stacking them until the paint is fully set.
Label ahead of time. Write each child’s name on their paper before painting starts, so nothing gets mixed up once several pigs are drying at once.
Tie it to the lesson. Use the activity as a chance to talk about what pigs eat, where they live on a farm, and the sounds they make, so the craft supports the actual unit instead of standing alone.
Complete the Farm Set
Once you’ve made a pig, it’s an easy next step to build out a full farm set with a few more handprint animals.
Pair it with a cow. A cow handprint craft uses the same basic technique, just swapped out with black and white spots instead of pink and a snout. Making both crafts back to back gives kids two farm animals in one afternoon.
Add a horse or sheep. If you want to keep building the set, a horse or sheep handprint craft uses the same palm-print base with different ear shapes, colors, and details.
Display them together. Line up the finished animals on a bulletin board or a shared piece of poster board to create a mini farm scene. Kids love seeing their own handprints turned into a whole barnyard.
Turn it into a take-home set. For a classroom, sending each child home with all their farm animals together, rather than one at a time, makes the whole project feel more complete. It also gives parents a single set of matching crafts to display, rather than a handful of loose papers collected over separate weeks.
Frequently Asked Questions
What kind of paint should I use for handprint crafts? Washable kids’ paint works best. It comes off skin and most fabrics easily, and it’s made to be safe for young children to use directly on their hands.
How do I keep the handprint from smudging? Press the hand down firmly without sliding it, then lift straight up in one motion. Let the print dry fully before adding the ears, snout, or tail on top.
How far in advance can I prep this activity? Cardstock, cut-out ears, and name labels can be prepped a day ahead. Paint should be set out right before the activity, since it can dry out or thicken if it sits too long.
How do I adapt this for a very young toddler’s hand? For toddlers under two, expect a smaller, less defined print. Guide the hand gently through the press, and keep the added details simple, since a smaller print leaves less room for extra decoration.
How do I store or display the finished craft? Once the paint is fully dry, store the piece flat in a folder, or frame it for display. Avoid folding a flat print later, since that can crack the dried paint. A labeled folder works well if you’re saving a whole set of farm animal crafts together.
Can I do this craft with just one child at home? Yes. It works just as well one-on-one as it does with a full classroom. You’ll move through the steps a little faster, and you can spend extra time adding a 3D tail or decorating the background with a barnyard scene.
Can I turn this into a full barnyard scene? Yes. Once the pig is finished, you can add handprint chickens, sheep, or a barn drawn in the background to build a full farmyard scene on one page. It’s a nice way to stretch a single craft into a longer afternoon project during a farm unit or a rainy day at home.
This pig handprint craft is a small project that fits perfectly into a bigger farm theme. It’s quick enough for a single afternoon, and it pairs naturally with a matching cow craft if you want to build out a full set. Whether you’re running a classroom farm week or spending a quiet afternoon at home, this is a craft that turns one messy handprint into something worth keeping.

Sohel Rana is the writer, editor, publisher, and founder of The Tidy Porch. He is the man who is responsible for the craft (my wife created) being converted into a written piece. He also helps her wife (Sumona) by capturing videos of each craft. In short, he brings each craft created by her wife in front of you by transforming it into an article and a video.
