
Last January, I sat at my kitchen table with white paint drying under my nails and my daughter’s handprint smudged across the paper twice already.
Snow was piling up outside the window. School was closed. I needed something to fill the afternoon that didn’t involve a screen. I grabbed white paint, blue paper, and a cotton ball, and twenty minutes later, we had a polar bear staring back at us.
It wasn’t perfect. It didn’t need to be. My daughter beamed at her own handprint and turned into an animal, and that was the whole point.
Here’s how you can make one too, plus five supplies that make it easier.
5 Supplies That Make This Craft Easier
- Washable White Tempera Paint — This paint goes on smooth, dries fast, and washes off little hands without a fight.
- Bright Blue Construction Paper Pack — A deep blue background makes the white handprint pop and feels like a snowy sky.
- Wiggle Eyes Variety Pack — These stick on with a dab of glue and instantly give your polar bear personality.
- Black Fine-Tip Markers — You’ll use these to add the nose, mouth, and claws with clean, steady lines.
- Cotton Balls, Jumbo Bag — One cotton ball becomes a soft, textured polar bear nose or a snowy border around the paper.
What You Need to Gather Before You Start
You only need a handful of items, and most of them are already in your craft bin.
Grab white washable paint, a paintbrush or foam brush, and a sheet of blue construction paper. Add a paper towel or wet wipe for quick cleanup. You’ll also want black markers or a fine paintbrush for facial details. If you want texture, keep one cotton ball nearby for the nose, and a pair of wiggle eyes if your child likes an extra silly touch.
None of this needs to be fancy. A dollar-store paint set works just as well as a name-brand one. What matters more is setting up your space first. Lay down newspaper or a plastic mat, because handprint crafts are messier than they look on Pinterest.
If you’re doing this with more than one child, set out a separate paper plate of paint for each hand. Sharing one plate slows things down and leads to thicker, uneven paint on the brush by the third or fourth print. A quick supply check before you start saves you from mid-craft scrambling with a paint-covered hand in the air.
How to Make a Polar Bear Handprint Craft, Step by Step
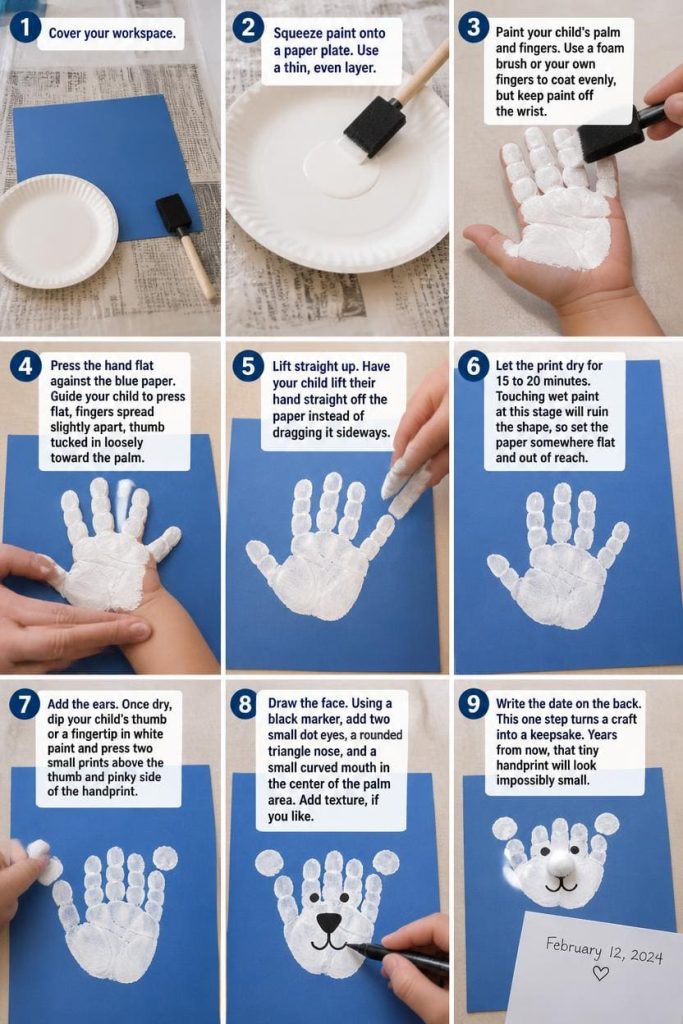
You can finish this craft in under thirty minutes, start to finish, including drying time.
- Cover your workspace. Lay newspaper or a plastic tablecloth over your table. Paint gets on more than the paper, so protect your surface first.
- Squeeze paint onto a paper plate. Use a thin, even layer. A puddle of paint that’s too thick will smear when your child presses down.
- Paint your child’s palm and fingers. Use a foam brush or your own fingers to coat their palm and fingers evenly, but keep the paint off their wrist.
- Press the hand flat against the blue paper. Guide your child to press their hand flat, fingers spread slightly apart, thumb tucked in loosely toward the palm. This shape becomes the bear’s head and ears.
- Lift straight up. Have your child lift their hand straight off the paper instead of dragging it sideways. Dragging smears the print and blurs the shape.
- Let the print dry for 15 to 20 minutes. Touching wet paint at this stage will ruin the shape, so set the paper somewhere flat and out of reach.
- Add the ears. Once dry, dip your child’s thumb or a fingertip in white paint and press two small prints above the thumb and pinky side of the handprint. These become the bear’s rounded ears.
- Draw the face. Using a black marker, add two small dot eyes, a rounded triangle nose, and a small curved mouth in the center of the palm area.
- Add texture, if you like. Glue a small cotton ball over the drawn nose for a soft, 3D touch, or add wiggle eyes in place of drawn dots.
- Write the date on the back. This one step turns a craft into a keepsake. Years from now, that tiny handprint will look impossibly small.
How to Turn This Into a Winter Classroom Activity
This craft works well for a classroom Arctic or winter animal unit, and it holds up in a group setting.
Set up a paint station with one adult managing the paint and prints, while another handles cleanup and drying. Have each child’s print labeled with their name in pencil before they even start, since wet paper is easy to mix up. Pair this activity with a penguin or seal handprint craft to build out a full Arctic animal bulletin board. Kids respond well to seeing their work grouped together, and a wall of polar bears, penguins, and seals makes a striking classroom display heading into January.
If you’re short on time, pre-cut the blue paper into uniform sizes ahead of time. This keeps the activity moving and avoids a mid-craft scramble for scissors.
You can also turn this into a quick science tie-in. While prints dry, talk about how polar bears actually have black skin under white fur, and how that fur helps them blend into snow and ice. Kids remember a fact more easily when it’s attached to something they just made with their own hands.
How to Turn This Into a Keepsake Gift
A single handprint on blue paper becomes a lasting gift with a few small touches.
Frame the finished print in a simple white or wood frame for nursery wall art. The contrast of white paint on blue paper looks intentional, not like a craft project taped to the fridge. You can also fold the print into a holiday card by writing a short winter message underneath the bear, perfect for grandparents who love anything with a small handprint attached.
For a baby’s first winter, add the child’s age and the date directly on the front in small lettering. This turns a simple activity into something a parent will keep for years, tucked into a memory box or hung above a crib.
Tips and Troubleshooting for Smooth Handprints
A few small adjustments fix most of the common problems with this craft.
If the print comes out smudged, your paint layer was likely too thick. Thin it slightly next time, or wipe excess paint off the brush before applying it to the hand. If the paint feels sticky or won’t dry, you’re probably using too much at once, so apply a lighter, even coat.
Keeping a toddler still is often the hardest part. Have them sit in a chair with both feet on the floor, and hold their wrist gently while you guide the press instead of asking them to do it alone. If your child pulls away mid-print, don’t try to fix it. A slightly imperfect print still reads as a polar bear, and it usually looks more charming than a technically perfect one.
Keep wipes within reach the entire time. Paint on hands travels fast, and a quick wipe between prints saves your walls, your clothes, and your patience.
One more tip: work on one print at a time, especially with younger toddlers. Trying to rush through multiple prints in a row raises the odds of a smear, a spill, or a paint handprint somewhere you didn’t plan for, like the wall behind your table.
Frequently Asked Questions
What age is this craft best for? This works well for ages 2 through 7. Younger toddlers may need more hand-over-hand guidance, while older kids can paint their own hand and place the print themselves.
Can I use paint other than white? Yes, but white keeps the classic polar bear look. If you want a different animal, black paint on the same blue paper makes a simple seal shape instead.
How long does the paint need to dry before adding details? Give it 15 to 20 minutes before drawing the face or ears. Touching the print too soon will smear the white paint.
Is this craft safe for children with sensitive skin? Washable, non-toxic paint is safe for most children, but check the label first if your child has known sensitivities, and consider a small patch test.
Can I do this craft without paint? Yes. Trace your child’s hand on white cardstock instead, then cut it out and glue it onto blue paper for a no-mess version.
How do I store the finished craft so it lasts? Once fully dry, slide the print into a page protector or laminate it. This keeps the paint from cracking or fading over time.

Sohel Rana is the writer, editor, publisher, and founder of The Tidy Porch. He is the man who is responsible for the craft (my wife created) being converted into a written piece. He also helps her wife (Sumona) by capturing videos of each craft. In short, he brings each craft created by her wife in front of you by transforming it into an article and a video.
