
Last December, I sat at my kitchen table with gold paint on my fingers and Christmas music playing low in the background.
My son held up his hand, paint still wet, and asked if he was really about to become an angel.
I laughed and told him yes, sort of. We pressed his palm onto white cardstock, added tiny paper wings, and by the time the tree lights came on that night, we had a little angel ornament drying on the counter.
It’s still one of my favorite ornaments we own. Here’s how you can make one too, plus five supplies that make it easier.
5 Supplies That Make This Craft Easier
- Gold Metallic Cardstock Pack — This paper gives your angel’s halo and wings a soft shine without any extra paint.
- White Washable Craft Paint — This paint glides on smoothly and gives you a clean, solid handprint every time.
- Craft Wire for Halos — A short length of this bends easily into a perfect little halo shape above the print.
- Fine-Tip Gold Paint Pen — You’ll use this to add delicate details like a face outline or a tiny star.
- Mini Ornament Hooks — These slide right onto the finished craft so it hangs on your tree in seconds.
What You Need to Gather Before You Start
You don’t need much to make this craft come together, and most of it can double for other holiday projects too.
Start with white or gold cardstock as your base. Grab white washable paint and a paintbrush or foam brush, plus a paper plate to hold it. You’ll want a small piece of gold or white paper for the wings, and either a paper strip or a short piece of craft wire for the halo. Keep a black or gold fine-tip marker nearby for the face, plus glue and a hole punch or ornament hook for hanging.
Set up your space before you begin. Lay down newspaper, since paint tends to travel further than you’d expect. Cutting the wings and halo ahead of time also saves you from stopping mid-project with paint still on your child’s hand.
If you’re making more than one ornament in a sitting, cut all your wing and halo shapes first, before any paint comes out. This way, once a handprint is drying, you’re not scrambling to find scissors with sticky fingers. A little prep here goes a long way toward keeping the whole afternoon calm instead of rushed.
How to Make an Angel Handprint Craft, Step by Step
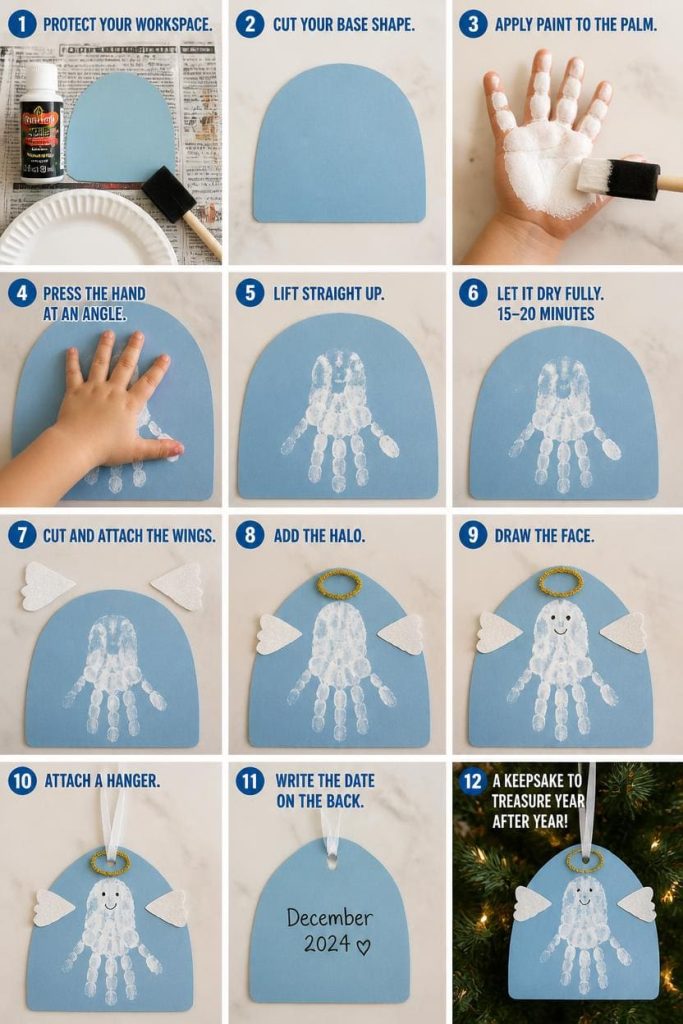
This craft comes together in about thirty minutes, including drying time.
- Protect your workspace. Cover your table with newspaper or a plastic mat before you open the paint.
- Cut your base shape. Trim your cardstock into a circle or simple dome shape, roughly the size of your child’s spread hand plus a little extra room around it.
- Apply paint to the palm. Coat your child’s palm and fingers evenly with white paint using a foam brush, keeping the wrist paint-free.
- Press the hand at an angle. Guide your child to press their palm near the bottom center of the cardstock, fingers pointed slightly outward. This becomes the angel’s body and dress.
- Lift straight up. Have your child lift their hand straight off the paper rather than sliding it, which keeps the print crisp and clean.
- Let it dry fully. Set the print aside for 15 to 20 minutes. Rushing this step is the most common reason prints smear.
- Cut and attach the wings. Cut two small wing shapes from white or gold paper and glue them just behind the top of the handprint, angled slightly upward like they’re mid-flutter.
- Add the halo. Bend a short piece of craft wire into a small circle, or cut a thin paper strip into a ring, and glue it just above where the head will be.
- Draw the face. Using a fine-tip marker, add two small dots for eyes and a soft curved line for a smile, centered near the top of the palm print.
- Attach a hanger. Punch a small hole at the top and thread ribbon or string through it, or glue on a mini ornament hook once everything is fully dry.
- Write the date on the back. This one line turns a simple craft into something you’ll pull out year after year.
How to Turn This Into a Christmas Ornament or Holiday Gift
This craft was practically made to hang on a tree, and a few small touches make it gift-ready too.
Write your child’s name and the year directly on the front or back before you seal it up. Grandparents especially love receiving one of these in the mail, since it captures a hand size they’ll only see for a few months longer. If you’re making several as gifts, set up an assembly line: paint all the hands first, let everything dry together, then add wings, halos, and faces in one batch. This saves time and keeps the paint mess contained to one sitting.
You can also slip a finished ornament into a small gift box with a short note explaining the year it was made. It turns a five-dollar craft into something that feels handmade and personal, which usually means more than anything store-bought.
Making This as a Memorial or Remembrance Keepsake
If you’re making this to remember someone you’ve lost, I’m glad you found this page, and I want to walk you through it gently.
Some families make this craft using a footprint or handprint taken shortly after a baby’s passing, kept by hospital staff, or from an older keepsake print already on hand. Others use it to honor a grandparent, a parent, or even a beloved pet, using a print or paw print saved from years earlier. There’s no wrong way to do this, and no timeline you need to follow.
Keep the process simple. Use the same white or gold cardstock, and consider a soft cream or pale blue background instead of bright colors if that feels more fitting. Skip anything that feels too festive if this isn’t tied to a holiday for you.
Some people write a name, a date, or a short phrase on the back instead of decorating the front further. Let it be as plain or as detailed as feels right to you. This craft doesn’t need to be elaborate to hold meaning. Sometimes the simplest version is the one you’ll keep closest.
Tips and Troubleshooting for a Clean, Sturdy Craft
A few adjustments prevent most of the common issues with this project.
If your print smears, your paint layer was likely too thick. Use a thin, even coat next time, and wipe excess paint off the brush before applying it. If the wings won’t sit flat, add a small dot of glue at the very tip as well as the base, since a single glue point often lets the paper curl upward as it dries.
For a hanger that holds up over years of use, skip tape and use a proper hole punch with ribbon threaded through and tied in a knot. Tape tends to give out after a season or two, especially once the ornament box gets stacked away each January. Let every layer dry completely before moving on to the next step, since wet paint under fresh glue tends to bleed and smudge details.
If you notice the cardstock warping slightly as it dries, press it flat under a heavy book overnight once everything is fully set. This flattens out any curling without disturbing the paint, wings, or halo, and it makes the finished piece sit better in a frame or on a tree branch.
Frequently Asked Questions
What age is this craft best for? This works well for babies and toddlers through about age 7. For infants, gently press their hand for them rather than asking them to press on their own.
Can I use paint other than white? Yes. Gold or silver paint gives the craft a shinier, more formal look, especially nice for a holiday mantel display.
How long does the paint need to dry before adding wings and a halo? Give it 15 to 20 minutes before attaching anything else. Adding pieces too soon can smear the print or loosen the glue.
Can I make this without paint? Yes. Trace your child’s hand on paper instead, then cut it out and glue it onto your base for a no-mess version.
Is this a good baptism or christening gift? Yes. Many families make this craft to mark a baptism, adding the child’s name and the date of the ceremony on the back.
How do I make this keepsake last for years? Once fully dry, slide it into a page protector or a small frame. This keeps the paint from cracking and protects it from bent corners in storage.

Sohel Rana is the writer, editor, publisher, and founder of The Tidy Porch. He is the man who is responsible for the craft (my wife created) being converted into a written piece. He also helps her wife (Sumona) by capturing videos of each craft. In short, he brings each craft created by her wife in front of you by transforming it into an article and a video.
