
Last winter, my daughter walked in from the cold with red cheeks and a big idea. “Can we make a gnome?” she asked. I grabbed white paint and a sheet of paper.
She pressed her hand down, and the paint squished between her fingers. When I lifted the paper, she shrieked with laughter. “He has a beard!” Those little fingers made the cutest long beard.
A red paper hat, a pom-pom nose, and we were done. The whole thing took one lazy afternoon. This gnome handprint craft is easy, cheap, and perfect for keeping. You will make one in about 20 minutes.
What You Need for This Gnome Handprint Craft
You need paper, washable paint, and a few craft scraps. You probably own most of it already.
- White cardstock or heavy paper, 8.5 x 11 inches (any thick printer paper works too)
- Washable, non-toxic white paint (mix one drop of black into white for gray)
- A paper plate for the paint
- A soft brush or sponge brush
- Colored paper or felt for the hat (no felt? Cut up an old card)
- A small pom-pom, about one inch wide (no pom-pom? Use a paper circle or a dab of pink paint)
- Child-safe scissors, a glue stick, and white school glue
- Wet wipes and a damp towel
- A marker for the name and date
This craft suits ages 1 to 6. Toddlers need a grown-up to guide them. Plan on 20 minutes of work, plus drying time. The mess level is low to medium.
How to Make a Gnome Handprint Craft Step by Step
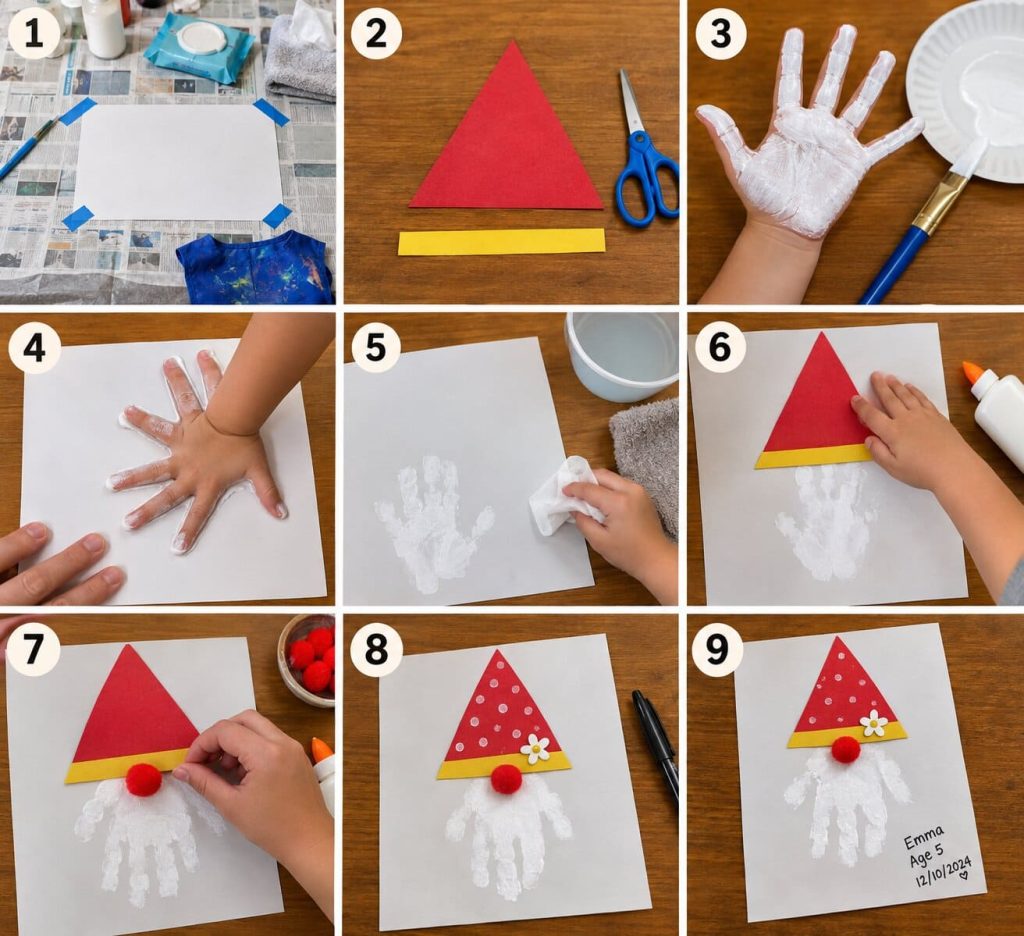
This gnome handprint craft takes nine simple steps. Read them once before you start so nothing surprises you.
Step 1: Set Up and Protect Your Space
Cover your table and dress your child for mess before you open the paint. Spread newspaper or a plastic tablecloth over the table. Put your child in an apron or an old shirt, and push the sleeves up high. Tape the paper’s corners down so it cannot slide. Keep wet wipes and a damp towel within reach.
Step 2: Cut Out the Hat
Cut the hat first, because scissors and wet paint do not mix. Cut a triangle from colored paper, about 4 inches wide and 4 inches tall. Then cut a thin strip, about half an inch wide, for a hat band. Set both pieces aside, away from little hands.
Step 3: Paint the Hand
Brush a thin, even layer of white paint over the palm, fingers, and thumb. Thin paint gives a clean print. Thick paint pools and smears. Ask your child to spread the fingers wide so paint reaches the gaps. Check the sides of the thumb, since that spot is easy to miss.
Step 4: Press and Lift the Handprint
Press the hand flat on the paper with the fingers pointing down. Place the wrist about 3 inches from the top edge. Steady the paper with your free hand.
Have your child press hard for a slow count of three. Tap each fingertip with your own finger so it prints. Then lift the hand straight up. Dragging causes smears.
Step 5: Clean Up Little Hands Right Away
Wipe your child’s hand as soon as the print is done. Wet paint travels fast to faces, sleeves, and chairs. Use a wet wipe first. Then wash with soap and warm water. Slide the paper to a flat, safe spot.
Step 6: Glue the Hat in Place
Wait until the print feels dry to the touch, about 10 to 15 minutes. Then spread glue on the back of the hat. Press it over the top of the palm so it covers the wrist. Let the hat overlap about an inch of the palm. The beard should hang below it.
Step 7: Add the Nose
Put the pom-pom right where the hat meets the beard. Use a dot of white school glue, because glue sticks cannot hold a pom-pom. Press for ten seconds and count out loud together. A good gnome nose peeks out under the hat’s edge.
Step 8: Add the Final Details
Small details give your gnome his personality. Glue the thin strip across the bottom of the hat as a band. Add a tiny paper flower, a star, or a few polka dots. Use a marker to write your child’s name, age, and the date near the bottom. You will love having that date years from now.
Step 9: Let It Dry Flat
Leave your gnome flat for at least 30 minutes. Washable paint dries fast, but glue needs more time. Keep it away from pets and curious siblings. Thick spots take longer, so wait until nothing feels cool or damp.
Tips for Getting a Clean Handprint With Toddlers and Little Kids
The best trick is a practice run on scrap paper. It shows your child what pressing feels like, and the real print goes much smoother.
Open the wet wipes before you start, not after the paint is on. Ask a helper to hold the paper while you guide the hand. If your child wiggles, hold the wrist gently and press down together. Then lift on a count of three.
Smudges happen, and they are not a disaster. Let the print dry, then dab white paint over the mistake. Or call it extra-fluffy beard. Toddlers often like to make two or three prints. Keep your favorite and save the rest for a card.
Fun Gnome Handprint Variations for Every Season
Change the hat and keep the same beard, and you get a new gnome for every season. For Christmas, use a red hat with a strip of white paper trim. For spring or St. Patrick’s Day, pick a green hat and glue on a paper clover.
For fall, choose an orange or brown hat with a small paper leaf or acorn. A gray print makes a wise old gnome, which kids find funny.
How to Turn Your Gnome Handprint Into a Keepsake or Gift
A framed gnome with your child’s name and age makes a gift grandparents will treasure. Trim the paper so it fits an 8 x 10 frame, and keep the gnome centered. You can also glue the print to the front of a folded card.
To protect it, keep the frame out of direct sunlight, which fades paint over time. Always write the date on the back, too. A few years from now, you will be glad you did.
Doing This Gnome Handprint Craft With a Group or Classroom
You can finish a whole class in one session by setting up stations. Cut all the hats ahead of time. Write each child’s name in pencil on the back of their paper before any paint comes out. Put one adult at the paint station and one at the glue station.
Each child needs about five minutes at the paint table. Lay the wet prints flat on a table, a baking sheet, or a clean floor. Do not hang them on a line, because the paint will drip.
Gnome Handprint Craft FAQs
What is the best paint for toddlers?
Washable, non-toxic tempera or finger paint works best. It wipes off skin easily and washes out of most clothes. Check the label for a non-toxic seal.
What age can do this craft?
Most children from 1 to 6 years old can join in. A one-year-old needs full help with pressing. Older kids can cut and glue the hat on their own.
Can I make it without paint?
Yes. Trace your child’s hand on white paper and cut it out. Flip it so the fingers point down, then glue it on a new sheet. This is a great choice for babies who dislike messy hands.
How do I keep the print from smudging?
Use a thin layer of paint and lift the hand straight up. Then leave the paper alone until it is dry. Touching it early is the most common cause of smears.
How long does it take to dry?
Thin washable paint dries in 15 to 20 minutes. Give the glue about 30 minutes before you frame or move your gnome.
Time to Make Your Gnome
Grab some paint and paper, and try this today. Your little gnome will be ready before snack time. Keep it, frame it, or send it to someone who loves your child. I would love to hear how yours turns out.

Sohel Rana is the writer, editor, publisher, and founder of The Tidy Porch. He is the man who is responsible for the craft (my wife created) being converted into a written piece. He also helps her wife (Sumona) by capturing videos of each craft. In short, he brings each craft created by her wife in front of you by transforming it into an article and a video.
