
My nephew Rayan, age 4, and I had just read “Mouse Paint” on a Saturday morning. He wanted to make a mouse. I painted his hand grey, and he pressed it on a plain sheet.
The print looked like a grey smudge. He frowned and asked, “Where does he live?” That question gave me an idea. I cut a little arched door in a second sheet and glued it over the first.
Rayan opened and closed it again and again. He made the mouse say “peekaboo” every time. This mouse handprint craft gives you a mouse that hides, peeks, and plays. Here is how you make it.
What You Need for a Mouse Handprint Craft
You need two sheets of cardstock, washable paint, and a few markers. Most of it is probably in your craft drawer already.
- Two sheets of white cardstock
- Kids’ washable, non-toxic paint in white and black
- A paper plate for mixing
- A sponge brush
- A glue stick
- A black marker
- A pink marker or crayon
- Small scissors (for the adult)
- Wet wipes
- A plastic tablecloth and an old shirt
I use cardstock because thin paper curls under wet paint, and the door ends up floppy. Cardstock holds its shape. Mix the grey by adding a tiny dot of black to a spoonful of white. A little black goes a long way. The adult does all the cutting. Stay close while your child paints, since little ones sometimes taste things.
How to Make the Mouse Hole Door Before You Start
Cut an arched door in the front sheet, and leave the left edge attached so it works as a hinge. This step is for the adult.
Draw an arch about 5 inches wide and 6 inches tall. Place it near the middle of the sheet, with the bottom about one inch above the edge. Cut along the curved top, the right side, and the bottom. Leave the left side uncut. Fold along that edge and crease it. The door now swings like a real one.
Next, lay the front sheet over the back sheet. Trace the opening in pencil on the back sheet. That outline shows you where to put the mouse. Print the mouse before you glue anything. Wet paint under glued paper makes a mess, and you want a dry, clear mouse.
How to Make a Peek-a-Boo Mouse Handprint Craft Step by Step
This mouse handprint craft takes ten steps and about 30 minutes, plus drying time. Your child makes one print, and the door does the rest.
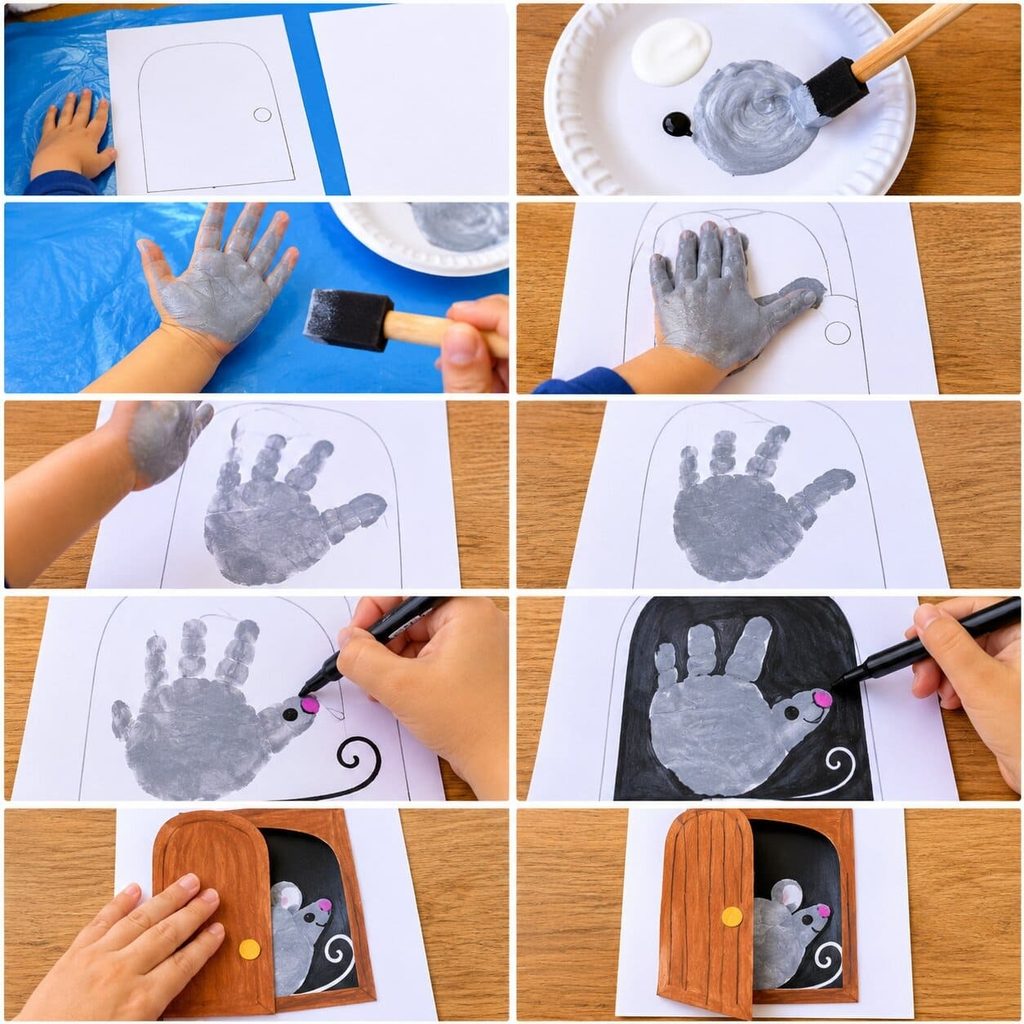
- Set up your table. Cover it with the plastic cloth and put the old shirt on your child. Place the back sheet with the pencil outline in front of them. Keep the front sheet aside, away from wet paint.
- Mix the grey. Squeeze white paint on the plate. Stir in a tiny dot of black until it looks like a soft mouse grey.
- Paint the hand. Dab a thin layer on your child’s left palm, fingers, and thumb with the sponge brush. Thin paint prints cleaner than thick paint.
- Position the hand. Ask your child to press the fingers together and stick the thumb out. Turn the paper so the fingers point left. The left hand puts the thumb on top, like a little ear.
- Press and lift. Press the whole hand inside the pencil outline. Count to three together. Lift straight up so the paint does not drag. Wipe the hand with a wet wipe right away.
- Let it dry. Wait about 20 minutes. Wash the sponge brush while you wait.
- Add the details. Draw a curly tail from the wrist end of the print with the black marker. Add one eye near the fingertips. Dot a pink nose at the very tip.
- Make the dark hole. Color the space around the mouse, inside the pencil line, with the black marker. Keep the mouse grey.
- Glue on the front sheet. Run the glue stick along the edges of the back sheet, about half an inch wide. Keep glue away from the door. Line up the corners and press flat for 30 seconds.
- Decorate and test. Color the door brown and draw a small knob on the right side. Open the flap and watch the mouse peek out.
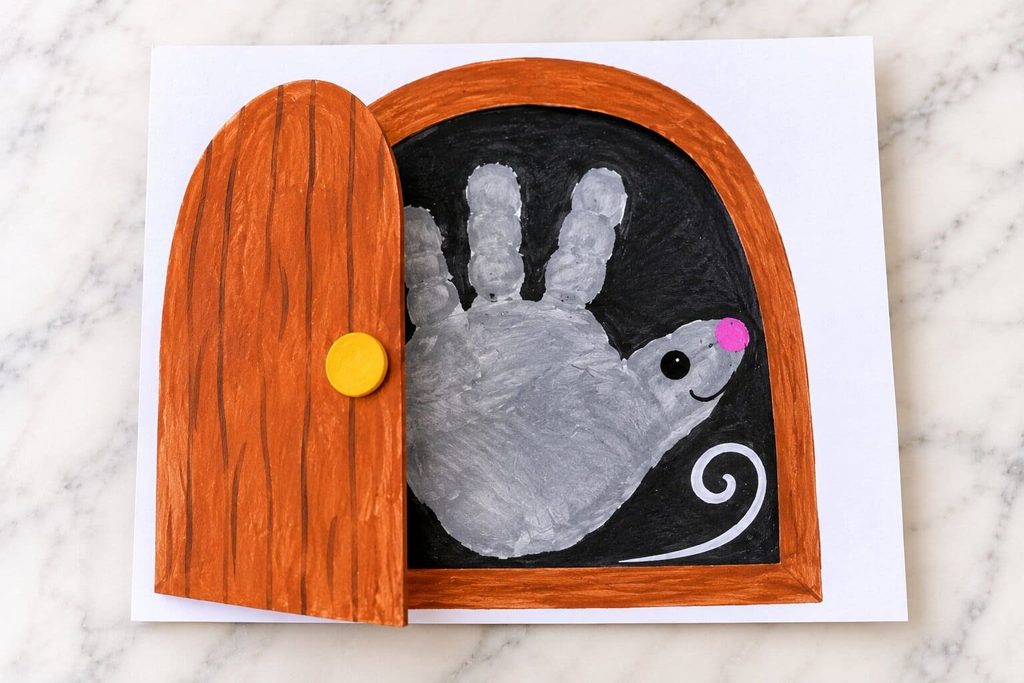
If the print smudges, let it dry first. Then trace the edge with the black marker. The outline hides small smudges. You can also print again on a spare sheet.
Storytime and Game Ideas for Your Mouse Hole
Use the mouse hole as a prop as soon as it dries. That keeps the fun going long after the paint is gone.
- Read first, then make. Try “Mouse Paint” by Ellen Stoll Walsh or “If You Give a Mouse a Cookie” by Laura Numeroff. Ask your child to open the door each time the mouse shows up.
- Act out “Hickory Dickory Dock.” Open the door when the mouse runs up the clock. Close it when the mouse runs down.
- Play a counting game. Make three or four mice on separate cards. Hide them and let kids count how many peek out.
- Play peekaboo. Have your child say “peekaboo” before each reveal, just like Rayan did.
A flat print gets one look. A door gives your child something to do with it.
How to Get a Cleaner Mouse Print
Use thin paint and press the whole hand down at once. That gives the clearest mouse shape.
Practice on a scrap sheet first. Keep the fingers pressed together before the hand touches the paper. Press flat without wiggling. Lift straight up, and wipe the hand right away so paint does not smear on the sheet.
If your child squirms, rest your hand lightly on top of theirs for the three-second count. My first print was a plain smudge, so I know how fast it happens.
Easy Ways to Decorate Your Mouse Hole
Simple add-ons make the mouse hole feel like a tiny home. Pick one or two, not all of them.
Paint or color the door brown. Draw a small doorknob with a marker. Glue a thin strip of brown paper along the bottom for a baseboard. Cut a cheese wedge from yellow paper and glue it beside the door. Draw stars or hearts around the hole. A glue stick works best for all of these. It dries fast and does not wrinkle the cardstock.
Ways to Keep and Display Your Mouse Hole
Write your child’s name and the date on the back before you display it. Those few words turn a craft into a keepsake.
Tape the top edge to a wall or fridge with painter’s tape. The door will still swing freely. To store it, slide a sheet of plain paper behind the flap and lay the craft flat in a folder. That keeps the door from bending. You can also save one each year and compare how the handprints grow.
FAQs
Is a mouse handprint craft safe for kids?
Yes, with the right supplies and close supervision. Use paint labeled non-toxic and washable. The adult should do all the cutting.
What if my child will not hold still for the print?
Keep the press short. Count to three and lift. Try a practice print on scrap paper first, then do the real one.
How do I make it with a group?
Pre-cut the doors and trace the outlines before kids arrive. Set up one paint plate for every three or four children. Add a gluing station for the adult.
Can I use a different paper?
Construction paper works if it is thick. Thin printer paper curls and makes the door floppy. Cardstock is the best choice.
How do I make it for a younger child?
Do the cutting and gluing yourself. Let your child make the print, then draw the eye with a marker. Skip googly eyes for kids under 3.
You now have a mouse handprint craft that comes with its own little home. Save this pin for your next storytime. Then grab two sheets of cardstock, mix a soft grey, and let your child make a mouse that peeks back.

Sohel Rana is the writer, editor, publisher, and founder of The Tidy Porch. He is the man who is responsible for the craft (my wife created) being converted into a written piece. He also helps her wife (Sumona) by capturing videos of each craft. In short, he brings each craft created by her wife in front of you by transforming it into an article and a video.
