
My niece Anika, age 2, came over on a rainy afternoon. I wanted to try a handprint butterfly craft for toddlers with her. I painted her hand and pressed it down. She pulled away too fast and wiped the paint on my sleeve.
The second print landed on top of the first. We got a purple blob. Then I folded the paper in half and painted only her right hand. She pressed it on one side of the fold, and I closed the card over the print.
When we opened it, the wings matched. She said “again!” We made four more. Today, you will make a bright butterfly with just one little hand.
What You Need for a Handprint Butterfly Craft
You need a few basic supplies, and you probably own most of them. Here is my list:
- White cardstock, folded in half
- Kids’ washable, non-toxic paint in pink and purple
- A paper plate for the paint
- A soft sponge brush
- Wet wipes
- A plastic tablecloth
- An old shirt for your toddler
- A black marker for the body
- Dot markers for wing decoration
Cardstock is my top pick because it holds wet paint without curling. Thin printer paper wrinkles and can tear. Washable paint wipes off small hands and most table surfaces. Stay close the whole time, since toddlers love to taste things.
Skip googly eyes, pom poms, and pipe cleaners for kids under 3. Those small parts can be a choking risk. Draw the face and antennae with a marker instead.
How to Set Up Before Your Toddler Sits Down
Set everything out before you bring your child to the table. A toddler will not wait while you hunt for wipes.
Cover the table with the plastic cloth. Put the old shirt on your child. Fold the cardstock in half and press the crease with your thumb.
A sharp crease lets the card close cleanly later. Pour a thin layer of pink and purple paint side by side on the paper plate. Set the wet wipes within reach. Open the card flat, like a book, in front of your child.
Now you are ready. The whole craft takes only a few minutes, which suits a short toddler attention span.
How to Make a Handprint Butterfly Craft for Toddlers Step by Step
This craft takes nine steps and one hand. The trick is to print once, then fold. Your toddler never has to line anything up.
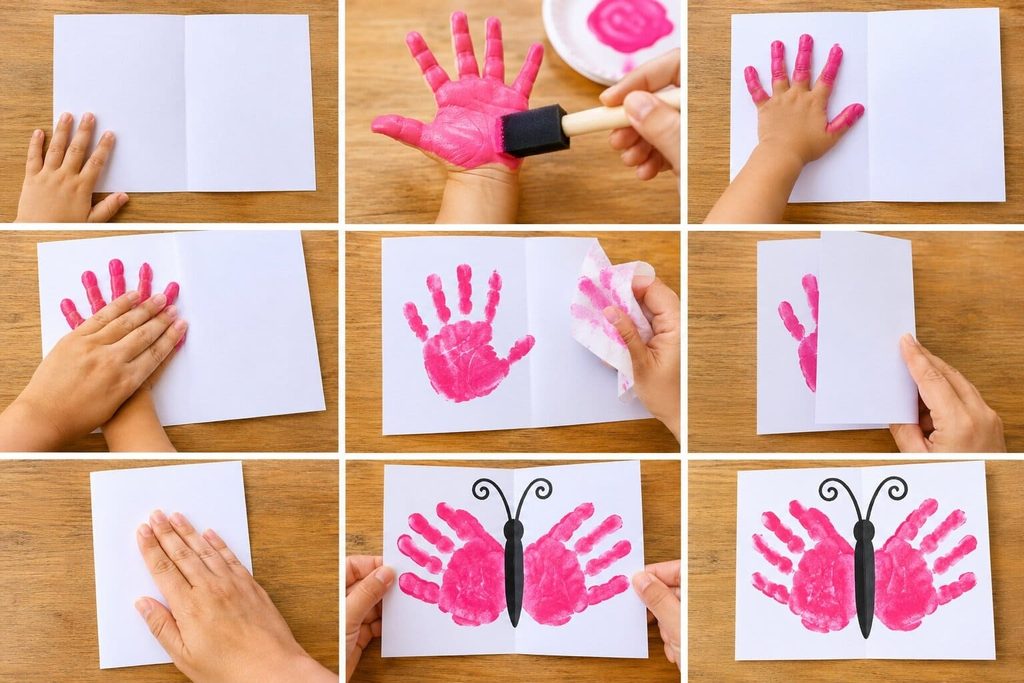
- Lay the open card on the table in front of your child. The crease should run up and down in the middle.
- Dip the sponge brush in the paint. Dab a thin, even layer over your toddler’s right palm and fingers. Thin paint prints cleaner than thick paint. If your child squirms, use two quick swipes.
- Guide the painted hand onto the left half of the card. Keep the thumb edge about one finger-width from the crease. Spread the fingers wide, like a star.
- Press down gently and count to three together. Rest your own hand on top of your child’s hand so it does not slide.
- Lift the hand straight up. Do not drag it. Wipe it right away with a wet wipe so no paint lands on sleeves.
- Fold the right half of the card over the wet print. Do this within about ten seconds, before the paint dries. Keep the card close so the fold is quick.
- Rub the closed card from the crease outward with your palm. Let your toddler help with a clean hand. Rub for about five seconds.
- Open the card slowly from the top corner. Hold the crease down with one hand while you peel. Two matching wings appear.
- Draw a black line in the gap between the wings for the body. Add two curly antennae at the top. Lay the butterfly flat until it dries. This usually takes 20 to 30 minutes.
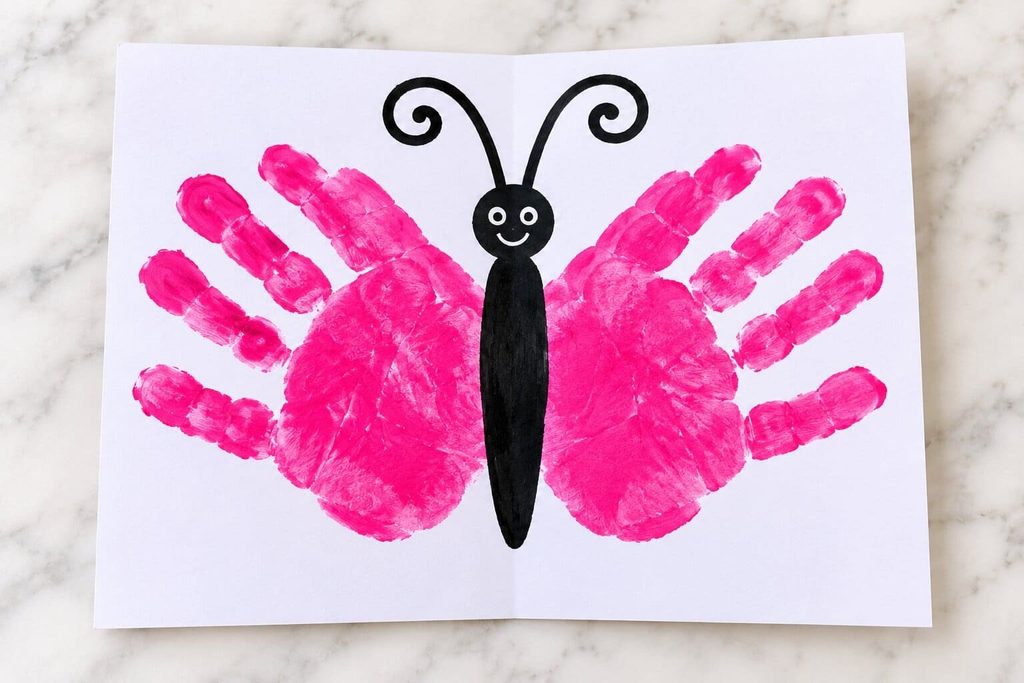
If the print looks faint, your paint was likely too thin or dried before you folded. Add a little more paint next time and fold faster. You can also fill thin spots with a dot marker.
The fold does the hard part. Your toddler makes one print, and the paper makes the second. The wings come out the same size and shape every time.
How to Keep the Mess Small
The best way to cut mess is to use less paint. A thin layer is enough for a clean print and a dry hand.
Use a sponge brush instead of letting your child dip a hand into the plate. Paint only one hand. Keep the wet wipes in your free hand so you can wipe right after the print. Roll your toddler’s sleeves up past the elbow.
Anika wiped her painted hand on my sleeve, so now I roll mine up too. Work over the plastic tablecloth and keep the paper plate near the card, so the painted hand travels only a few inches.
Fewer inches means fewer drips. If a drip lands on the table, wipe it at once. Washable paint comes off easily while it is wet.
Easy Ways to Decorate Your Butterfly
Keep decoration simple and safe. Big, easy tools work best for little hands.
Dot markers are my favorite. Anika pressed them along the wings and loved the bright colors. Press dots along the wing edges for a pattern. You can also dab a fingertip into leftover paint and add finger-painted dots.
Chunky crayons make swirls and stripes. Large stickers add sparkle, but stay close and keep them out of little mouths. Torn tissue paper and a glue stick work for kids who are past the mouthing stage.
For the body, draw one black line in the gap between the wings. Add two curved lines on top for antennae. I do this part myself because a marker line needs a steady hand.
Tips for 1-, 2-, and 3-Year-Olds
Your role changes as your child grows. Start by doing most of it, then step back.
One-Year-Olds
You lead. Hold your child’s wrist, dab the paint, and guide the hand down. Keep it to one butterfly, since a short session ends happily.
Two-Year-Olds
You share the work. Anika could press and rub on her own, but she needed me for the fold. You handle the paint and the fold. Let your toddler press the hand and rub the closed card. Expect a squirm, and offer a second try.
Three-Year-Olds
They take over. Many threes can dab their own paint, fold the card, and add the dots. You supply the wipes and the marker body. Ask them to name the colors on the wings.
What to Do With Your Finished Butterfly
Label it and display it. A small label turns a craft into a keepsake.
Write your child’s name and the date in pencil on the back. Tape the butterflies to a window or the fridge, where everyone can see them. Hang a few on a string of twine with clothespins. Slide your favorite into a simple frame. Save one each spring in a folder. In a few years, you can compare how the hand has grown.
FAQs
Is a handprint butterfly craft for toddlers safe?
Yes, with the right paint and close supervision. Choose paint labeled non-toxic and washable. Wipe your child’s hands right after the print so paint does not reach their mouth.
What if my toddler hates paint on their hands?
Try a washable ink pad instead. It feels drier and prints a clear hand. You can also use a sponge brush and dab a very light layer. Stop if your child is upset, and try again another day.
Can I make this with a baby?
Yes. You do all the steps. Use a washable, non-toxic ink pad made for babies, press the hand gently, and wipe it right away.
Can I use a different paint?
Washable tempera and washable finger paint both work. Thick finger paint needs an extra thin layer. Skip acrylic paint, because it is hard to remove from skin and clothes.
What is the best paper?
White cardstock is the best choice. It stays flat when wet and folds into a clean crease. Printer paper works in a pinch but may wrinkle.
You now have a butterfly craft that works on the first try. Save this pin for your next rainy afternoon. Then fold a sheet of cardstock, grab the pink and purple paint, and let one small hand make the wings.

Sohel Rana is the writer, editor, publisher, and founder of The Tidy Porch. He is the man who is responsible for the craft (my wife created) being converted into a written piece. He also helps her wife (Sumona) by capturing videos of each craft. In short, he brings each craft created by her wife in front of you by transforming it into an article and a video.
