
Last spring, my class kept watching a bee outside our window. I wanted a craft that did more than look cute. So I painted a small hand yellow and pressed it sideways on paper.
A fuzzy bee body appeared. The kids giggled. We added stripes, wings, and a big smile. Then each child wrote one kind thing they had done. I hung every bee together. We called it our hive.
This bumble bee handprint craft is simple and cheerful. You will make one bee first. Then you will turn a group into a Bee Kind Hive.
Bumble Bee Handprint Craft at a Glance
This craft takes about 20 minutes of hands-on time. It works well for ages 2 to 6 with a helper nearby.
- Active time: 20 minutes
- Prep time: 10 minutes
- Drying time: 20 to 30 minutes
- Ages: 2 to 6
I timed it with a group of six kids. Everyone finished before snack.
What You Need for a Bumble Bee Handprint Craft
You only need basic supplies. Most classrooms already have them. Gather everything first, and the mess stays small.
For one bee, I use:
- 1 sheet of white cardstock, 8.5 by 11 inches
- 2 tablespoons of yellow washable paint
- 1 tablespoon of black washable paint, or a black marker
- 1 flat paintbrush, 1 inch wide
- 1 black paper square, 3 by 3 inches, for the head
- 1 white paper rectangle, 4 by 6 inches, for the wings
- 2 googly eyes, or white paint for dots
- 1 glue stick and scissors
- Baby wipes and paper towels
I pick cardstock because thin paper curls when it gets wet. Washable paint also saves your sleeves.
How to Make a Bumble Bee Handprint Craft Step by Step
You can finish one bee in ten simple steps. Here is exactly how I do it.
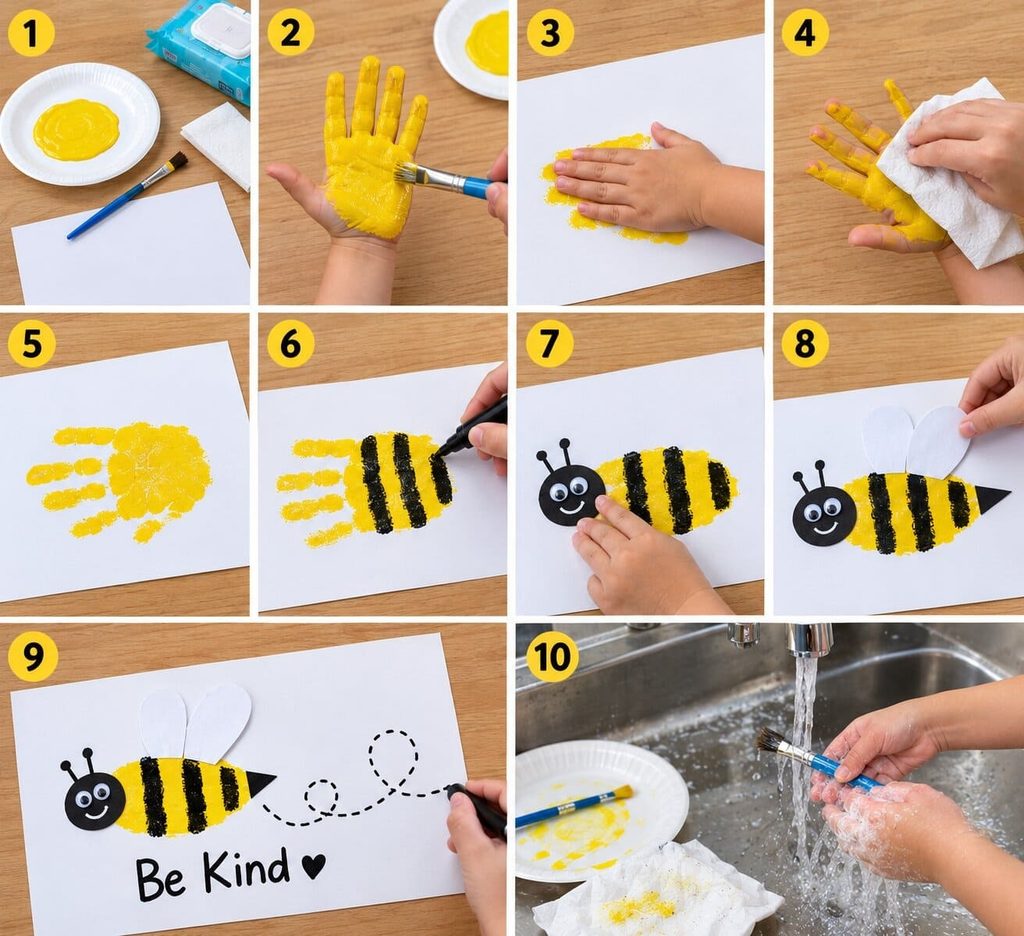
- Set up your table. Cover it with scrap paper. Pour yellow paint onto a plate. Keep wipes within reach. Tip: Turn the cardstock so the long edge sits at the bottom.
- Paint the hand. Brush a thin coat of yellow over the palm and all four fingers. Skip the thumb. Tip: Thin paint dries fast and prints clearly.
- Press the hand. Ask your child to hold the fingers together and tuck in the thumb. Place the hand sideways in the middle of the page, with the fingers pointing left. Press for five seconds. Tip: Gently press the knuckles so every part prints.
- Lift and wipe. Lift the wrist straight up. Wipe the hand right away. Tip: Sliding smears the edges of the body.
- Let it dry. Lay the sheet flat for 20 to 30 minutes. Tip: Start the next child while you wait.
- Add the stripes. Paint or draw three black stripes across the print. Space them evenly. Tip: A marker is neater for little ones, and paint looks fuzzier.
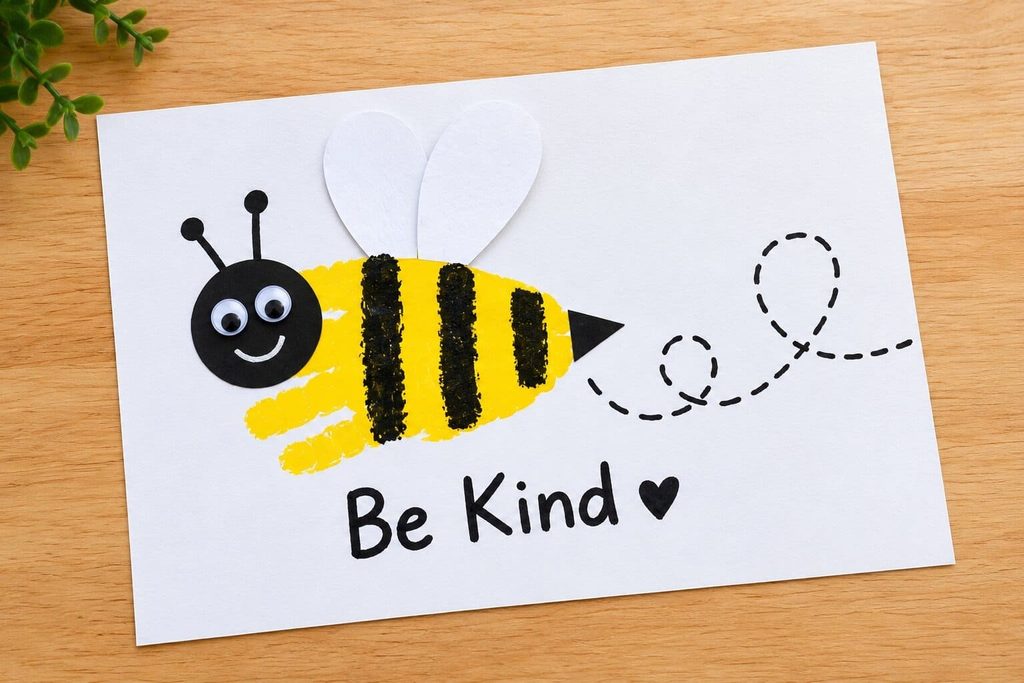
- Add the head and face. Cut a black circle, about 2 inches wide. Glue it at the fingertip end. Add two googly eyes and draw a smile. Draw two short antennae with the marker. Tip: Press the circle for ten seconds so it sticks.
- Add the wings and stinger. Cut two white ovals, about 2 inches long. Glue them above the body. Draw a small black triangle at the wrist end. Tip: Overlap the wings a little so they look natural.
- Draw the flight path and write the kind word. Make a dotted line curling behind the bee. Write one kind word or act below it. Tip: Pencil the words first so they fit.
- Clean up. Rinse the brush and wipe the plate while the paint is wet. Wash small hands with soap and warm water. Tip: Dried paint is hard to remove.
Kind Words to Write on Your Bee
Short, simple phrases work best. Kids can say them out loud, and you can write them for the youngest ones. I ask each child, “What kind thing did you do?” Then I write their answer. Here are some favorites:
- I shared my crayons.
- I said thank you.
- I helped a friend.
- I gave a hug.
- I waited my turn.
- I cleaned up my toys.
- I said sorry.
- I smiled at a friend.
One child once told me, “I let the bug go outside.” We wrote that one in big letters.
How to Build a Bee Kind Hive Display
Hang your bees in a loose cluster around a paper hive. A full wall of yellow bees looks bright and happy from across the room.
How to Make the Hive Shape
Cut 20 hexagons from yellow and orange paper. Each one should be about 4 inches wide. Tape them together in rows, like a honeycomb. Hang the honeycomb in the center of the wall. A big round hive from brown paper also works well.
How to Hang 15 or More Bees
Place the bees around and above the hive. Tilt some of them so they look like they are flying. Leave about 3 inches between bees. Painter’s tape holds the paper without tearing the wall.
How to Add Flowers and a Banner
Cut flowers from colored paper and tape them along the bottom. Add a banner above the hive that says “Bee Kind.” Cut each letter from black paper so it stands out.
What to Do About Absent Children
Make their bee when they return. Add it to the wall right away. Until then, hang a blank bee with their name. I keep two extra cardstock sheets ready for late arrivals.
Bee Facts to Share With Kids
Read a few facts while the paint dries. It turns the craft into a quick science lesson.
- Bees are insects.
- Bees have six legs.
- Bees visit flowers to drink a sweet liquid called nectar.
- Bees carry a powder called pollen from flower to flower.
- Bees help plants grow fruits and seeds.
My class loved the six legs fact. Several kids counted their own legs, then laughed.
How to Turn Your Bee Into a Mother’s Day Card
Mount one bee on a folded card and write a short message. This takes about ten extra minutes. Fold a sheet of cardstock in half. Cut around the finished bee and leave a thin white border. Glue it to the front. Write “Mom, you’re the bee’s knees” above it. Add a note inside and sign your child’s name. Moms and grandmas love this one.
Tips for Toddlers and Messy Hands
Keep it short, use less paint, and do the hard parts yourself. Toddlers often curl their fingers or pull away fast.
- Let them stamp on scrap paper first.
- Hold their wrist and press for them.
- Use white paint dots instead of googly eyes.
- Add the stripes, head, and wings after the print dries.
One two-year-old printed three hands in a row. We kept the best one and cheered for the rest.
Easy Bumble Bee Handprint Variations
Small changes make the same craft feel new.
- Use a fingertip dot trail for the flight path.
- Make a baby bee with a smaller handprint.
- Add a paper flower under the bee.
- Write each child’s name on the wings.
- Draw a tiny crown on the head for a queen bee.
Bumble Bee Handprint Craft FAQs
What paint works best for a bumble bee handprint craft?
Washable tempera paint works best. It spreads smoothly, dries fast, and washes off skin and clothes. I avoid acrylic with little ones because it can stain. Test one print on scrap paper first. That shows you how thick your coat should be.
How long does the paint take to dry?
Thin coats usually dry in 20 to 30 minutes. Thick coats take longer and may smear. Lay each sheet flat until it feels dry and no longer cool. I check the thickest part of the palm print first. Do not stack the sheets before then.
Can I make this craft without paint?
Yes. Trace the child’s hand with a pencil. Then color the shape with a yellow crayon or marker. Tracing is cleaner for toddlers and large groups. The bee looks flatter, but it still looks great once you add the stripes, wings, and face.
What if my child’s fingers spread apart?
Gently press the fingers together before you stamp. If they still wiggle, trace the hand instead. A small gap is fine. It makes the body look fuzzy, like a real bumble bee. A few scruffy bees look great on a hive display anyway.
Can I do this craft with a whole class?
Yes. Set up two paint stations and keep wipes at both. Send small groups of four to the table while the rest practice writing kind words. A helper at each station speeds things up. Plan about 15 minutes per group.
Time to Build Your Hive
You now have everything you need to start. Grab some yellow paint and press one small hand. Soon you will have a hive full of kind and happy bees.

Sohel Rana is the writer, editor, publisher, and founder of The Tidy Porch. He is the man who is responsible for the craft (my wife created) being converted into a written piece. He also helps her wife (Sumona) by capturing videos of each craft. In short, he brings each craft created by her wife in front of you by transforming it into an article and a video.
