
Last October, my preschool class begged for something spooky. I did not want scary. So I pulled out black paint and white paper. Each child pressed one hand, then the other.
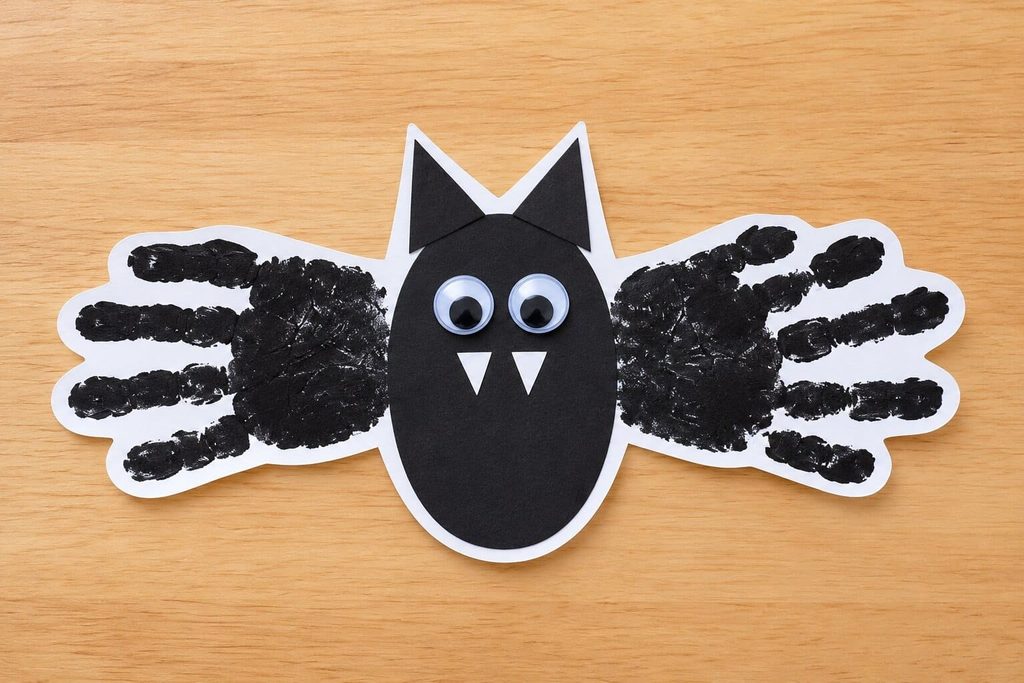
The prints looked like wings. Someone yelled, “Bats!” We added ears, eyes, and tiny fangs. Then we hung every bat on a dark wall. The room felt like a real cave.
Parents stopped to look each morning. This bat handprint craft is cheap and easy. You will make one bat first. Then you will turn a group into a bat cave.
Bat Handprint Craft at a Glance
This craft takes about 20 minutes of hands-on time. It works for ages 2 to 6 with a helper.
- Active time: 20 minutes
- Prep time: 10 minutes
- Drying time: 20 to 30 minutes
- Ages: 2 to 6
What You Need for a Bat Handprint Craft
You only need basic supplies for each bat. Gather them first, and the mess stays small.
- 1 sheet of white cardstock, 8.5 by 11 inches
- 2 tablespoons of black washable paint
- 1 flat paintbrush, 1 inch wide
- 1 sheet of black paper for the body, ears, and extras
- 2 googly eyes, or white paint for dots
- A little white paper for fangs
- 1 glue stick
- Scissors for the adult
- Baby wipes and paper towels
I choose cardstock because thin paper curls when it gets wet. Washable paint saves your sleeves.
How to Make a Bat Handprint Craft Step by Step
You can make one bat in ten simple steps. Here is exactly how I do it.
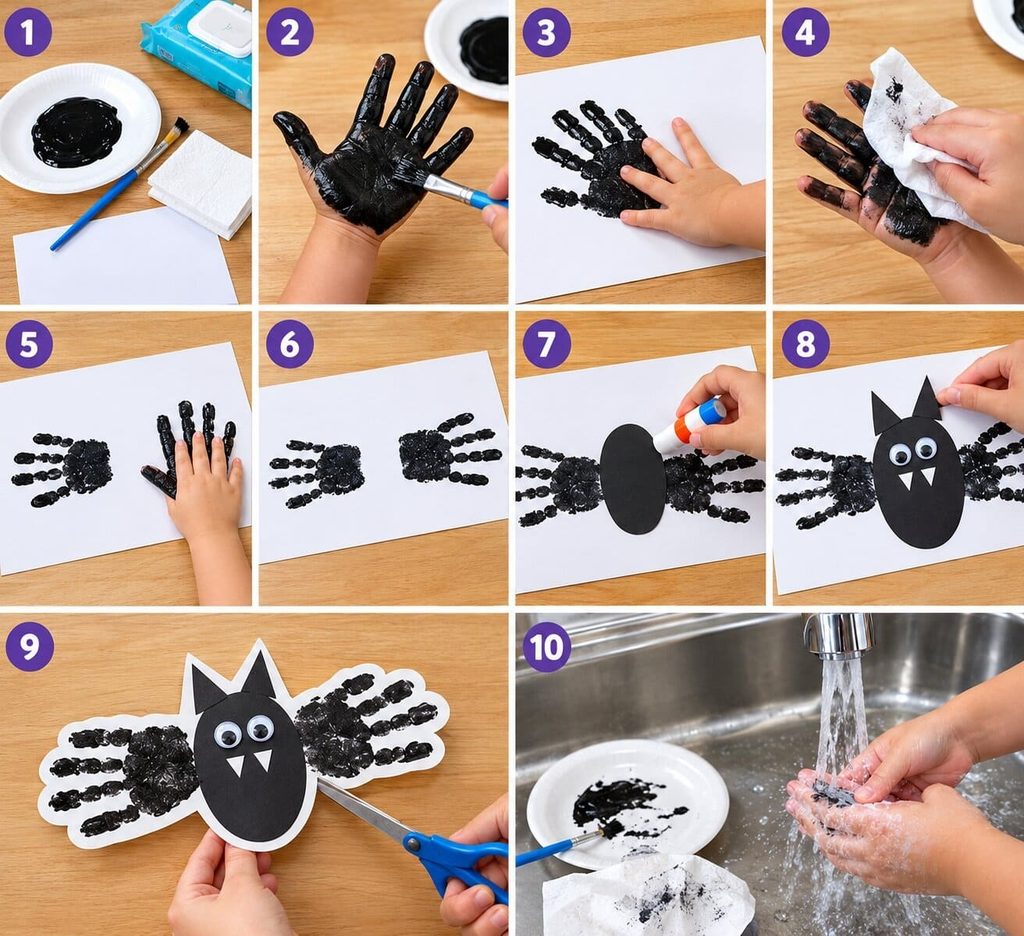
- Set up your station. Cover the table with scrap paper. Pour black paint onto a plate. Keep wipes close. Tip: Turn the cardstock sideways so the long edge sits at the bottom.
- Paint the left hand. Brush a thin coat over the palm and all five fingers. Tip: Thin paint dries fast and prints clearly.
- Press the left hand. Place it left of center with the fingers pointing left. Spread the fingers a little. Press for five seconds. Tip: Gently press the knuckles so every finger prints.
- Lift and wipe. Lift the wrist straight up. Wipe the hand right away. Tip: Sliding smears the edges.
- Paint and press the right hand. Press it with the fingers pointing right. Leave a gap of about 1.5 inches between the two wrists. Tip: The gap is where the body will go, so do not squeeze the hands together.
- Let it dry. Lay the sheet flat for 20 to 30 minutes. Tip: Start the next child while you wait.
- Add the body. Cut a black oval, 2 by 3 inches. Glue it over the gap between the wings. Tip: A glue stick keeps the paper flat. Liquid glue wrinkles it.
- Add ears, eyes, and fangs. Glue two black triangles, about 1 inch tall, at the top of the body. Add two googly eyes. Glue two tiny white triangles below them. Tip: White paint dots work well for toddlers.
- Cut out the bat. An adult cuts around the wings and body. Leave a thin white border, about a quarter inch wide. Tip: The border helps the bat stand out on a dark wall.
- Clean up. Rinse the brush and wipe the plate while the paint is wet. Wash small hands with soap. Tip: Dried paint is hard to remove.
How to Build a Bat Cave Wall Display
Hang the bats on a dark backdrop with a moon and stars. A full wall of bats looks bold, even from across a room.
How to Make the Dark Backdrop
Tape sheets of navy or deep purple paper together. For 15 bats, I cover a space about 3 by 4 feet. A roll of paper from a craft store saves time. Painter’s tape holds it without ripping the wall.
How to Hang 15 or More Bats
Hang the bats in loose rows. Tilt a few and place them at different heights. That makes them look like they are flying. Leave about 3 inches between bats.
How to Add the Moon, Stars, and Glow
Cut a crescent moon from yellow paper and tape it in one corner. Add a few paper stars. Put a glow-in-the-dark sticker on each bat’s eyes. Turn off the lights for a minute and watch the kids cheer.
What to Do About Absent Children
Make their bat on the day they return. Add it to the wall right away. I keep two spare cardstock sheets ready for late arrivals.
Bat Facts to Share With Kids
Read a few simple facts while the paint dries. It turns the craft into a quick lesson.
- Bats are mammals, like dogs and people.
- Bats sleep upside down.
- Bats are awake at night.
- Many bats eat insects.
- Many bats use sound to find their food.
My class loved the upside-down fact. Several children tried to hang from the monkey bars right after.
How to Turn Bat Handprints Into Halloween Decor at Home
You can turn finished bats into a garland or a window display. For a garland, punch a hole in each wing tip. Thread black yarn through the holes and hang it across a doorway. For a window display, tape the bats to the inside of the glass. The white border looks sharp against the night sky.
Tips for Toddlers and Messy Hands
Keep it short and use less paint. Do the hard parts for them.
- Let them stamp on scrap paper first.
- Hold their wrist and press for them.
- Use white paint dots instead of googly eyes.
- Cut out the bat yourself after it dries.
One two-year-old printed four hands in a row. We hung the best pair and kept the rest for a garland.
Easy Bat Handprint Variations
Small changes make the same craft feel new.
- Use dark purple paint for a spooky twist.
- Add a tiny pumpkin in one corner of the backdrop.
- Write each child’s name on the bat’s belly.
- Make a baby bat from one small handprint.
Bat Handprint Craft FAQs
What paint works best for a bat handprint craft?
Washable tempera paint works best. It spreads smoothly, dries fast, and washes off skin and clothes. Acrylic paint can stain, so I skip it with little ones. Test one print on scrap paper first. That shows you how thick your coat should be.
How long does the paint take to dry?
Thin coats usually dry in 20 to 30 minutes. Thick coats take longer and may smear. Lay each sheet flat until it feels dry and no longer cool. I check the thickest part of the palm print first. Do not stack sheets before then.
Can I skip cutting out the bat?
Yes. Leave the bat on the white sheet and glue it to the backdrop as a small square. It looks less like a cave, but it is quicker. You can also trim only the edges. Cutting does make the bats look more real.
What if the two wings touch or overlap?
Do not worry. The body covers the center. If the handprints overlap a lot, glue a larger oval on top. A slight overlap makes the bat look like its wings are stretching. Every bat on the wall will look a little different, and that is fine.
Can I do this without googly eyes?
Yes. Dip a pencil eraser in white paint and press two dots. Let them dry before you cut. You can also draw eyes with a white crayon. White shows up well on black paper, and tiny hands can do it easily.
Time to Hang Your Bats
You now have everything you need. Grab some black paint and two small hands. Soon you will have a bat cave that makes everyone smile.

Sohel Rana is the writer, editor, publisher, and founder of The Tidy Porch. He is the man who is responsible for the craft (my wife created) being converted into a written piece. He also helps her wife (Sumona) by capturing videos of each craft. In short, he brings each craft created by her wife in front of you by transforming it into an article and a video.
