
“Is it dry yet?” my niece asked. For the fourth time. I poked the green paint. Still tacky. Her school party started in an hour, and my paper plate Christmas tree craft was a puddle of good intentions.
So I tossed the paint and grabbed a green plate instead. Scissors, glue, and a ruler later, the tree was done. It even stood up on its own. No waiting. No paint on the couch. You can make the same tree in about twenty minutes, and I’ll walk you through every cut and glue dot.
What You Need for a Paper Plate Christmas Tree Craft
You need one 9-inch plate per tree and a few basic supplies. Most of them are already in your craft drawer.
- One 9-inch green paper plate (white works too)
- A ruler and a pencil
- Kid scissors
- White craft glue (a glue stick won’t hold the paper rolls)
- A glue stick for little hands
- Brown cardstock, about 2 x 3 inches
- Two paper strips, 1 x 3 inches, in green or brown
- A scrap of yellow paper for the star
- Stickers, pom-poms, sequins, paper dots, or markers
Plan on 20 minutes. Marking and cutting take about five. The rest is gluing and decorating. Give each child a tray so tiny stars don’t roll off the table.
No-Paint Ways to Make a Plate Green
Use a green paper plate and skip the paint, and you have a no-paint paper plate Christmas tree. Green plates are sold in party aisles and craft stores, and nothing has to dry.
Only have white plates? Color them with a green marker. Use wide, side-to-side strokes so the color looks even. You can also glue torn green paper scraps over the plate with a glue stick. Torn edges add a fluffy, branchy look. Do this before you cut the plate, because a flat plate is easier to cover.
Paint works too. It just adds a wait. Washable paint needs a good while to dry, and wet paint sticks to little hands. That’s the wait I’m trying to save you.
Paper Plate Christmas Tree Craft Step by Step
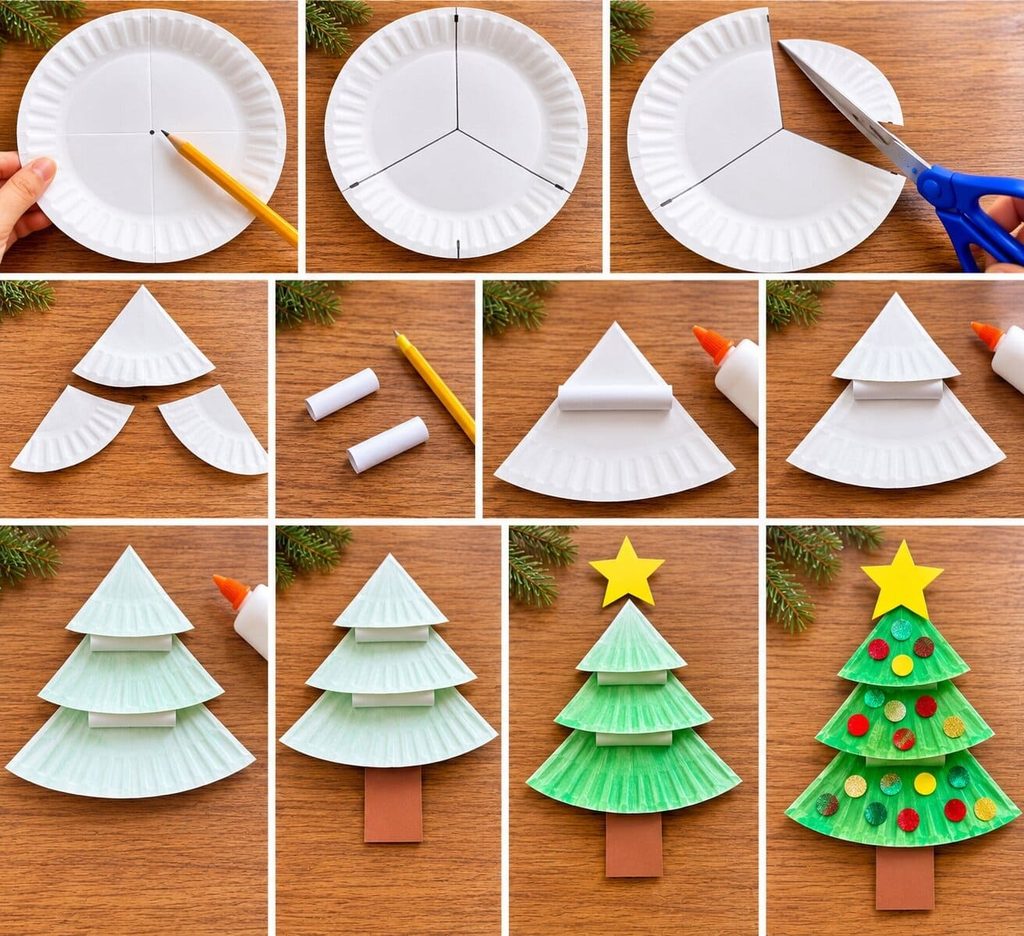
You make this tree from one plate cut into three wedges, then stack the wedges into tiers. Follow the steps in order, and do the plate coloring first if you’re using white plates.
- Find the center. Fold the plate in half, then open it. Fold it in half the other way and open it again. Make a pencil dot where the creases cross.
- Mark the rim like a clock. The creases give you 12, 3, 6, and 9 o’clock. Mark 12 first. The 4 o’clock mark sits one-third of the way from 3 to 6. The 8 o’clock mark mirrors it, one-third of the way from 9 to 6.
- Draw three lines. Use the ruler to connect each rim mark to the center dot. You now have three equal wedges, like a pie cut in thirds.
- Cut along the lines. Cut slowly, right on the line. An adult should do this step for kids under six.
- Make two spacer rolls. Cut two paper strips, 1 x 3 inches. Roll each strip tightly around a pencil. Dab craft glue on the loose end and hold it for a few seconds. Slide the roll off. You now have two small tubes.
- Build the bottom tier. Lay one wedge on the table with its point up. Squeeze a line of white craft glue along one roll. Lay the roll sideways across the wedge, about half an inch below the tip.
- Add the middle tier. Press a second wedge on top of the roll, point up. Its curved edge should cover the bottom wedge’s tip by about an inch. Hold it for ten seconds.
- Add the top tier. Glue the second roll across the middle wedge, just below its tip. Press the last wedge on it the same way. Hold again until it grips.
- Make the trunk. Cut a brown cardstock rectangle, 2 x 3 inches. Fold it in half so it’s 2 inches wide and 1½ inches tall. Glue the front half to the back of the bottom wedge, at the bottom center. Let the folded edge stick out about half an inch below the plate edge.
- Add the star. Cut a yellow star about 2 inches wide. Glue it over the top tip.
- Decorate. Stick on stickers, sequins, or pom-poms. Try a counting game: add 10 ornaments in 3 colors, and name each color out loud.
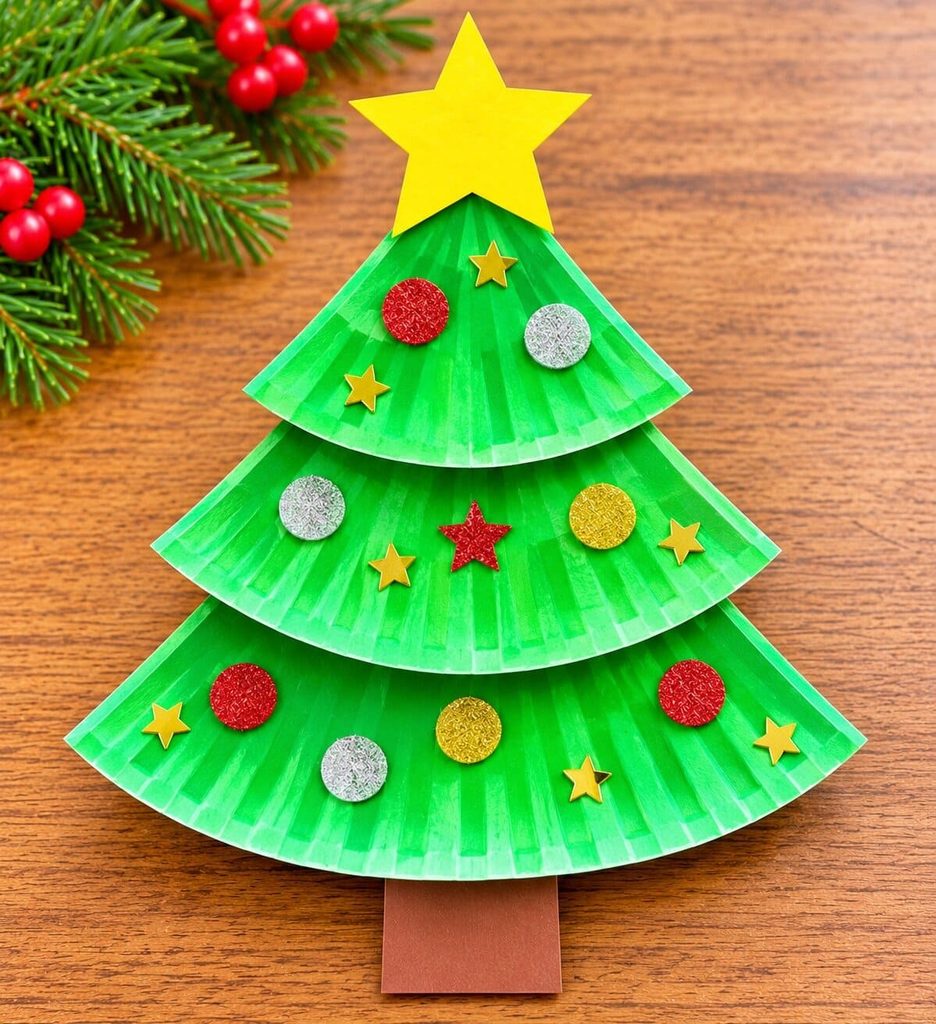
Before you glue anything, stack the dry wedges on the table. A quick test run shows you the overlap, and it takes about ten seconds.
How to Make Your Paper Plate Tree Pop Out and Stand Up
Paper rolls make the tiers pop out, and a folded trunk card makes the tree stand. Together they give the tree depth and a steady base.
The rolls lift each tier about a quarter inch. That small gap makes shadows, and shadows make the tree look 3D. Use white craft glue on the rolls, since a glue stick won’t hold them.
The trunk card works like the easel leg on a picture frame. Fold the brown card, glue the front half behind the tree, and swing the back half out at an angle. Rest the folded edge on the table. Adjust the back half until the tree stands without leaning. If it tips forward, widen the angle a little.
Party Mode: How to Run This Craft With 15 to 20 Kids
Pre-cut everything, then let the kids do only the gluing and decorating. That keeps this classroom party craft moving and keeps the scissors with the adults.
The night before, cut the wedges for every child. Cut the strips, trunk cards, and stars too. Fold the trunk cards in half. Roll the spacers yourself, since that’s the fussiest step. Pack one zip bag per child with three wedges, two rolls, one trunk card, and one star.
On party day, set a cup of decorations in the middle of each table. Use one bottle of craft glue per table. Plan one adult helper for every table of five or six kids. Kids glue the tiers and stick on ornaments. A helper glues each trunk card on the back. Expect each tree to take about 15 minutes at the table. Put name tags on the backs so the trees go home with the right child.
Age Guide: What Kids Can Do at Each Age
Ages 2½ to 3 decorate, ages 4 to 5 glue and decorate, and ages 6 to 7 can do almost everything. Adults handle the cutting for the younger two groups.
- Ages 2½ to 3: Give them a finished tree and a sheet of stickers. Skip sequins and pom-poms, which are choking risks for children under 3.
- Ages 4 to 5: They can press wedges onto glue and stick on ornaments. Let them count to ten as they decorate.
- Ages 6 to 7: They can mark the clock-face lines and cut with kid scissors. At a party, pair them with a younger buddy.
Fixes for Common Paper Plate Tree Problems
Most problems come from loose glue or an uneven cut. Each one has a quick fix.
The tiers droop. Check that the rolls are glued with white craft glue, not a glue stick. Then hold each tier in place for ten seconds.
The tree tips over. Swing the trunk card’s back half out wider. A wider angle gives it a firmer base.
The wedges look uneven. Small marking errors show up when you stack. Trim the larger wedge until the three match.
The glue slides off a shiny plate. Glossy coatings repel water-based glue. Switch to a strong, tacky craft glue and press for a full minute.
FAQs About Paper Plate Christmas Trees
What can I use instead of paint?
Use a green plate, a green marker, or torn green paper glued on. All three are dry-free. Markers are the fastest option for small kids.
How do you cut a paper plate into three equal parts?
Find the center by folding the plate twice. Mark the rim at 12, 4, and 8 o’clock like a clock face, then draw lines to the center. Cut along the lines for three even wedges.
How long does it take?
Prep takes about five minutes. Kids usually need around 15 minutes to glue and decorate.
Can toddlers make this?
As a paper plate Christmas tree craft for toddlers, it works best with an adult doing the cutting and rolling. Toddlers can decorate a finished tree with stickers. Keep small items away from children under 3.
How do you make a paper plate Christmas tree stand up?
A folded card on the back works like a tiny easel. Glue one half to the tree and angle the other half backward. Test it on a table before you add heavy ornaments.
That’s the whole paper plate Christmas tree craft: no paint, no waiting, and no printer. I hope yours stands tall on the first try. Save this pin to your Christmas board so you can find it again when party planning starts.

Sohel Rana is the writer, editor, publisher, and founder of The Tidy Porch. He is the man who is responsible for the craft (my wife created) being converted into a written piece. He also helps her wife (Sumona) by capturing videos of each craft. In short, he brings each craft created by her wife in front of you by transforming it into an article and a video.
