
Last December, my daughter and I filled a grocery bag with pinecones. The air smelled like cold pine and wet leaves. We painted right there on the porch.
Her first ornament looked like a lumpy brown blob. I laughed so hard I had to sit down. Then I tried a trick. She did the messy painting. I added a thin twine loop and a touch of gold. It looked like a shop ornament.
These pinecone Christmas tree ornaments still hang front and center. You can make them too. Each takes about 25 minutes of hands-on time, plus drying.
Quick facts: 25 minutes hands-on | 1 hour drying | Ages 3 and up | Makes 6 to 10 ornaments
What Do You Need for Pinecone Christmas Tree Ornaments?
You need pinecones, paint, and twine. Most items cost very little.
- Pinecones are the star, so pick six to ten that are two to three inches long.
- A baking sheet lined with foil keeps sticky sap off your pan.
- Non-toxic washable paint is the safest choice for small hands.
- Foam brushes give kids smooth control and cost very little.
- Matte white craft paint creates a soft, snowy look.
- Fine gold paint adds shine without the mess of loose glitter.
- Fine glitter is optional, but it gives a frosted sparkle.
- Thin twine or quarter-inch ribbon makes a neat loop that holds the weight.
- A low-temp hot glue gun locks the loop in place, or use strong craft glue.
- Scissors cut twine cleanly.
- Newspaper or a drop cloth protects your table.
How Do You Prepare Pinecones for Ornaments?
Gather dry cones from the ground, then bake them. Baking kills hidden bugs and opens the scales, which are the little wooden flaps. Closed, damp cones will not look full on a tree.
Start outside. Shake each cone hard to knock out dirt and critters. Soak them in a bowl of water with a splash of vinegar for 20 minutes. Soaking closes them up, but don’t worry. Baking opens them again.
Pat the cones dry. Set them on your foil-lined sheet. Bake at 200°F for 30 to 45 minutes. Stay close, because sap can drip and cones can darken. Let them cool fully before anyone touches them.
I skipped this once. A tiny spider crawled out of my ornament on Christmas Eve. Now I always bake.
Which Pinecones Work Best for Ornaments?
Choose small to medium cones, two to three inches long. They are light, so most branches can hold them. Large cones look bulky and pull branches down.
Look for cones with open, even scales and no broken pieces. Gather them on dry days, since wet cones carry more dirt. I keep a paper bag in my car during fall walks for surprise finds.
What Is the Kid Job and What Is the Adult Job?
Your child does the painting. You do the prep and the finishing. This split keeps the craft fun for them and keeps the result neat.
Here is the kid job:
- Dab white paint on the scale tips.
- Sprinkle glitter over wet paint on a tray.
Here is your job:
- Bake the cones.
- Choose the color palette.
- Tie on the loop.
- Add gold touches and fix any blobs.
In my experience, toddlers stay interested for about ten minutes. That is plenty of time to paint two or three cones. You can finish the rest while they snack.
How to Make Pinecone Christmas Tree Ornaments Step by Step
You need about 25 minutes of hands-on time and one hour of drying. Follow these steps in order.
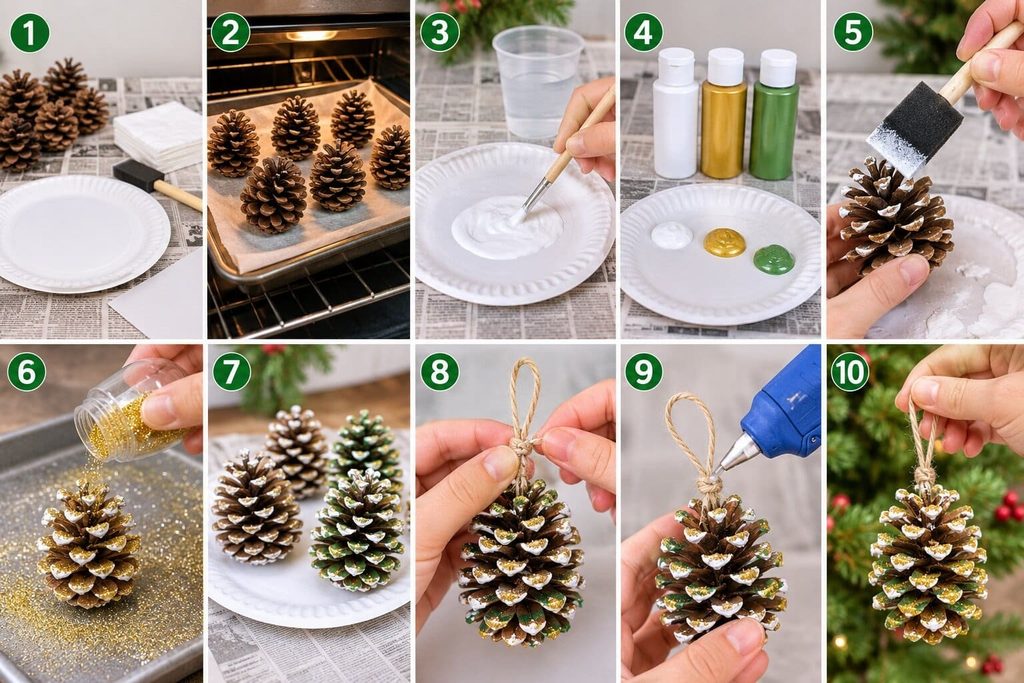
- Cover your table with newspaper. Set out paper plates, wipes, and scrap paper.
- Bake and cool your pinecones using the method above.
- Pour white paint onto a paper plate. Add two or three drops of water and stir. Thin paint lets the wood show through.
- Pick your palette. I use white, gold, and one soft green. Three colors make the set look planned.
- Hand your child a foam brush. Show them how to dab, not scrub. Dabbing only the tips gives a snowy look.
- Let your child sprinkle fine glitter over the wet paint. Do this over a tray so you can reuse the extra.
- Stand the cones upright on a paper plate. Let them dry for 30 to 45 minutes.
- Cut an eight-inch piece of twine. Slide it between the top two rows of scales and tie a tight knot.
- Add one pea-sized dot of hot glue over the knot. Hold it for ten seconds. Trim any tails.
- Dab a little gold on a few scales. Let it dry for 15 minutes, then lift the ornament by the loop to test it.
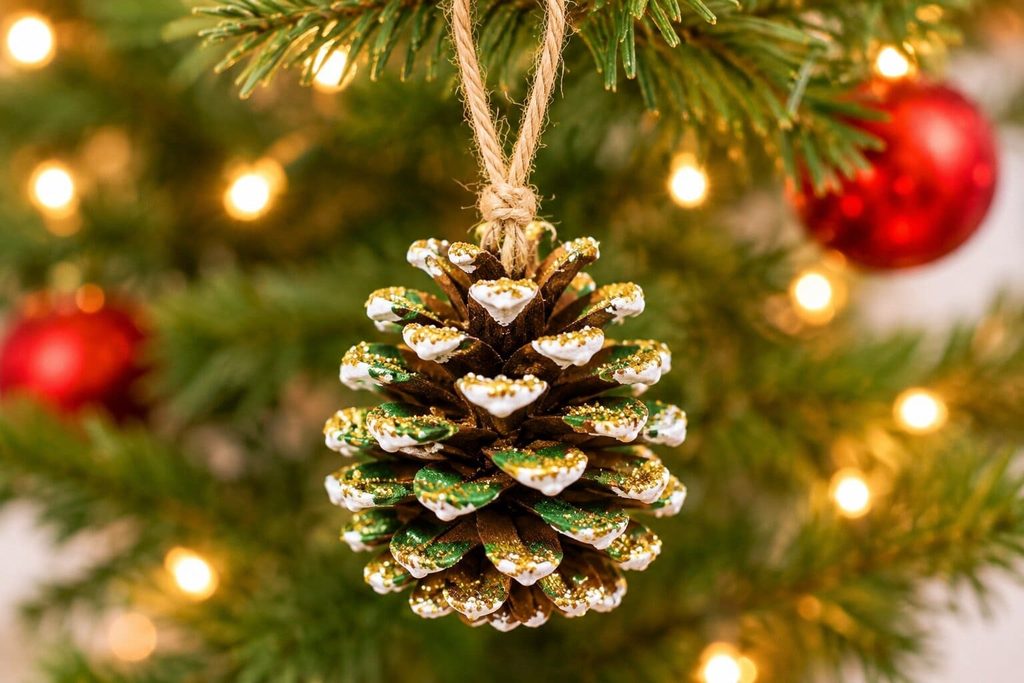
If something goes wrong, don’t panic. Wipe wet paint mistakes with a damp paper towel. If the loop slips, add a bit more glue. If glitter keeps falling, brush on a thin coat of clear sealer outdoors.
What Are Easy Pinecone Ornament Ideas?
One base cone can become five different looks. Pick one, or make a mixed batch.
Snowy Whitewash Pinecone Ornaments
Dab white paint on the tips, then brush lightly across the top of the scales. This gives a fresh snowfall look.
Gold-Dipped Pinecone Ornaments
Dip just the points in gold paint. Let them dry upside down on a cup.
Paint-Dabbed Confetti Pinecone Ornaments
Use tiny dots of red, green, and cream. Keep the dots small so it feels cheerful, not busy.
Yarn-Wrapped Pinecone Ornaments
Wrap cream yarn around the bottom half. Glue the ends at the back and tuck them between scales.
Mini Wrapped Present Pinecone Ornaments
Cross a thin ribbon around the cone and tie a small bow on top. It looks like a tiny gift.
How Do You Make Pinecone Ornaments Look Polished?
Use a small palette, thin your paint, and try dry brushing. Dry brushing means dipping the brush, wiping most paint off, and stroking lightly. It leaves a soft, frosted finish. Try a farmhouse palette of white, natural twine, and a touch of gold. For a Scandinavian look, use white, red, and plain brown. Pick one palette per tree.
Keep your loops the same length and color in each batch. A matching set looks like it came from a boutique. A mix of random ribbons looks like a craft day. Both are lovely, but only one looks store-bought.
How Do You Make Pinecone Ornaments in Batches?
Work in an assembly line. Bake all the cones at once. Let your child paint a few while you cut twine for the rest. An egg carton makes a handy drying rack, because each cup holds one cone upright.
A batch of twelve takes about 90 minutes with breaks. That is enough for your tree, a few gifts, and a spare.
Are Pinecone Ornaments Safe for Toddlers?
Yes, when you handle the risky steps. The oven and hot glue gun are for adults only. Everything else is toddler-friendly.
Choose paint labeled non-toxic and washable. Skip beads, buttons, and sequins for children under three. They are choking risks. Keep fine glitter away from mouths and eyes. Stay within arm’s reach the whole time.
How Do You Hang, Store, and Gift Pinecone Ornaments?
Hang them on sturdy branches near the tips, where they show best. Pinecones are light, so most branches hold them well.
To store them, set each ornament in an egg carton or a small box lined with tissue. Keep the box somewhere dry. Damp air can cause mold.
For gifts, write your child’s name and the year on the back with a fine marker. Pack two or three in a kraft box with tissue. Grandparents love this keepsake.
Frequently Asked Questions
Do I need to bake pinecones for ornaments?
Yes, I strongly suggest it. Baking removes bugs and sap. It also opens the scales so the ornament looks fuller.
What paint works best on pinecone ornaments?
Matte acrylic craft paint works best. Look for the non-toxic washable kind if kids are helping. Thin it slightly so it grips the scales.
How do I keep glitter from falling off pinecone ornaments?
Sprinkle glitter on wet paint, then let it dry fully. An adult can add a light coat of clear sealer outdoors. Fine glitter also sticks better than chunky glitter.
Can toddlers really make pinecone ornaments?
They can. Toddlers can dab paint and sprinkle glitter with help. You handle the oven, glue, and finishing touches.
How long do pinecone Christmas tree ornaments last?
Stored dry, they can last for many years. I still have ones from a few Christmases ago. Their color only softens a little.
Start With One Ornament
Make one test ornament first. It takes just a few minutes and shows you how your paint behaves. Then let your little helper take over, and enjoy the lumpy, loving results that you turn into something worth hanging.

Sohel Rana is the writer, editor, publisher, and founder of The Tidy Porch. He is the man who is responsible for the craft (my wife created) being converted into a written piece. He also helps her wife (Sumona) by capturing videos of each craft. In short, he brings each craft created by her wife in front of you by transforming it into an article and a video.
