
On a rainy afternoon, I opened a pack of dot stickers. Soon my two kids were fighting over one paper tree. My little one wanted to stick dots everywhere. My big one wanted rules.
So I made one dot sticker Christmas tree craft with three levels. Both kids stayed busy, and I got twenty quiet minutes. One sticker even ended up on the dog.
You can make this easy toddler Christmas craft in about 15 minutes. Then you can use it again and again.
Quick facts: 15 minutes to prep | 5 to 15 minutes to play | Ages 2 to 5 | No paint, no glue, no mess
What Do You Need for a Dot Sticker Christmas Tree Craft?
You need about ten simple supplies, and you may own most of them already.
- Thick white cardstock holds sticky dots without tearing like printer paper does.
- A green marker or crayon colors the tree with bold, even strokes.
- A black marker draws clear outlines that small eyes can see.
- A pencil lets you sketch the tree and fix mistakes.
- A ruler keeps the tree and rows neat.
- Dot stickers in five colors, about three-quarter-inch round, are the heart of the craft.
- A few larger dot stickers are easier for two-year-olds to peel.
- A small star sticker or yellow dot tops the tree.
- A clipboard or masking tape holds the paper still on the table.
- A ziplock bag or folder stores the kit for later.
- A clear laminating sleeve or contact paper makes the tree reusable, if you want that.
What Size Dot Stickers Are Best for Toddlers?
Choose three-quarter-inch round stickers and thick cardstock. This size is easy to see and grab. Cardstock stays flat and does not rip when a sticker is pulled off.
Printer paper wrinkles under sticker after sticker. Tiny dots under half an inch frustrate small fingers. I learned that the hard way. My toddler gave up after two stickers.
Prepare about 25 stickers per child. The tree holds 15, and the extras cover mistakes. Any brand works, including the classic Do-A-Dot style stickers sold in craft aisles.
How Do You Make a Christmas Tree Template for Dot Stickers?
Draw one big, simple tree with 15 circles in five rows. The same template then works for every age. A large tree is easier to fill than a small one.
On letter-size cardstock, draw a triangle about nine inches tall and seven inches wide at the base. Add a one-inch trunk at the bottom. Mark five rows inside the triangle.
Draw one circle in the top row, two in the second, then three, four, and five. Make each circle about three-quarter inch wide. Leave a little space between circles.
How to Make a Dot Sticker Christmas Tree Step by Step
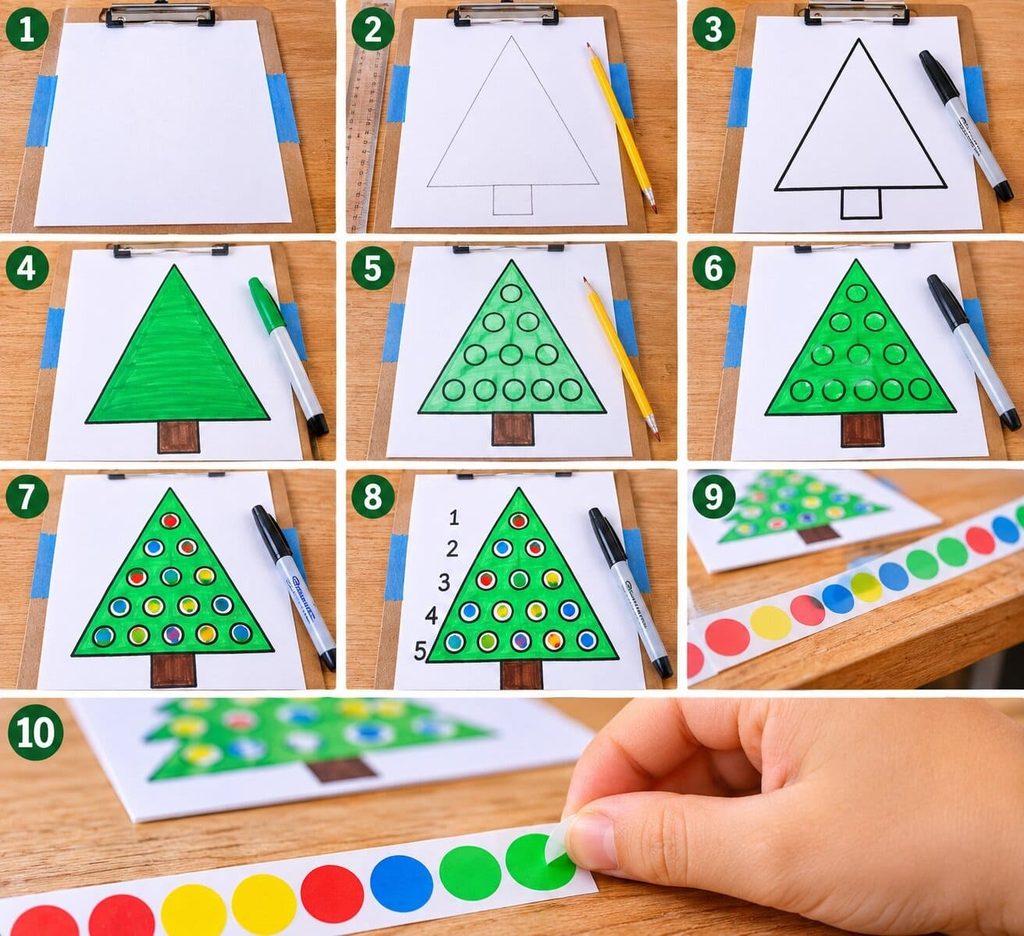
Set aside about 15 minutes. You can make several trees at once, so do a batch.
- Tape the cardstock to a clipboard or table so it will not slide.
- Use the pencil and ruler to draw the triangle and trunk.
- Trace over the outline with the black marker. Erase leftover pencil marks once dry.
- Color the tree green and the trunk brown or black. Let it dry for five minutes.
- Draw five rows of circles in pencil, with one, two, three, four, and five circles.
- Trace each circle lightly with the black marker.
- For Level 2, color a small marker dot inside each circle. Use five colors that match your stickers.
- For Level 3, write the numbers one through five at the left of each row.
- Line your stickers up on a long piece of tape, sticky side down, along the table edge. I call this a sticker strip. Little hands can grab them easily.
- Fold a tiny tab on the edge of each sticker. It gives small fingers a handle.
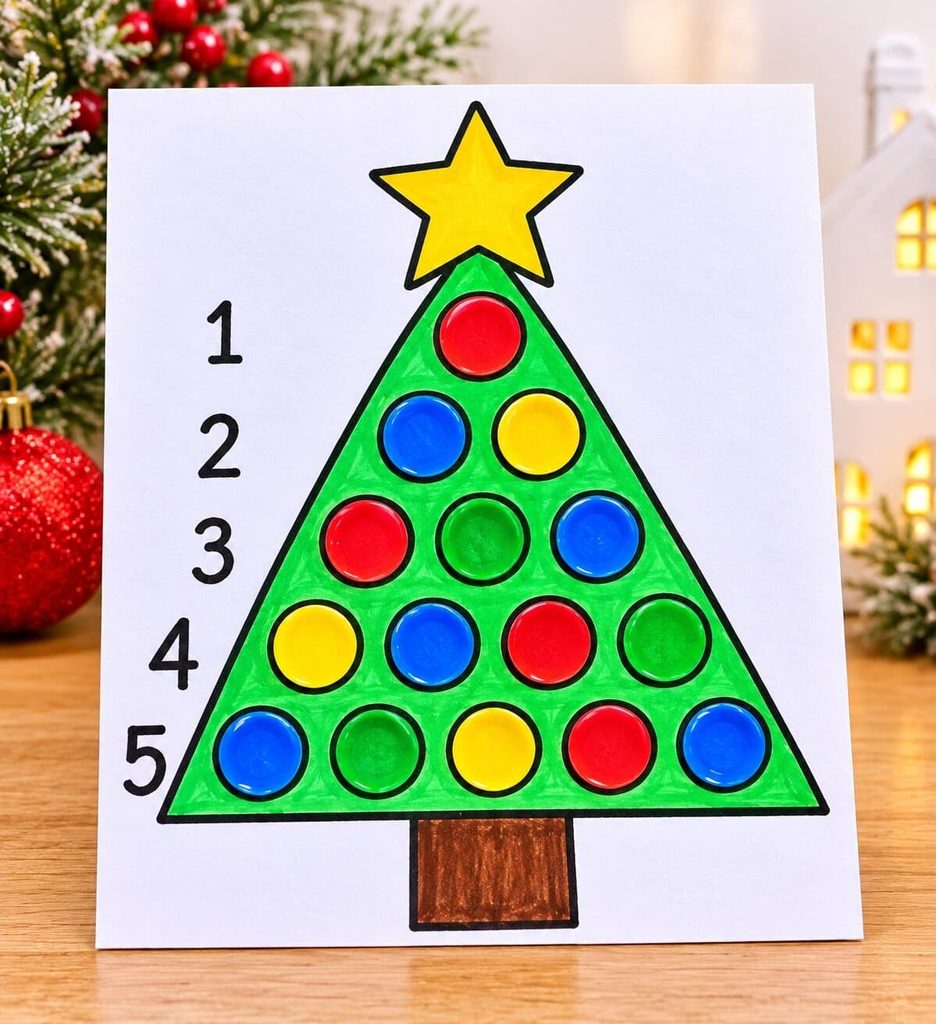
If something goes wrong, do not worry. If the marker smears, cover it with a sticker. If a circle looks crooked, nobody will notice. If the paper curls, tape the edges flat.
What Are the Three Levels of This Preschool Christmas Craft?
The same tree works at three levels. Pick the one that fits your child today. Move up when they are ready.
Level 1: Peel and Stick for 2-Year-Olds
Let your child stick dots anywhere. Use the larger stickers. You can say, “Pick a color and press it down.” This takes five to ten minutes. Your child is practicing peeling and pressing. There are no rules, and that is the point. If your child loses interest after a few dots, stop there. Try again tomorrow.
Level 2: Match the Color for 3-Year-Olds
Ask your child to match each sticker to a colored dot on the tree. You can say, “Find the red sticker for the red dot.” This takes about ten minutes. Your child is practicing color matching and careful placing. If a match is wrong, smile and keep going.
Level 3: Patterns and Counting for Ages 4 to 5
Challenge your child to make a pattern, such as red, green, red, green. Or ask them to count out the right number of dots for each row. You can say, “Row three needs three dots.” This takes about 15 minutes. Your child is practicing patterns and counting. Count the dots out loud together at the end.
Can Siblings of Different Ages Make the Same Christmas Tree Craft?
Yes, give each child their own copy and their own level. Everyone uses the same design, so nobody feels left out. The younger child gets big dots. The older child gets rules.
My kids sat side by side at the table. My toddler stuck dots with joy. My older child counted out loud. If the older child finishes first, hand over a fresh tree and let them invent a new rule. Neither one asked for a different craft. When your child grows, simply move up a level.
How Do You Turn It Into a Reusable Quiet-Time Kit?
Put the tree, stickers, and an instruction card in a folder or ziplock bag. Keep it on a shelf where you can grab it. A ready kit saves you five minutes of setup on a hard afternoon.
Write the three levels on an index card. Set a visual timer for ten minutes. A timer tells your child when the activity ends, which helps avoid surprise meltdowns. For a reusable tree, slip it into a clear sleeve or cover it with contact paper. Peel the stickers off gently when done. Replace them often, since the sticky side wears out.
How Do You Display Dot Sticker Christmas Trees?
Hang them on the fridge, a window, or a wall with painter’s tape. A group of trees looks like a little forest. Add each child’s name and the date. Write the date on the back, too. Next year, you can see how their sticker placing has changed.
Teacher tip: For 15 to 20 kids, prep the trees ahead. Print the template on cardstock and cut sticker strips for each table. Give each child one tree and 25 stickers in a small cup. The whole session takes about 20 minutes. Hang all the trees along one wall to make a class forest.
Is a Dot Sticker Craft Safe for Toddlers?
Yes, with close supervision. Stickers are a choking risk for children under three. Stay within arm’s reach the whole time.
Keep stickers away from mouths. Throw away peeled backing right away. Count the stickers before and after, so none go missing. If your child likes to chew everything, wait a few months and try again.
Frequently Asked Questions
What age can start dot sticker crafts?
Many children can start around age two, with close supervision. Use large stickers and Level 1. Wait longer if your child still puts everything in their mouth.
What size dot stickers are best for a Christmas tree craft?
Three-quarter-inch round stickers work best for most kids. Use larger ones for two-year-olds. Tiny dots are hard for small fingers.
How do I keep toddlers from putting stickers in their mouths?
Stay close and keep the stickers in a strip on the table. Give a few at a time instead of the whole pack. Throw away peeled backing right away.
Can I reuse the dot sticker tree?
Yes. Cover it with a clear sleeve or contact paper. Peel the stickers off gently when finished. You can also draw a new tree in a few minutes.
How long does this Christmas craft take?
Making the tree takes about 15 minutes. Most kids finish in 5 to 15 minutes, depending on the level. A calm afternoon can fit two rounds.
Start With One Tree and Level 1
Draw just one tree and start with Level 1. It takes only a few minutes to set up. Then watch your child grow into the next level, one sticker at a time.

Sohel Rana is the writer, editor, publisher, and founder of The Tidy Porch. He is the man who is responsible for the craft (my wife created) being converted into a written piece. He also helps her wife (Sumona) by capturing videos of each craft. In short, he brings each craft created by her wife in front of you by transforming it into an article and a video.
