
The first year, my son’s thumb was barely bigger than a pea. The paint felt cold, and he squealed. I pressed too hard, and the print came out as a smudge. I kept it anyway.
The dog ended up with a green nose that day, too. Now our Christmas tree thumbprint art holds five rows of prints, and each thumb is bigger than the last.
Last week I stared at that first tiny dot and teared up. You can start your own this year. It takes about 30 minutes, plus drying.
Quick facts: 30 minutes hands-on | 1 hour drying | Ages baby to adult | Washable, non-toxic paint
What Do You Need for Christmas Tree Thumbprint Art?
You need a canvas, washable paint, and a few simple tools.
- An 11 by 14 inch canvas board holds up for years and takes paint well.
- A pencil and ruler help you draw the tree and mark even rows.
- Non-toxic washable paint in green and brown covers the tree and trunk.
- Washable paint in four to six bright colors becomes your ornament prints.
- Paper plates work as quick paint palettes.
- A small flat brush paints the tree evenly.
- A small sponge brush inks a thumb with a thin, even layer.
- Baby wipes clean paint off fast.
- A fine-tip permanent marker or paint pen writes names and years.
- A small star sticker or gold dot tops the tree.
- A pet-safe ink pad lets the dog or cat join in.
- A sheet of scrap paper gives everyone a practice print.
- A frame protects the finished piece.
What Is the Best Surface for a Thumbprint Christmas Tree?
Choose a canvas board, 11 by 14 inches. It stays flat, holds paint well, and fits a standard frame. That size leaves room for about ten years of prints.
Thick cardstock is cheaper, but it can curl as paint dries. The wood looks lovely, but it is heavy and the grain can blur small prints. I used cardstock the first year and switched to canvas in year two. The canvas has held up much better.
How Do You Draw a Christmas Tree for Thumbprints?
Draw a wide triangle with plenty of empty space inside. A simple shape lets you add a new row each December without crowding the old ones.
On your canvas, draw a triangle about ten inches tall. Make the base about nine inches wide. Add a one-inch trunk at the bottom. The top of the tree is narrow, so a small family fits there.
Larger families can start a few rows down, where the tree is wider. Space each row about one and a half inches apart. That gives you room for a print and a tiny name below it.
How to Make Christmas Tree Thumbprint Art Step by Step
Plan on about 30 minutes of hands-on time, plus about one hour of drying.
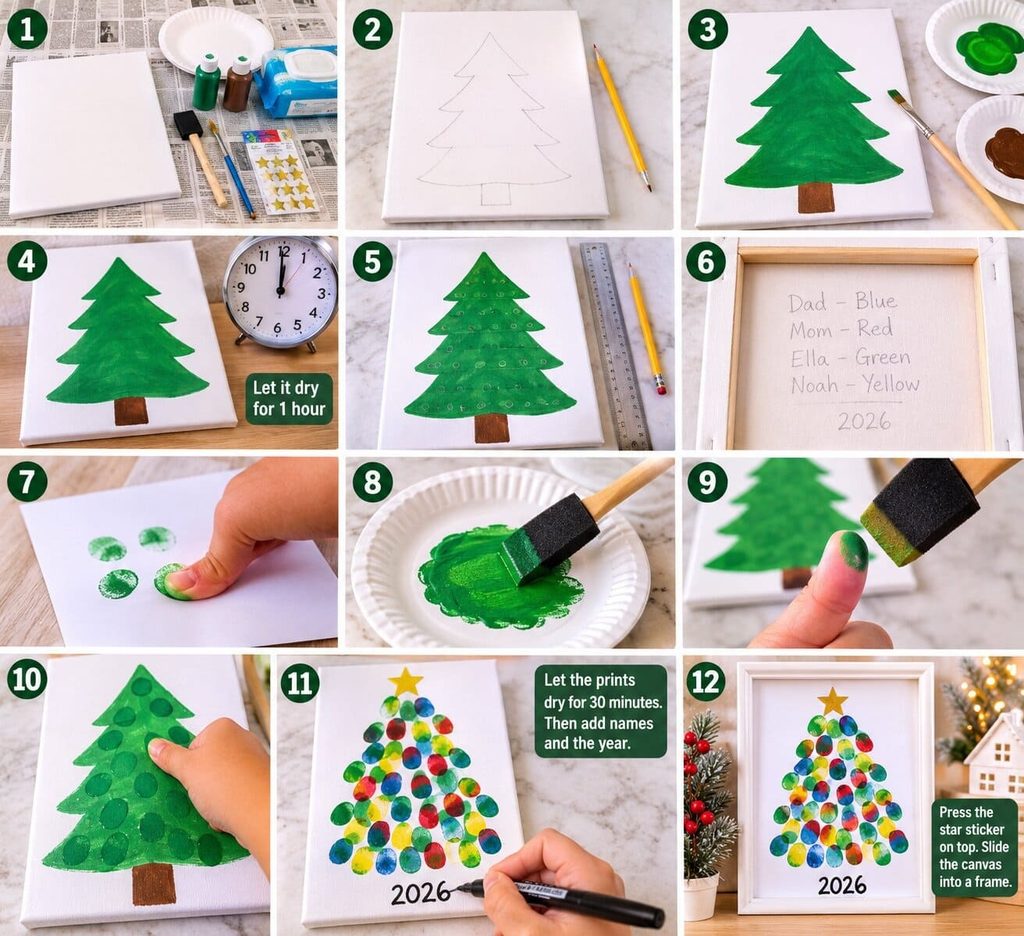
- Cover your table with newspaper. Set out paper plates, wipes, and scrap paper.
- Draw the tree and trunk with a pencil, using the size above.
- Paint the tree green with the flat brush. Paint the trunk brown. Apply two thin coats and let the first dry for 15 minutes.
- Let the tree dry for one full hour. Wet paint will smear the prints.
- Use the ruler to make light pencil dots for the first row. Space them one inch apart.
- Give each person a color. Write the list on the back of the canvas in pencil, such as “Dad, blue.” You will need this next year.
- Practice on scrap paper. Everyone gets one try.
- Squeeze a quarter-sized puddle of paint on a plate. Spread it thin with the sponge brush.
- Dab paint onto the thumb with the sponge. Press the thumb on a pencil dot. Roll it slightly, then lift straight up.
- Wipe the thumb right away. Move to the next person and the next color.
- Let the prints dry for 30 minutes. Then write each name and the year below the print with a marker.
- Press the star sticker on top. Slide the canvas into a frame.
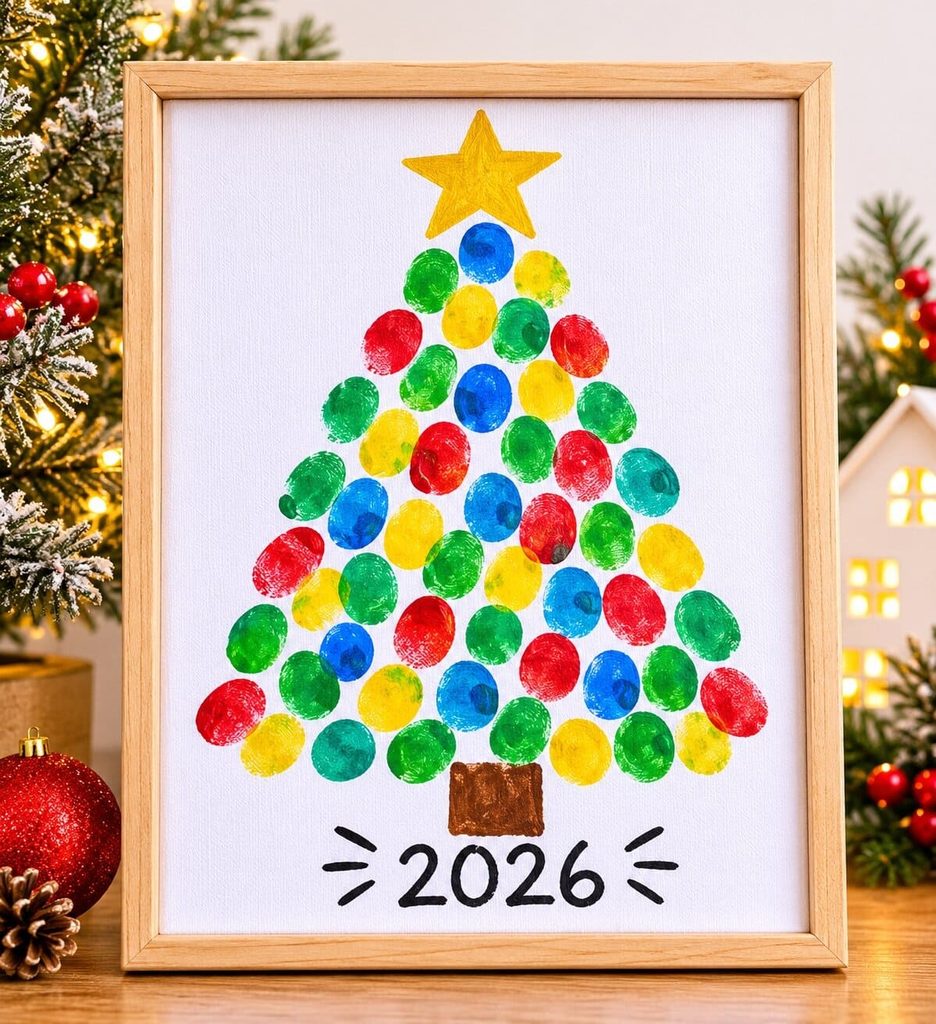
If something goes wrong, stay calm. Wipe a wet print off with a damp cloth right away. If a print dried badly, paint over it with green and try again next to it.
How Do You Get a Clean Thumbprint From a Baby, a Toddler, and an Adult?
Use thin paint and a light touch for everyone. Thick paint blurs the lines of the print. Each age needs a slightly different approach.
Baby Thumbprints
Ink the thumb with the sponge brush, not by dipping. Hold the wrist gently and press the thumb down for a second. I do this after a nap, when my little one is calm. Babies curl their fists, so a tickle on the palm helps open them.
Toddler Thumbprints
Make it a game. Count to three together, then press and lift. Let your toddler hold the sponge, because it keeps small hands busy. Keep a wipe ready in your free hand.
Adult Thumbprints
Adults press too hard. Use a light touch and a quick roll. A soft roll shows each swirl.
How Do You Include the Whole Family and the Pet?
Give each person their own color, then add a row for them. Parents, grandparents, and siblings can all join.
A paw print needs special care. Use only a pet-safe ink pad, not craft paint. Press the paw on scrap paper first, with a treat in your hand. The paw is bigger than a thumb, so cut the print into a circle and glue it in place. Wipe paws right after.
How Do You Add a New Row to the Thumbprint Tree Each Year?
Keep the same paint brand and colors, and keep a swatch card. Dab each color on a small card and tape it to the back of the frame. Colors from different brands rarely match.
Draw the next row at the same spacing as last year. Take a photo of the tree each December before you add prints. Then hang the tree in the same spot each year so it becomes a tradition. We add ours the first weekend of December, right after we put up the real tree.
How Do You Display, Seal, and Store the Art?
Frame it with a mat so the glass does not touch the paint. Hang it away from direct sun, which fades color. Store it flat in a dry place if you take it down.
To seal prints, an adult can use a light coat of clear acrylic spray outdoors. Hold the can about ten inches away. Let it dry fully. I seal mine each year, after the new row dries. Avoid sealing the tree until the paint has cured for 24 hours.
Can You Make a Thumbprint Christmas Tree as a Gift or Classroom Craft?
Yes. Both versions work well with the same basic steps. A smaller canvas makes a lovely gift for a grandparent. Add the child’s name and age so the gift tells a story.
For a classroom, draw one big tree on a poster board. Each child adds one print. Then give every child a mini version to take home.
Teacher tip: For 15 to 20 kids, prep the trees the day before. Set out one paint plate for every four children. Call children over in small groups, and keep a wipe station by the sink. The whole session takes about 30 minutes. Write names after the prints dry.
Is Thumbprint Art Safe for Babies and Toddlers?
Yes, if you take a few simple steps. Choose paint labeled non-toxic and washable. Use skin-safe baby wipes. Stay within arm’s reach the whole time.
Keep paint away from mouths and eyes. Check the skin afterward for redness. I always test a tiny dot on my child’s arm first. If the skin looks red, stop and skip that paint.
Frequently Asked Questions
What paint is safe for a baby’s thumbprint?
Use washable, non-toxic paint labeled safe for children. Baby-safe ink pads also work well. Test a small spot on the skin first.
How do I get a clean thumbprint from a wiggly toddler?
Use thin paint and make it a game. Count to three, press, and lift. Practice on scrap paper first so the real print goes smoothly.
How big should a thumbprint Christmas tree canvas be?
An 11 by 14 inch canvas works for most families. It leaves room for about ten years of prints. Choose a bigger one if you have a large family.
Can I add thumbprints to the tree every year?
Yes. That is the heart of this project. Keep a swatch card of your paint colors, and repeat the same row spacing each December.
How do I keep thumbprint art from fading?
Hang it away from direct sunlight. Use a light coat of clear acrylic spray. A frame also protects it from dust and fingerprints.
Start With One Print This Year
Start with just one thumb and one color. It takes only a few minutes, and you will be glad you began. Next December, you will add a new row and see how much has changed.

Sohel Rana is the writer, editor, publisher, and founder of The Tidy Porch. He is the man who is responsible for the craft (my wife created) being converted into a written piece. He also helps her wife (Sumona) by capturing videos of each craft. In short, he brings each craft created by her wife in front of you by transforming it into an article and a video.
