
On a gray December afternoon, I dumped a bag of pinecones on the kitchen table. My daughter grabbed a green brush and got to work.
The room smelled like pine and wet paint. By dinner, her pinecone Christmas tree craft had grown into eight little trees. One tipped over and took a cup of water with it. We laughed and kept going.
Then I spread cotton batting on a tray and set the trees in it. Our table became a snowy forest. You can build one too. It takes about 45 minutes, plus drying.
Quick facts: 45 minutes hands-on | 1 hour drying | Ages 3 and up | Pinecones are free
What Do You Need for a Pinecone Christmas Tree Craft?
You need pinecones, paint, and a few simple bases.
- Pinecones in mixed sizes, from one to four inches, make the forest look natural.
- A baking sheet lined with foil catches sticky sap in the oven.
- Non-toxic washable paint in green, white, and gold keeps cleanup easy.
- Foam brushes give small hands smooth control.
- Wooden discs about two to three inches wide work as sturdy bases.
- Low-temp hot glue or tacky craft glue holds each cone in place.
- Paper stars or tiny star stickers make quick tree toppers.
- Cotton batting or white felt becomes your snowy ground.
- A wooden tray or board gives the forest a frame.
- Newspaper or a drop cloth protects your table.
How Do You Prepare Pinecones for Crafting?
Pick dry, closed cones with a flat bottom, then bake them. Baking kills hidden bugs and opens the scales. Scales are the small wooden flaps.
Shake each cone hard outdoors. Look for cones that sit upright with no wobble. Skip any that lean to one side.
Mix your sizes. A forest of identical trees looks like a row of soldiers. Tall and short trees look like the real thing. I aim for two big cones, four medium, and four small.
Set the cones on your foil-lined sheet. Bake at 200°F for 30 to 45 minutes. Stay nearby, since sap can drip. Let them cool fully before anyone touches them.
What Is the Kid Job and What Is the Adult Job?
Your child paints and decorates. You handle the oven, the glue, and the final setup. This split keeps the fun with your child and the polish with you.
Here is what your child does:
- Paints the cones green.
- Dabs white paint on the tips for snow.
- Presses on star toppers.
Here is what you do:
- Bake the cones.
- Glue each cone to its base.
- Add gold touches.
- Arrange the finished trees on the tray.
Toddlers last about ten minutes at the table. That is enough time to paint two or three trees. I finish the rest while my daughter snacks. Uneven paint is fine. It gives each tree its own character, and dry brushing hides most of the gaps.
How to Make Pinecone Christmas Trees Step by Step
You need about 45 minutes of hands-on time and one hour of drying. Follow these steps in order.
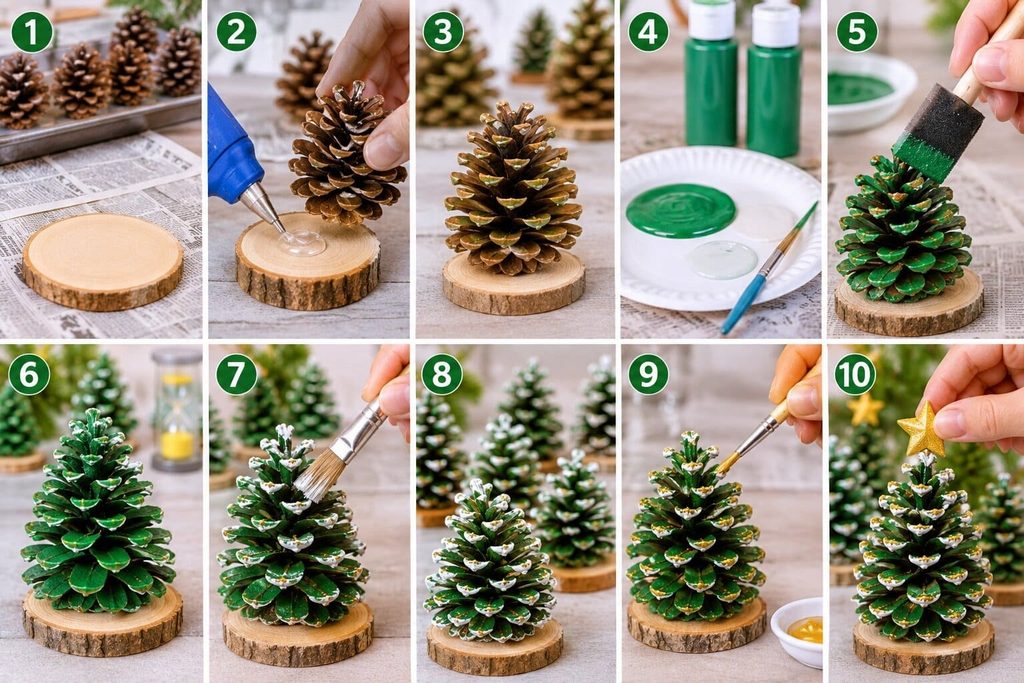
- Cover your table with newspaper. Bake and cool your pinecones using the method above.
- Put a dime-sized dot of hot glue on a wooden disc. Press a cone onto it, flat end down. Hold for 15 seconds.
- Check each tree. If one rocks, add a little more glue around the bottom edge. Let it set for five minutes.
- Pour green paint onto a paper plate. Stir in two or three drops of water. Thin paint slides between the scales and does not clump.
- Hand your child a foam brush. Show them how to dab down and across the cone. Dabbing covers better than scrubbing.
- Let the first coat dry for 20 minutes. Add a second coat if you see bare brown patches.
- Put a little white paint on a clean brush. Wipe most of it off on a paper towel. Lightly brush the tips of the scales. This is called dry brushing. It leaves a soft, frosty look.
- Let all the trees dry for 30 to 45 minutes. Test one with a finger before you move on.
- Dab a touch of gold on a few tips of each tree. Use a very light hand. A little shine goes a long way.
- Glue a paper star to the top of each cone with a pea-sized dot of craft glue. Hold for ten seconds.
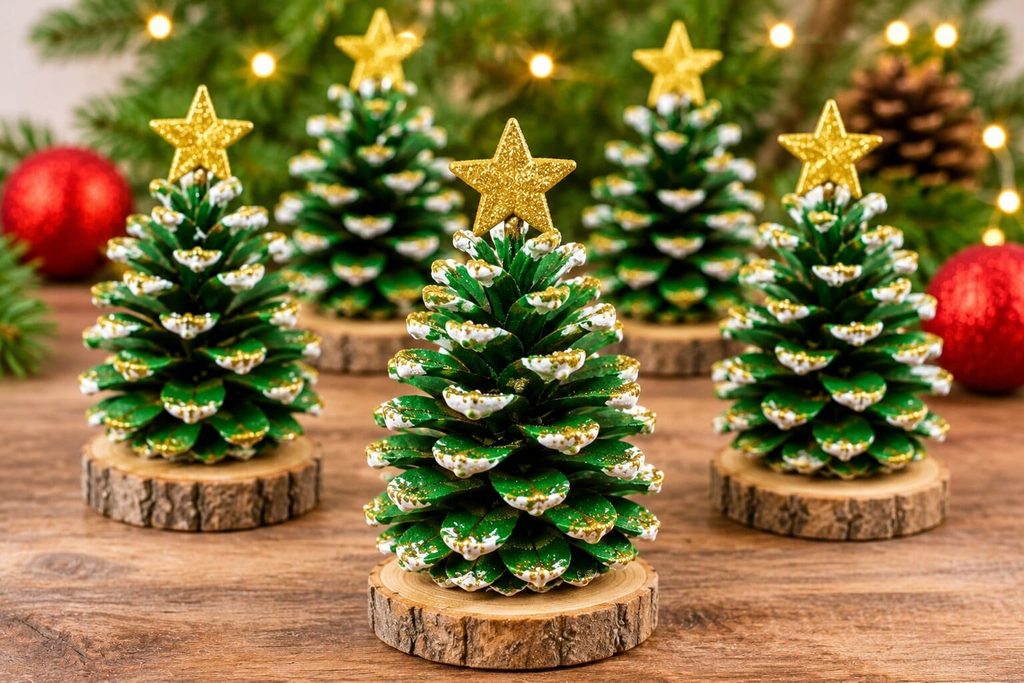
If something goes wrong, do not worry. Wipe wet paint mistakes with a damp paper towel. If a star slides off, use stronger glue. If a tree tips, trim the bottom of the cone with scissors, then reglue it. If paint looks streaky, wait until it dries and add one more thin coat.
What Pinecone Tree Styles Should You Make?
Make four styles and mix them. Variety makes the scene feel real. You can make two or three of each.
Snowy White Pinecone Trees
These are the easiest. Paint the whole cone thin white, then dry brush a little green at the bottom for depth.
Forest Green Pinecone Trees
Paint two coats of green. Add a touch of white on the tips of the top rows only.
Gold-Tipped Pinecone Trees
Paint the cone green first. Brush gold lightly over the scale tips once the green is dry.
Mini Baby Pinecone Trees
Use the smallest cones you have. Paint them any color you like. Glue them to tiny cardboard circles cut from a cereal box.
How Do You Arrange a Pinecone Forest So It Looks Styled?
Group your trees in odd numbers and vary their heights. Odd groups look natural to the eye. Even rows look stiff.
Spread cotton batting on your tray. Pull it apart a little so it looks fluffy. Set your tallest tree slightly off-center. Place medium trees around it in groups of three. Tuck baby trees near the front.
Leave gaps between groups. Empty space looks like a path through the woods. Stick to three or four colors in the whole scene. I use white, green, and gold. A small palette makes a handmade scene look planned.
Add small touches last. A few pinches of white glitter on the batting look like fresh snow. A tiny string of battery lights tucked behind the trees makes the scene glow at night. Choose cool-running LED lights and keep them low.
Where Can You Display Pinecone Christmas Trees?
A tray forest fits on a mantel, dining table, shelf, or classroom windowsill. Choose a spot away from heat. Cotton batting and candles do not mix.
Gift version: Make a small forest of three trees on a small board. Tie a ribbon around the board. Grandparents love it.
Teacher tip: For a group of 15 to 20 kids, do the prep ahead. Bake the cones and glue them to bases the night before. Set out one paper plate of thin paint per table. Give each child two cones. A 30-minute session works well. Let the trees dry overnight, then arrange one class forest together.
Is a Pinecone Craft Safe for Toddlers?
Yes, if an adult handles the risky parts. Hot glue and the oven are adult-only jobs.
Choose paint labeled non-toxic and washable. Skip beads, buttons, and sequins for children under three. These are choking risks. Keep glitter away from little mouths and eyes. Stay within arm’s reach the whole time. I keep a wet rag nearby for sticky fingers.
How Do You Store Pinecone Trees So They Last?
Store them in a box with tissue paper between the trees. Keep the box in a dry spot. Damp air can cause mold.
Wrap the tall trees one at a time so the stars do not bend. Keep the cotton batting in a separate bag. It is cheap, so you can replace it each year. Mine have lasted four Christmases and still look good.
Frequently Asked Questions
How do I make pinecone trees stand up?
Glue each cone to a flat base. A wooden disc or a cardboard circle works well. Choose cones with flat bottoms for the best balance.
Do I need to bake pinecones before crafting?
Yes, I strongly suggest it. Baking removes bugs and sap. It also opens the scales so your trees look fuller.
What paint works best on pinecones?
Matte acrylic craft paint works best. Pick the non-toxic washable kind when kids help. Thin it with a few drops of water so it slides between the scales.
Can toddlers make pinecone Christmas trees?
They can. Toddlers can dab paint and press on stars with help. You handle the oven, the glue, and the setup.
How long does a pinecone Christmas tree craft take?
Plan on about 45 minutes of hands-on time. Add one hour for drying. You can split it over two days to keep things relaxed.
Start With One Tree
Make one tree first. It shows you how your paint behaves and how your cones sit. Then add a second, and a third, and watch your forest grow into something your whole family wants to show off.

Sohel Rana is the writer, editor, publisher, and founder of The Tidy Porch. He is the man who is responsible for the craft (my wife created) being converted into a written piece. He also helps her wife (Sumona) by capturing videos of each craft. In short, he brings each craft created by her wife in front of you by transforming it into an article and a video.
