
Every December, I made a handprint wreath with the little ones in my life. We hung it up. Then I packed it away in January and never saw it again. It felt like a waste.
Small hands only stay that size for a short time. So I tried something new. I built one paper base and swapped the handprints each season. The wreath stayed on the wall all year.
This wreath handprint craft needs only paper, scissors, and glue. You will make one reusable wreath that moves from fall to Christmas to spring.
What Is a Reusable Handprint Wreath, and Why Does It Work All Year?
A reusable handprint wreath is one paper base with handprints that peel off and swap. You build the base once. You change the handprints when the season changes.
I like this setup because the hard part happens only one time. The base takes about ten minutes. A new set of handprints takes about fifteen.
Each set also records how big your child’s hand was that year. Write the date on the back, and you have a keepsake you can pull out and compare later.
What Materials Do You Need for a Handprint Wreath for Kids?
You need paper, scissors, glue, and a few small extras. Most of it is probably in your craft drawer already.
- 1 sturdy 9-inch paper plate
- 6 to 8 sheets of cardstock in one season’s colors
- 1 green crayon or marker, or 1 sheet of green paper
- 1 pencil
- Child-safe scissors for the kids and sharp scissors for you
- 1 glue stick
- Removable glue dots or small loops of masking tape
- 1 hole punch
- 18 inches of ribbon or yarn
- 1 envelope for storing old handprints
Cardstock is worth the extra cost. Thin construction paper curls and tears when little hands press on it. Keep baby wipes close for sticky fingers.
How Do You Make a Wreath Handprint Craft Step by Step?
Follow the ten steps below. The whole project takes about 45 minutes. Kids ages 2 to 5 can help with every part, with an adult nearby. Toddlers can trace and press. Preschoolers can try the cutting.
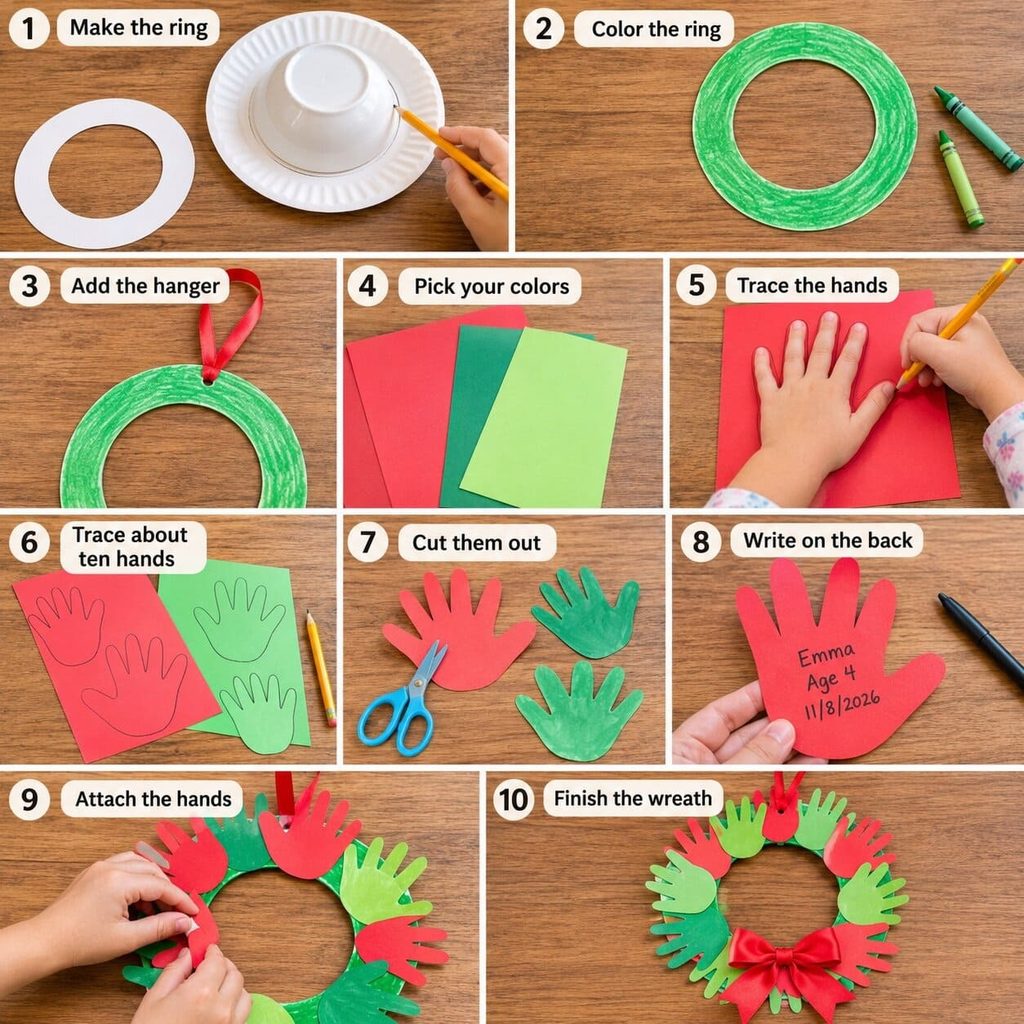
- Make the ring. Set a small bowl in the center of the plate. Trace around it with a pencil. Cut out the circle. You now have a ring about two inches wide.
- Color the ring green. Fill it in with a crayon or marker. You can also glue a sheet of green paper over it and trim the edges. If you use glue, give it ten minutes to dry.
- Add the hanger. Punch one hole near the top edge of the ring. Thread the ribbon through. Knot the ends to make a loop.
- Pick your colors. Choose two or three for the current season. Lay the sheets out so your child can see them.
- Trace the hands. Place your child’s hand flat on a sheet with the fingers together. Trace around it with the pencil. Ask your child to hold still like a starfish. A calm voice helps wiggly toddlers.
- Trace about ten hands. Two or three fit on one sheet. If your child gets tired, trace the rest yourself.
- Cut them out. Toddlers need an adult to cut. Preschoolers can cut wide, easy curves. Trim any rough edges afterward.
- Write on the back. Turn each hand over. Write your child’s name, age, and the date. Do this now, before the handprints are on the wreath.
- Attach the hands. Put a glue dot or tape loop on the back of each palm. Press the first hand onto the ring. Point the fingers the same direction every time, like leaves growing around a circle. Let each hand overlap the last one slightly.
- Finish the wreath. Fill any gaps with one more hand. Add a paper bow at the bottom if you like. Hang it up and step back.
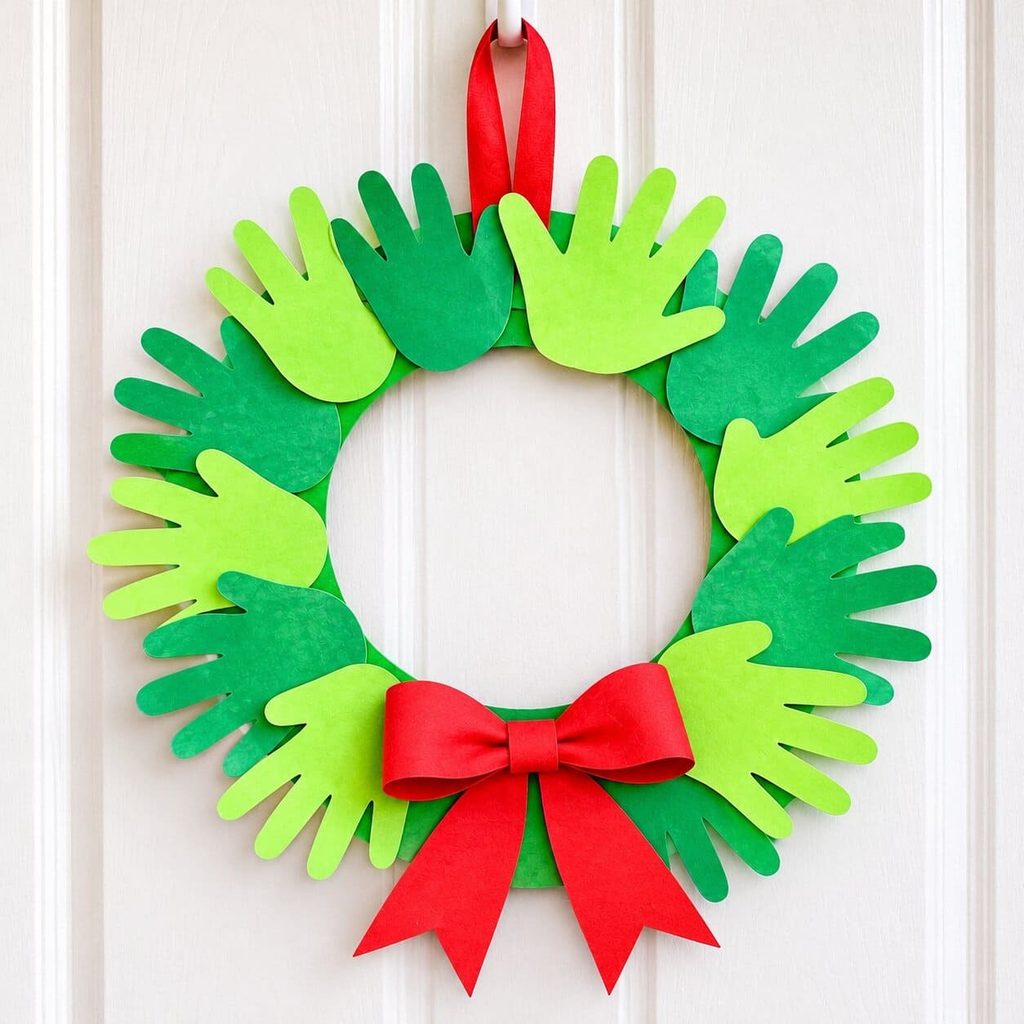
In my kitchen, steps one to three went fast. Steps five to seven took the longest. If your child loses interest, stop after tracing and finish the next day.
Which Colors and Handprints Work for Each Season?
Match the handprint colors to the season and keep the same green base. Here are combinations that look good together.
- Fall: orange, yellow, brown, and deep red. The hands look like autumn leaves.
- Christmas: red, green, and white. Add tiny paper circles as berries.
- Valentine’s Day: pink, red, and white. Overlap the hands for a soft, full look.
- Spring: pale pink, lavender, and light yellow. Glue a paper flower where the hands meet.
- Summer: sky blue, sunny yellow, and coral. It looks bright on a plain wall.
Two colors can look cleaner than four. If you want variety, change the shade, not the number of colors.
How Can You Help Toddlers and Preschoolers Succeed?
Keep each step short and let kids do the parts they can handle. A calm, quick session works better than a long one.
- Tape the paper to the table so it does not slide while tracing.
- Split the craft into two sessions. Trace and cut on day one. Build the wreath on day two.
- Let toddlers press the glue dots. Most kids enjoy this part.
- Use scissors only with an adult within arm’s reach.
- Praise the effort. A wobbly edge adds charm.
Wobbly cuts show up less once the hands overlap. The finished wreath still looks full and cheerful.
How Do You Turn It Into a Class or Group Wreath?
Give each child one handprint and build the wreath on a bigger ring. A teacher can cut a large ring from a poster board or the lid of a big cardboard box.
Here is a simple plan for a class of about 20.
- Trace a round tray or pizza box onto poster board, then cut out the center.
- Have each child trace one hand on cardstock.
- Cut the hands out, or cut them ahead of time for younger groups.
- Write each child’s name on the back.
- Attach the hands in a circle with glue dots.
Next season, each child makes a fresh handprint. The class wreath changes with the calendar. Parents will notice how the hands grow.
How Do You Hang, Store, and Swap the Handprints?
Hang the wreath by its ribbon on a hook, and keep old handprints flat in an envelope. Paper does not like rain or direct sun. An indoor wall or a covered porch spot works best.
To swap the handprints, peel each one off slowly. Press new glue dots onto the new hands and place them around the ring.
Slide the old set into the envelope. Label it with the season and year, such as “Fall 2026.”
Take the old sets out once a year and lay them side by side. You will see the size change. Many parents enjoy that more than the wreath itself.
Wreath Handprint Craft FAQs
What age is this wreath handprint craft best for?
It works well for ages 2 to 5 with adult help. Toddlers can trace and press the glue dots. Preschoolers can try the cutting.
Can I use paint instead of paper?
Yes. Paint handprints on separate sheets of cardstock and let them dry. Then cut them out and attach them as usual. Painting straight onto the plate makes them impossible to swap.
How many handprints do I need?
About ten covers a 9-inch plate ring. Use twelve if your child has small hands. Extra hands fill any gaps.
Can I make it without a paper plate?
Yes. Cut a ring from a cereal box, poster board, or thin cardboard. Color it green and follow the same steps.
How do I make the wreath last for years?
Use cardstock, removable glue dots, and an envelope for storage. Keep everything dry and away from direct sun.
How do I make it a keepsake?
Write your child’s name, age, and the date on the back of each hand. Store each set in its own envelope. Add a new set each year.
Your Wreath Handprint Craft Is Ready
This wreath handprint craft takes one afternoon and keeps working all year. You make the base once. Then you change the handprints and enjoy the wreath in every season.

Sohel Rana is the writer, editor, publisher, and founder of The Tidy Porch. He is the man who is responsible for the craft (my wife created) being converted into a written piece. He also helps her wife (Sumona) by capturing videos of each craft. In short, he brings each craft created by her wife in front of you by transforming it into an article and a video.
