
Last Sunday, I traced four hands on the same sheet of paper. Mine, my sister’s, her son’s, and the baby’s. I only wanted to test the outline. Then I lined them up and stopped.
The hands stepped down in size like a family photo. One looked like a mama whale. One looked like a calf. I grabbed more paper and kept going. This whale handprint craft turns each hand into its own whale.
Together they swim on one ocean scene. You need paper, scissors, and glue. A pod takes less than an hour.
What Is a Whale Pod Handprint Craft, and Why Does It Make a Great Keepsake?
It is a paper craft where every person in a group adds one handprint whale to the same ocean. The whales swim side by side, and each one is a different size.
It works as a keepsake because hand size tells a story. A toddler’s whale sits next to a grandparent’s whale. Years later, you can see exactly who made which one. My sister framed ours, and her son still points to the tiny whale first.
What Materials Do You Need for a Handprint Whale Craft for Kids?
You need paper, glue, scissors, and a few small extras. This list makes a pod of four whales.
- 1 large sheet of blue paper or poster board, about 12 by 18 inches, for the ocean
- 1 sheet of light blue paper for waves
- 4 sheets of gray, blue, or dark purple cardstock for the whales
- 8 small scraps of white paper for name tags and spouts
- 8 googly eyes, or a black marker
- 1 pencil
- 1 black marker
- Child-safe scissors, plus sharper scissors for you
- 1 glue stick and 1 small bottle of white glue
Cardstock holds its shape better than thin paper. White glue sticks the googly eyes and small spouts better than a glue stick does.
How Do You Make a Whale Handprint Craft Step by Step?
Follow the steps below. The whole craft takes about 45 minutes. It works for ages 2 to 6 with an adult nearby. Toddlers can press and stick. Older kids can trace and cut.
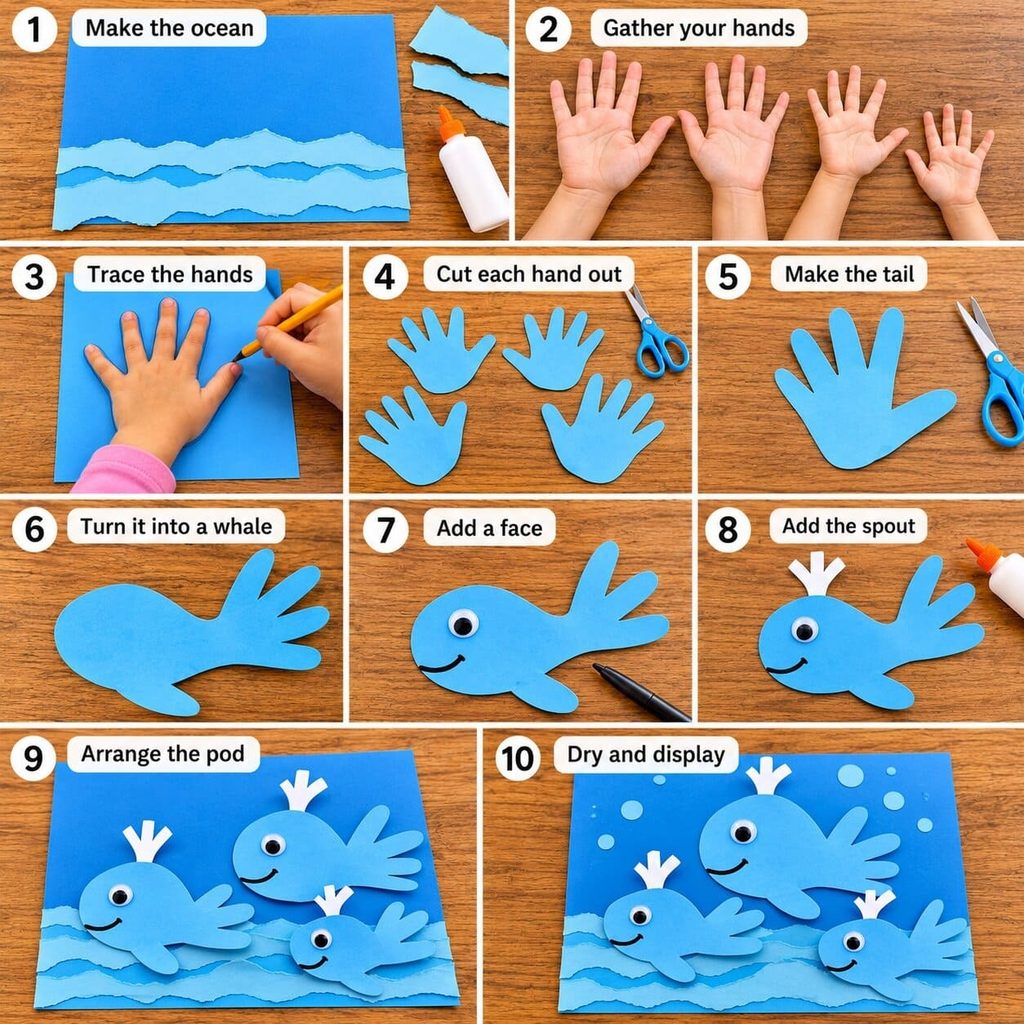
- Make the ocean. Tear the light blue paper into wavy strips. Glue them along the bottom third of the big blue sheet.
- Gather your hands. Pick four people. A mix of sizes works best.
- Trace the hands. Press one hand flat on cardstock with the fingers together and the thumb out. Trace around it, including a little of the wrist.
- Cut each hand out. Round off the wrist end. That becomes the whale’s head. Adults should cut for toddlers.
- Make the tail. Cut a short slit between the middle and ring fingers, about one inch long. Fan the two sides apart so they look like tail flukes.
- Turn it into a whale. Rotate the hand sideways. The palm is the body. The thumb is the side fin. The fingers are the tail.
- Add a face. Glue on a googly eye near the head. Draw a curved smile with the marker.
- Add the spout. Cut a tiny white strip with a few snips at the top. Glue it above the head.
- Arrange the pod. Place the biggest whale at the back and the smallest near the front. Leave small gaps between them. Glue them down.
- Dry and display. Let the scene dry flat for 20 minutes. Then hang it or tuck it in a frame.
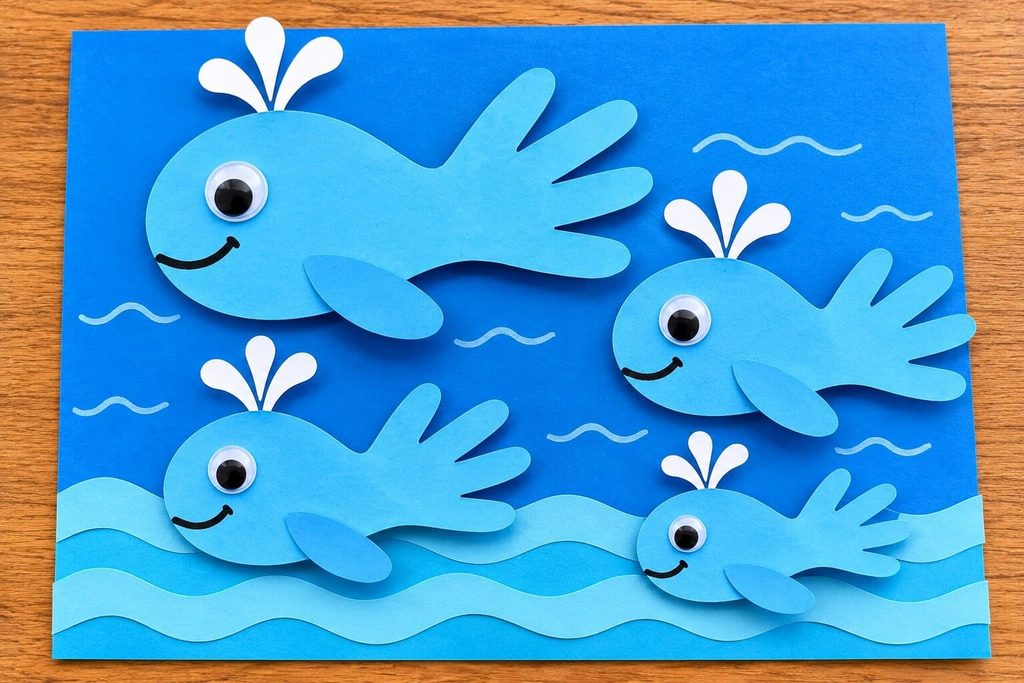
Steps three to five take the longest. If your little one gets restless, trace and cut ahead of time. They can still decorate and glue.
How Do You Turn Handprints Into Whales of Different Sizes?
Let each person’s real hand set the size. Bigger hands make bigger whales, and smaller hands make smaller ones. You do not need to resize anything.
Try this order for a family pod. Trace a parent first. Then a sibling. Then the youngest child. A baby can press a hand on a scrap, and you can trace around it. Even a baby’s tiny whale holds up well next to the big ones.
If every hand is about the same size, change the paper colors. Use a darker gray for the adult and a lighter blue for the child. You can also tilt one whale to look like it is swimming up.
How Do You Make the Name Tags and Spout Messages?
Write each person’s name on a small white tag and tuck it under their whale. Then add a one-word message to the spout. It takes five extra minutes. It also makes the pod feel personal.
Here are messages that worked for us.
- Brave
- Kind
- Silly
- Strong
- Love
For a mother and calf pair, I like “Mama” and “Little One.” Young kids can tell you the word, and you can write it. Older kids can pick their own. Cut a tiny strip, write the word, and glue it above the spout.
What Whale Facts Can You Share While You Craft?
Talk about whales while the glue dries. A few short facts make the craft a mini science lesson. Keep them simple.
- Whales are mammals. They breathe air, like us.
- A whale’s spout is warm breath blown out through its blowhole. It is not water from its mouth.
- Baby whales are called calves. A calf often swims close to its mother.
- Orcas and sperm whales travel in family groups called pods.
- Some whales, such as blue whales, often swim alone or in pairs.
- Blue whales are the largest animals on Earth.
My nephew liked the blowhole fact best. He kept blowing air out of his nose and calling it a spout.
How Can You Help Toddlers and Preschoolers Succeed?
Keep each step short and let kids do the parts they can handle. A quick, calm session works better than a long one.
- Tape the paper to the table before you start.
- Trace and cut the hands ahead of time for children under three.
- Let toddlers press the whales onto the ocean and stick on the waves.
- Skip googly eyes for children under three. Draw eyes with a marker.
- Keep baby wipes close for sticky fingers.
- Split the craft into two sessions if energy runs low.
- Praise the ideas, not the neatness.
Wobbly edges look natural in an ocean scene. No one will notice a crooked tail.
How Do You Make a Class Whale Pod?
Give each child one handprint whale and build one big ocean together. This works well for ocean units and end-of-year displays.
Here is a simple plan for a class of about 20.
- Cover a bulletin board with blue paper. Add wavy strips along the bottom.
- Have each child trace a hand on cardstock. Cut them out ahead of time for younger classes.
- Let each child add an eye, a smile, and a name tag.
- Ask each child to pick a kind word for the spout.
- Staple the whales onto the board in loose groups.
Title the board “Our Class Pod.” Kids can find their own whale and then read their classmates’ kind words. It makes a sweet display for open house night.
How Do You Display, Frame, or Give the Finished Pod as a Gift?
Hang the pod on a wall, tuck it in a frame, or roll it up as a gift. A gift version works well for grandparents, birthdays, and baby showers.
For a frame, use a flat frame that leaves a little space under the glass. This keeps the googly eyes from pressing flat. For a hanging version, tape a ribbon loop on the back. Write the date and the names on the back, too. Years later, you will be glad you did.
Skip tape on the front. It can lift the paper. Use a small dot of glue instead.
Whale Handprint Craft FAQs
What age is this whale handprint craft best for?
It works well for ages 2 to 6 with an adult nearby. Toddlers can stick and press. Older kids can trace, cut, and write the messages.
Can I use paint instead of paper?
Yes. Paint a hand and press it on a scrap of paper. Let it dry, then cut it out. Painting straight onto the ocean makes it hard to change the layout.
How many whales should be in the pod?
Three to five whales look full without feeling crowded. Four is a good starting point. You can add more for a class pod.
Can I make this with only one child?
Yes. Trace a parent’s, grandparent’s, or sibling’s hand, too. You can also make a mother and calf pair with an adult’s whale and a child’s whale.
What if the hands are all the same size?
Change the paper shade for each whale. Use darker colors for the grown-ups and lighter ones for the kids. You can also tilt the whales at different angles.
How do I make it a keepsake?
Write each person’s name and the date on the back. Frame the scene or store it flat in a folder. Add a new pod every year, and the sizes will tell the story.
Your Whale Handprint Craft Is Ready to Swim
This whale handprint craft is simple, and it grows with your family. Each hand makes one whale. Together they make a pod. Hang it where you can see it, and make a new one next year.

Sohel Rana is the writer, editor, publisher, and founder of The Tidy Porch. He is the man who is responsible for the craft (my wife created) being converted into a written piece. He also helps her wife (Sumona) by capturing videos of each craft. In short, he brings each craft created by her wife in front of you by transforming it into an article and a video.
