
Last winter, I read a Dr. Seuss story at bedtime with my niece. The next morning she stopped at the recycling bin. She pulled out a cereal box and asked if the Lorax could use it.
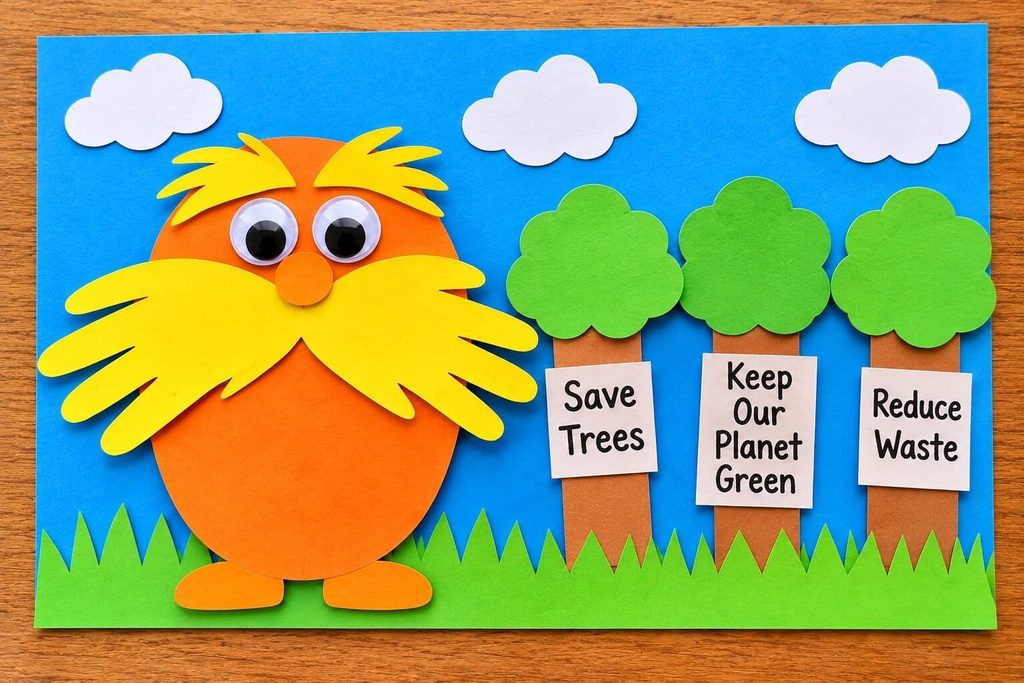
I laughed, then said yes. We cut it up and made a paper friend with a big yellow mustache. This lorax handprint craft uses scrap paper, scissors, and glue.
You trace a hand to make the mustache. Then you add tiny trees that each hold a nature promise. By the end, you have a Lorax-inspired character and a whole pledge forest.
What Is a Scrap-Paper Lorax Pledge Forest, and Why Does It Work?
It is a Lorax-inspired paper craft made from recycled scraps, with a small forest of trees that each hold one nature pledge. It works because kids do something instead of only making something.
The scrap paper is part of the lesson. Your child sees that old cereal boxes and junk mail can become something new. The pledge is short and chosen by the child. My niece wrote that she would turn off the water while brushing her teeth. She talked about it for days.
What Materials Do You Need for a Lorax Handprint Craft?
You need scrap paper, glue, and scissors. Dig through the recycling bin before you buy anything. This list makes one Lorax and four pledge trees.
- 1 piece of orange scrap paper, about 6 by 8 inches, for the body (a paper bag colored with orange marker also works)
- 2 sheets of yellow scrap paper for the handprints and eyebrows
- 4 pieces of bright scrap paper, about 4 inches square, for tree tops (pink, orange, yellow, or purple)
- 4 strips of green or brown scrap paper, 2 by 6 inches, for tree stems
- 1 sheet of blue or white paper, about 12 by 18 inches, for the background
- 1 small scrap of red or brown paper for the nose
- 2 googly eyes, or a black marker
- 1 pencil and a few markers
- 1 glue stick and 1 small bottle of white glue
- Child-safe scissors, plus sharper scissors for you
Cereal box cardboard makes a sturdy body. Thin paper curls when it gets wet with glue, so use the glue stick on large pieces.
How Do You Make a Lorax Handprint Craft Step by Step?
Follow the ten steps below. The whole craft takes about 45 minutes. It works for ages 2 to 6 with an adult nearby. Toddlers can press and stick. Older kids can trace, cut, and write.
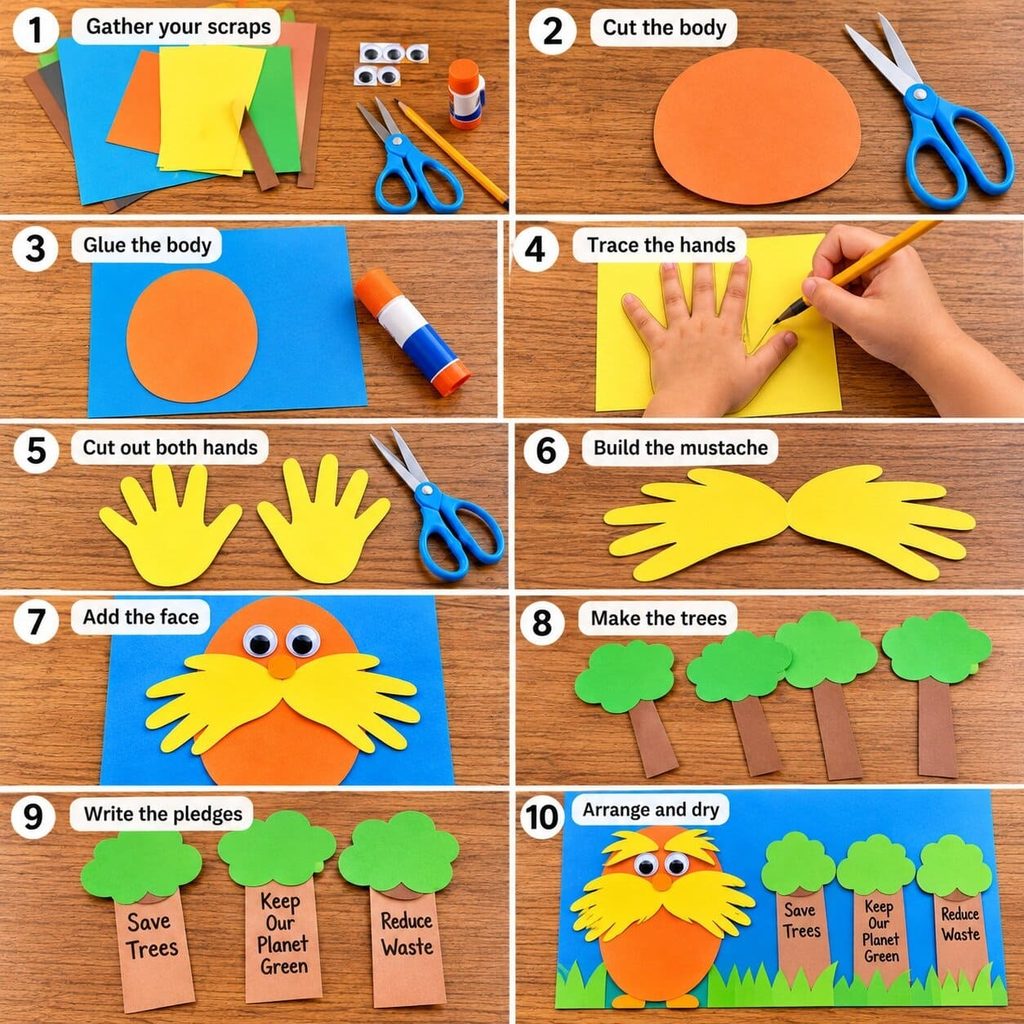
- Gather your scraps. Sort the paper by color. Set the yellow pile close to your child.
- Cut the body. Cut the orange paper into a plump oval. A wobbly oval looks friendly.
- Glue the body. Place the oval near the left side of the blue sheet. Press it down with the glue stick.
- Trace the hands. Press your child’s hand flat on the yellow paper. Trace it with a pencil. Do this twice.
- Cut out both hands. Adults should cut for toddlers. Older kids can cut wide curves.
- Build the mustache. Follow the mustache steps in the next section.
- Add the face. Glue on two googly eyes above the mustache. Add a small paper nose between them.
- Make the trees. Follow the tree steps below, one tree for each pledge.
- Write the pledges. Ask your child to say each promise out loud. Then write it on a stem.
- Arrange and dry. Glue the trees in a row on the right side. Let the whole scene dry flat for 20 minutes.
Steps four and five take the longest. If your child gets tired, trace and cut ahead of time. They can still decorate and glue.
How Do You Make the Handprint Mustache and Eyebrows?
Turn the two yellow handprints so the fingers point out to the sides. Overlap the palms under the nose. The two hands form one big, fluffy mustache.
Here is a quick way to do it. Glue the first hand with its fingers pointing left. Glue the second one over it with its fingers pointing right. Let the thumbs stick out a little at the top.
For the eyebrows, cut two small yellow shapes from the leftover scrap. Make them thick and slightly curved. Glue them above the eyes. Angle them a bit for a grumpy look, or flatten them for a calm one. My niece gave hers a big surprised arch, and it looked great.
How Do You Make the Truffula Tree Pledge Tops?
Cut each bright square into a round top, then snip a fringe around the edge. The fringe gives you the fluffy, tufted look of the story’s trees. Glue the top to the upper end of a stem strip.
A few tips help this go smoothly.
- Fold the square in half and cut a half circle. When you open it, the top is round.
- Make short cuts around the edge. Stop about half an inch before the middle.
- Curl the fringe a little with a pencil. It looks softer.
- Use white glue where the top meets the stem. It holds better.
Little hands can curl the fringe and press the pieces together. That small job keeps toddlers busy and proud.
What Are Easy Pledge Ideas for Young Kids?
Short, simple pledges work best. Pick actions that a small child can really do. Here are ideas that worked at our table.
- Turn off the water while I brush my teeth.
- Put my paper in the recycling bin.
- Help plant a seed.
- Pick up one piece of litter.
- Say thank you to a tree.
- Use both sides of my paper.
If your child cannot write yet, say the pledge back and write it for them. They can add a small drawing next to it. A picture counts as a promise too.
How Can You Help Toddlers and Preschoolers Succeed?
Keep each step short and give kids jobs they can finish. A calm, quick session works better than a long one.
- Tape the paper to the table so it does not slide.
- Trace and cut the yellow hands ahead of time for children under three.
- Let toddlers press the pieces down and curl the fringe.
- Draw the eyes with a marker for children under three. Googly eyes are a choking risk for very young kids.
- Keep baby wipes nearby for sticky fingers.
- Split the craft into two sessions. Make the Lorax first, then the trees.
- Praise the ideas, not the neatness.
Crooked cuts add charm to a forest. No tree needs to look the same.
How Do You Make a Class Pledge Forest for Seuss Day or Earth Day?
Give each child one tree and let the Lorax stand at the head of the forest. This works well for a class of about 20.
Here is a simple plan.
- Make one big Lorax on a bulletin board. Use poster board for the body and a teacher’s handprints for the mustache.
- Give each child a stem, a top, and a pencil.
- Ask each child to think of one pledge. Write it on the stem.
- Let kids glue their trees along the bottom of the board, side by side.
- Add a title like “Our Pledge Forest.”
The same display works twice a year. Use it around Dr. Seuss Day in early March. Then keep it up for Earth Day in April. In April, read a few pledges aloud and ask who has kept theirs.
How Do You Display and Keep the Craft?
Hang the craft on a wall or the fridge, or tuck it into a frame. Paper holds up well indoors. Keep it away from direct sun, which fades bright colors.
For a keepsake, write your child’s name, age, and the date on the back. Then add the year to the pledges. Later, you can look back and see what your child cared about at that age. Some families add a new tree each Earth Day.
Lorax Handprint Craft FAQs
What age is this lorax handprint craft best for?
It works well for ages 2 to 6 with an adult nearby. Toddlers can press, glue, and curl fringe. Kindergarten kids can cut and write their own pledges.
What can I use if I do not have orange paper?
Color a paper bag with an orange marker or crayon. You can also use orange paint on plain cardboard. Let it dry before you cut the oval.
Can I use paint instead of paper?
Yes. Paint your child’s palm yellow and press it on scrap paper. Let it dry, then cut it out and use it as the mustache. It gives a softer, painted look.
Can I do this without googly eyes?
Yes. Draw the eyes with a black marker, or cut two white circles and add black dots. This is also safer for toddlers.
How many pledge trees should we make?
Four trees make a good start for one family. A class can make one per child. More trees make a fuller forest.
How do I make it a keepsake?
Write the name, age, and date on the back. Store it flat in a folder or frame it. Add a new tree each year.
Your Lorax Handprint Craft Is Ready
This lorax handprint craft turns scrap paper into a friendly character and a small forest of promises. It takes less than an hour and costs almost nothing. Hang it up, and let the pledges remind your family what to care about.

Sohel Rana is the writer, editor, publisher, and founder of The Tidy Porch. He is the man who is responsible for the craft (my wife created) being converted into a written piece. He also helps her wife (Sumona) by capturing videos of each craft. In short, he brings each craft created by her wife in front of you by transforming it into an article and a video.
