
My niece covered a coffee filter in green scribbles. It looked like a messy bush. She frowned. Then I gave the filter one spritz of water. The colors spread.
Blue and yellow peeked out from the green. She gasped and said, “It’s magic!” I didn’t correct her. That filter became the prettiest tree in our window. You can make one too.
You need a coffee filter, washable markers, and a spray bottle. Today, I’ll show you how to make a coffee filter Christmas tree craft for kids, one drawing and one spritz at a time.
What Supplies Do You Need for a Coffee Filter Christmas Tree Craft for Kids?
You need a coffee filter, washable markers, and a spray bottle. Most of it is already in your kitchen. Here’s my full list:
- 1 white basket-style coffee filter, about 8 to 9 inches across when flat (plus a few extras for practice)
- Washable, water-based markers in green, red, yellow, blue, and brown
- 1 spray bottle of water, or a dropper or wet paintbrush
- 1 tray, baking sheet, or plastic plate
- 1 towel or paper towels
- Scissors and a glue stick
- 1 sheet of navy cardstock, 8.5 x 11 inches
- 1 small piece of brown paper, about 0.75 x 1 inch
- 1 small piece of yellow paper, about 1.5 x 1.5 inches
- 1 pencil
- A plastic tablecloth or newspaper
A pack of filters costs very little. That’s why I always grab extras for practice.
Why Do the Colors Bloom on a Coffee Filter?
Water moves through the paper fibers and carries the marker ink along. That’s why dry lines turn into soft clouds. Some colors travel farther than others, so new shades can appear at the edges.
A green marker may split into yellow and blue. It’s a fun fact to share while you watch. You don’t need a lesson. Just ask your child, “What do you see?”
What Kind of Markers and Filters Work Best?
Washable, water-based markers and plain white basket filters work best. Permanent markers don’t bloom the same way, because their ink won’t travel with the water.
Basket filters are flat and wide, so you get a roomy canvas. Cone filters are smaller. Brown unbleached filters work too, but the colors look duller. Test one marker on a scrap filter first.
How Do You Make a Coffee Filter Christmas Tree Step by Step?
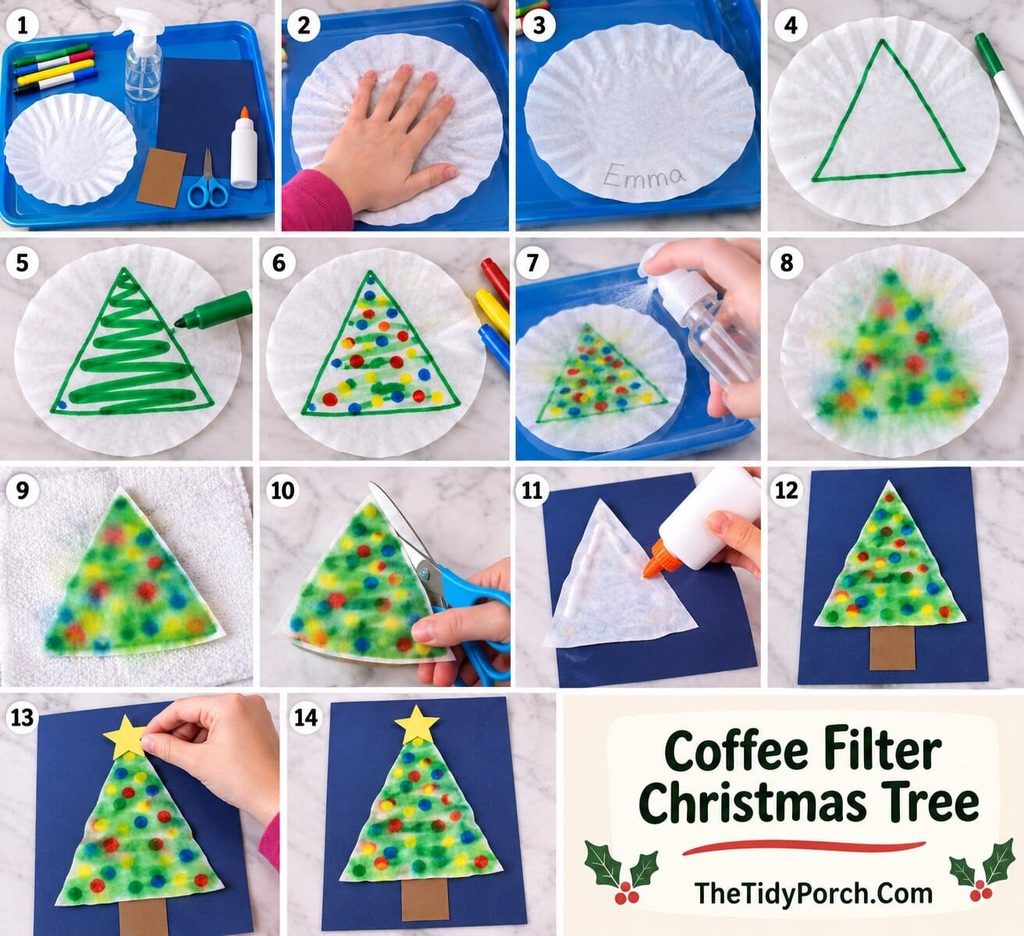
Draw, spritz, dry, cut, and mount. Active time is about 15 minutes, plus 30 to 60 minutes of drying.
Set Up and Draw
- Cover the table with a plastic tablecloth or newspaper. Set the tray on top.
- Flatten the filter with your palm. A few wrinkles are fine.
- Write your child’s name lightly in pencil on the edge. Marker and water would smear it.
- Draw a triangle outline with the green marker. Make it about 6 inches tall and 5 inches wide at the base. Center it on the filter.
- Fill the triangle with thick zigzag or striped green lines. Leave small gaps. The colors need room to spread.
- Add small dots of red, yellow, and blue as ornaments. They will blur into soft glowing spots. Want crisp ornaments? Add them with a marker after the filter dries.
Spritz and Dry
- Hold the spray bottle about 8 inches above the filter. Give it 4 to 6 light sprays. The filter should be damp, not soaked.
- Watch for 1 to 2 minutes. The colors spread and blend.
- Slide the filter onto a dry towel and lay it flat. Drying takes 30 to 60 minutes, depending on how damp it is. Don’t hang it wet, because the colors will run.
Cut and Mount
- Cut along the outer edge of the green, following the triangle shape.
- Swipe glue on the back. Press the tree onto the navy cardstock, centered. Its bottom edge sits 3 inches above the bottom of the cardstock.
- Glue the brown trunk just under the base. Overlap the tree by a quarter inch.
- Cut a freehand star about 1 inch across from the yellow paper. Glue it just above the tip.
- Add crisp ornament dots with markers, if you like.
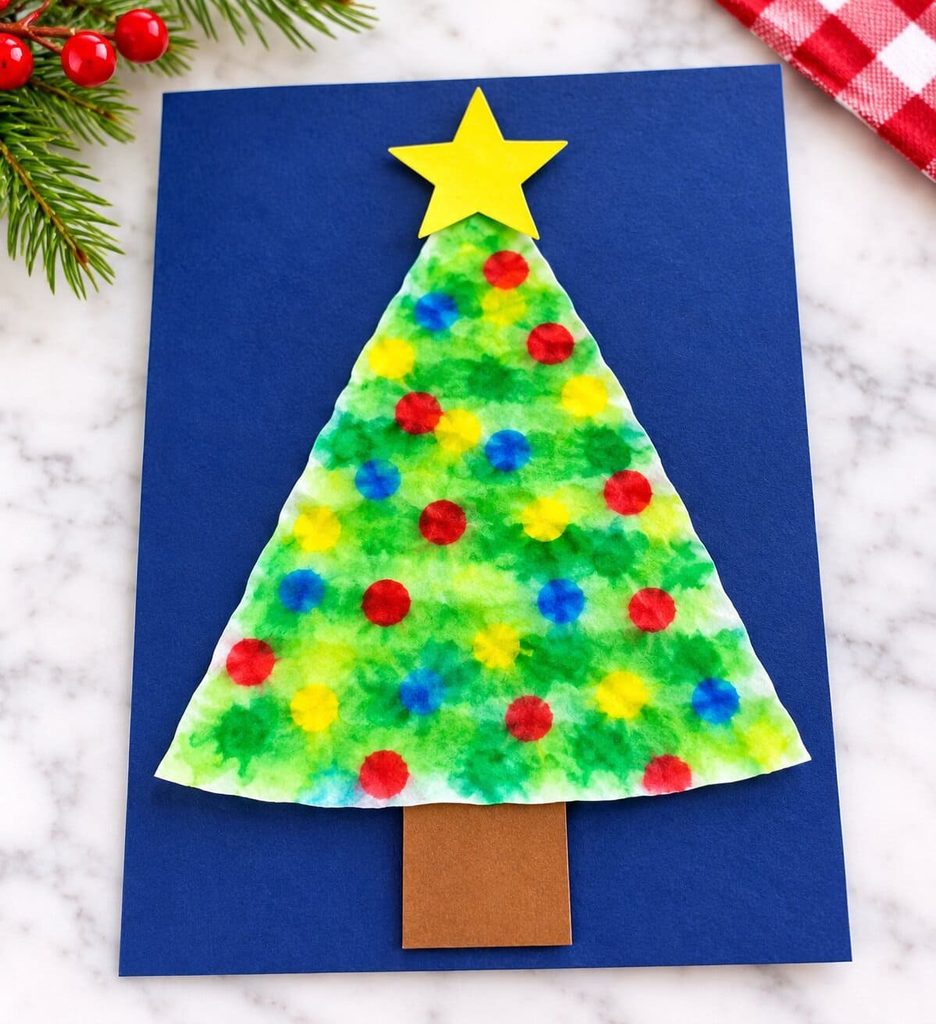
The mounted tree is about 6 inches tall, plus the trunk and star.
Keep It Safe and Tidy
Use washable markers. An adult should handle the spray bottle and scissors for toddlers. Keep the tray under the filter to catch water. Wipe spills right away.
How Much Water Should You Use?
Use 4 to 6 light sprays from about 8 inches away. The filter should look damp, not soaked. Hold the bottle farther away for a softer mist. With too little water, the colors stay stiff. With too much, they merge into muddy brown. No spray bottle? Place 10 to 15 drops along the zigzag lines with a dropper. Or dab with a wet paintbrush. I like the dropper for preschoolers, because it gives them control.
How Do You Fix Muddy Colors, Soggy Filters, and Wrinkles?
Most problems come from too much water. Here’s what to try:
- Muddy brown colors: Use fewer sprays next time. Add ornaments after drying.
- Soggy or torn filter: Leave it flat on a dry towel. Don’t lift it while wet. Glue a torn tree onto cardstock to hide the tear.
- Colors that didn’t bloom: Check your markers. Permanent ink won’t spread. Add a few more sprays.
- A wrinkled filter: Once dry, press it under a book for 10 minutes.
- Colors that ran together: Leave bigger gaps between lines next time. Keep red and green dots apart.
How Can You Make This Craft for Toddlers vs. Preschoolers?
Toddlers scribble and watch. Preschoolers plan and decorate. The base steps stay the same.
Toddler Version (Ages 2 to 3)
Draw the triangle outline for your child. Give them big markers and let them scribble inside. Sit beside them and scribble too. They love copying you. You spray the water. You cut the tree after it dries. Toddlers love the surprise. They don’t need a neat shape, because the spray softens every line.
Preschool Version (Ages 4 to 6)
Let your child draw the triangle. Ask for stripes and ornament dots. Give them a dropper to add the water. Then let them glue on the star and trunk. This works as an easy coffee filter Christmas craft for preschoolers. A marker coffee filter Christmas tree also looks great in a window.
How Do You Run This Craft With a Whole Class?
Set up one station for every four or five kids. For 20 kids, that’s four stations. Give each station a spray bottle, a tray, and a towel. Flatten the filters ahead of time. Write each child’s name in pencil before the markers come out. Ask kids to roll up their sleeves, since wet filters can drip. Let the trees dry flat on a towel-covered table. Mount them the next day.
How Can You Turn the Tree Into a Window Decoration or Keepsake?
Mount it, hang it, or roll it into a cone. Write the year on the back first. Then pick one:
- Window sun catcher: Tape the dry tree to a window. The thin paper lets light shine through, so the colors glow.
- Framed print: Mount the tree on navy cardstock. Place it in an 8 x 10 inch frame.
- Hanging ornament: Glue the dry tree onto cardstock. Cut around it, leaving a quarter inch border. Punch a hole near the top and tie on ribbon.
- Standing cone tree: Color a whole filter green, then spritz it and let it dry. Cut it in half to make two half circles. Roll one half into a cone with a half-inch overlap. Secure it with tape or a dab of white glue.
Ready to Try a Coffee Filter Christmas Tree Craft for Kids?
Yes, and you can start today. You need one filter, a few markers, and a spritz of water. The marker does the drawing. The water does the magic.
FAQs About Coffee Filter Christmas Trees
What kind of markers work best on coffee filters?
Washable, water-based markers work best. Their ink travels with water, so the colors bloom. Permanent markers stay put.
Do I need special coffee filters for this craft?
No. Plain white basket-style filters work great. Store brands are fine. Cone filters work too, but they’re smaller.
How long does a coffee filter craft take to dry?
Most filters dry in 30 to 60 minutes. Damp ones take longer. Lay them flat on a towel.
Can toddlers do the coffee filter Christmas tree?
Yes. Toddlers scribble inside a pre-drawn triangle. An adult sprays and cuts. Kids age 2 and up can enjoy it.
Why did my coffee filter colors turn brown?
You likely used too much water or mixed too many colors. Red and green blend into brown. Use fewer sprays, and add red ornaments after drying.
Can I turn the tree into an ornament?
Yes. Glue the dry tree onto cardstock and cut around it. Punch a hole near the top and add ribbon.

Sohel Rana is the writer, editor, publisher, and founder of The Tidy Porch. He is the man who is responsible for the craft (my wife created) being converted into a written piece. He also helps her wife (Sumona) by capturing videos of each craft. In short, he brings each craft created by her wife in front of you by transforming it into an article and a video.
