
My four-year-old neighbor held up her finished tree and pointed. “Triangle! Triangle! Triangle!” She counted four of them out loud.
Then she ran to the window and spotted a fifth, on the roof next door. I had planned a simple Christmas craft. She turned it into a shape lesson. That’s the magic of this triangle Christmas tree craft.
You cut one folded square, and a neat triangle appears. Stack four of them, and you have a tree. You don’t need a template, a printer, or perfect cutting skills. Today, I’ll show you how, step by step.
What Supplies Do You Need for a Triangle Christmas Tree Craft?
You need paper, scissors, a ruler, and a glue stick. Here’s my full list:
- 1 sheet of cardstock, 8.5 x 11 inches, for the base (white, kraft, or navy)
- 3 sheets of green construction paper, 8.5 x 11 inches: 1 dark, 1 medium, 1 light
- 1 piece of brown paper, 1 x 1 inch
- 1 piece of yellow paper, about 1.5 x 1.5 inches
- Small scraps of red and yellow paper
- Scissors (child-safe for kids)
- 1 pencil and 1 ruler
- 1 glue stick
- 1 damp cloth or a few wipes
Construction paper cuts easily.
How Do You Cut a Perfect Triangle Without a Template?
Fold a paper square in half, cut one diagonal line, and open it. You get a neat triangle with no template. Follow these steps:
- Measure and cut a square.
- Fold it in half so the fold is on the left.
- Draw a line from the top of the fold to the bottom outer corner.
- Cut along the line.
- Open the piece. You have a triangle.
The fold makes both sides match. The triangle’s base and height both equal the square’s side. A 6-inch square makes a triangle 6 inches wide and 6 inches tall. Keep the scrap, too. It’s two small triangles, so one square gives you three. That shows kids that shapes come from other shapes.
How Big Should Each Triangle Be?
Cut four squares: 6, 5, 4, and 3 inches. Each one is 1 inch smaller than the last.
- 6 x 6 inches: dark green
- 5 x 5 inches: medium green
- 4 x 4 inches: light green
- 3 x 3 inches: medium green
The dark sheet gives the 6-inch square. The medium sheet gives the 5-inch and 3-inch squares. The light sheet gives the 4-inch square. Neighbors are different shades, so every layer shows.
How Do You Make a Triangle Christmas Tree Step by Step?
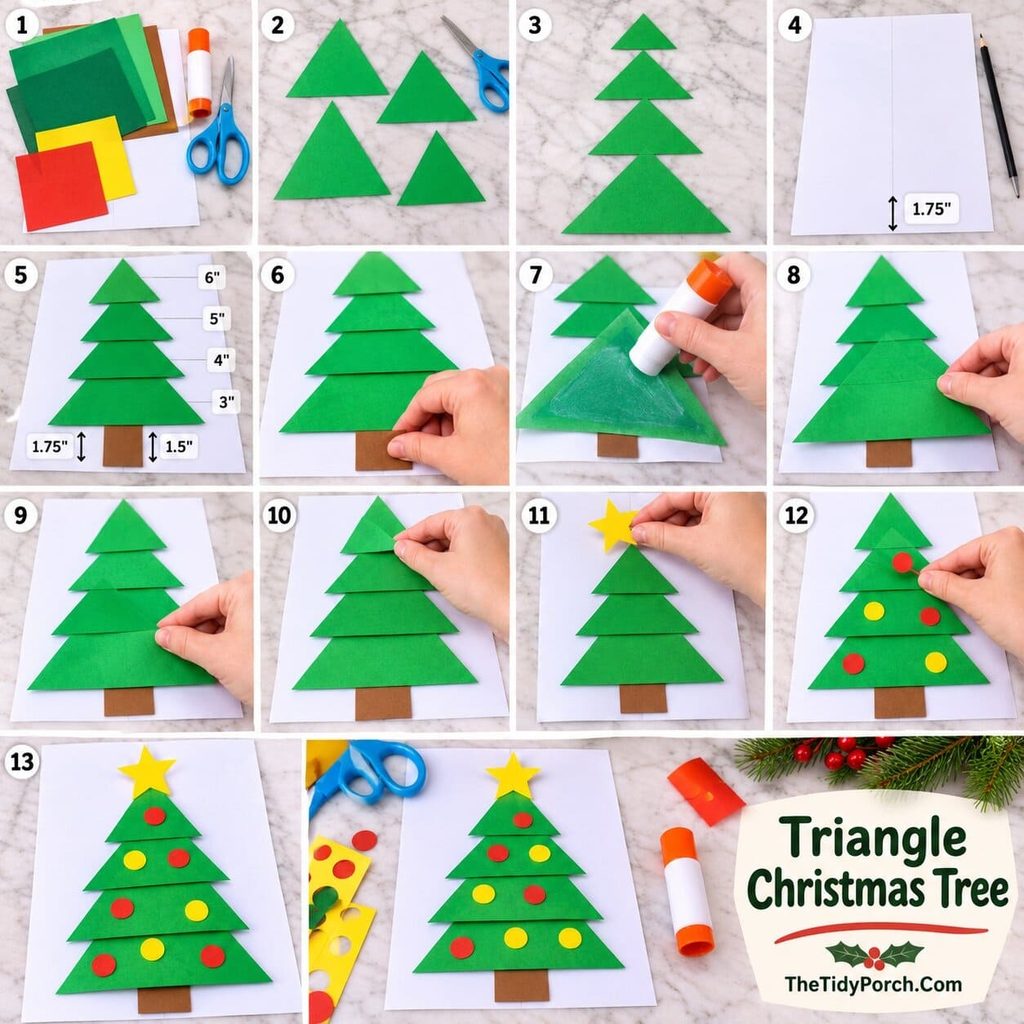
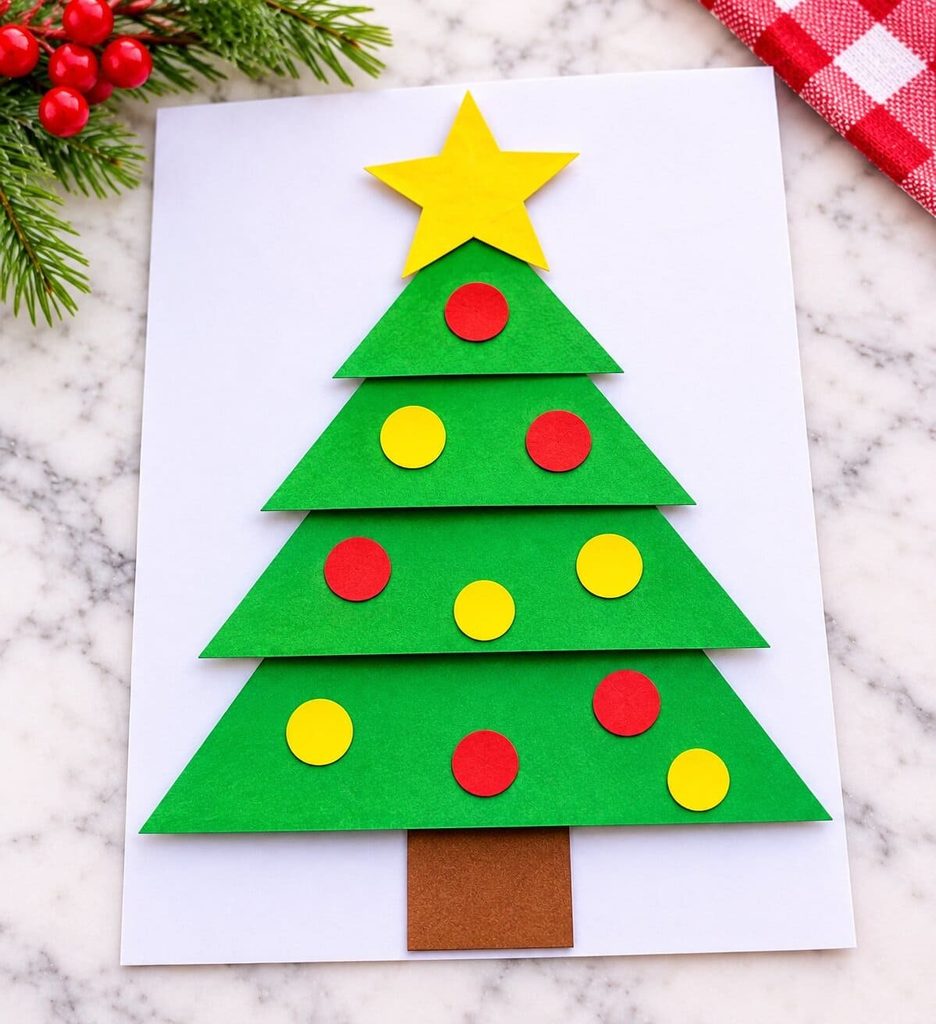
Cut four triangles, dry fit them, then glue from largest to smallest. It takes about 30 minutes. The finished tree is about 7.5 inches tall and 6 inches wide.
Cut and Sort
- Cover your table. Cut the four squares.
- Fold and cut each square into a triangle. Save the scraps.
- Sort the triangles from biggest to smallest. Count them. Say “triangle” out loud.
Place and Glue
- Draw a light pencil line down the center of the base sheet. Run it from 1.75 inches above the bottom edge to 9.25 inches.
- Dry fit the triangles without glue. Center each base on the line. Set the bottom edges at 1.75 inches (6-inch triangle), 3.25 inches (5-inch), 4.75 inches (4-inch), and 6.25 inches (3-inch). Each bottom edge sits 1.5 inches above the one below. Each tier’s corners poke out a little past the tier below. That gives the tree its stepped look.
- Glue the trunk first. Press the brown square on the line, with its bottom edge 1 inch above the page bottom. The big triangle will cover its top quarter inch, so no gap shows.
- Swipe the glue stick over the entire back of the 6-inch triangle, from the center out. Press it flat the same way.
- Repeat with the 5, 4, and 3-inch triangles. Each smaller triangle covers the top of the one below.
Add the Star and Ornaments
- Cut a freehand star about 1 inch across from the yellow paper. Glue its bottom point to the tip of the top triangle.
- Cut 6 to 8 dots, about half an inch wide, from the red and yellow scraps. Glue them on the tiers.
- Let the tree dry flat for 10 minutes.
Keep It Safe and Tidy
Supervise scissor use for ages 3 to 6, and give them child-safe scissors. Small scraps are a choking risk for children under 3. Keep them away from younger siblings. Wipe sticky fingers and tables with a damp cloth.
How Can You Turn This Craft Into a Shape Lesson?
Sort, count, and name the triangles before you glue. Lay the four triangles in a row, from biggest to smallest. Ask your child to count them. A triangle has 3 sides and 3 corners, so trace each one with a finger. After the tree is done, go on a shape hunt. Look for triangles around the house, like a pizza slice, a roof, a tent, or a sail. Set a timer for two minutes and see how many you find.
How Do You Fix Crooked Triangles and Gaps?
Most problems come from the fold or the glue. Here’s what to try:
- Crooked triangles: Line up the square’s edges before you fold. Press the fold flat. Cut slowly.
- Gaps along the edges: Add a bit more glue near the edges. Press them flat.
- Wrinkled paper: Use a thinner swipe of glue. Smooth the paper with a clean sheet on top.
- A leaning tree: Check your center line. Shift each triangle to match it.
- A triangle too small or too large: Measure the square again, then cut a new one.
How Can You Make This Craft for Toddlers vs. Preschoolers and Older Kids?
Toddlers sort and glue. Preschoolers cut. Adults can go modern. The base steps stay the same.
Toddler Version (Ages 2 to 3)
Pre-cut three triangles from 6, 5, and 4 inch squares. Ask your child to sort them from biggest to smallest. Then help them glue the triangles in order, at 1.75, 3.25, and 4.75 inches. Use dot stickers for ornaments, or skip them.
Preschool and Kindergarten Version (Ages 4 to 6)
Your child cuts their own triangles. You draw each diagonal line first. They cut along it with child-safe scissors. Then they add the star, trunk, and ornament dots. This is an easy shape Christmas tree craft for kids who are learning to cut. It’s a great triangle Christmas tree craft for preschool shape units.
Modern Geometric Version (Older Kids and Adults)
Use the same sizes in kraft, white, and gold paper. Mount the tree on dark or white cardstock. The clean edges give a calm, modern look.
How Do You Run This Craft With a Whole Class?
Make a kit for each child, then let them cut and glue. Cut the squares ahead of time on a paper cutter. Put one of each size and color in an envelope. For ages 3 to 5, draw the diagonal lines ahead of time. Draw the center line on every base sheet. Tape a size chart reading 6, 5, 4, 3 to each table. Allow 40 minutes. Early finishers can start the shape hunt.
How Can You Turn the Tree Into a Card or Keepsake?
Frame the full tree, or shrink it into a mini card. Write the year on the back first. Then pick one:
- Framed print: Slip the full tree into an 8.5 x 11 inch frame.
- Mini card: Cut three triangles from 4, 3, and 2 inch squares. Place their bottom edges at 1, 2.25, and 3.5 inches above the bottom of a 5 x 7 inch folded card front. The tree is about 4.5 inches tall and 4 inches wide. Add a 0.5 x 0.5 inch trunk with its bottom edge 0.75 inch above the card bottom. Top it with a 0.75 inch star.
Ready to Make Your Own Triangle Christmas Tree Craft?
Yes. You need four squares, one fold each, and a glue stick. The fold makes the shape. Your child names it. Then go find more triangles.
FAQs About Triangle Christmas Trees
Do I need a template for a triangle Christmas tree?
No. Fold a square in half and cut one diagonal line. You only need a ruler and scissors.
How many triangles do I need?
Four for the full tree. Use three for toddlers or the mini card.
What age can a child cut triangles?
Many children can cut simple straight lines around age 3 or 4, with help. Let an adult draw the diagonal line first.
What paper works best for a triangle Christmas tree?
Construction paper works best. It cuts easily and glues flat. Use cardstock for the base.
How can I teach shapes with a Christmas craft?
Sort, count, and name the triangles before you glue. Then go on a shape hunt. Ask your child to point out every triangle on the finished tree.
Can I turn the tree into a card?
Yes. Cut three triangles from 4, 3, and 2 inch squares. Glue them onto a 5 x 7 inch folded card.

Sohel Rana is the writer, editor, publisher, and founder of The Tidy Porch. He is the man who is responsible for the craft (my wife created) being converted into a written piece. He also helps her wife (Sumona) by capturing videos of each craft. In short, he brings each craft created by her wife in front of you by transforming it into an article and a video.
