
Last December, I sat at my kitchen table at 9 p.m. The house was quiet. My phone was dark. I was tired, but my hands wanted a job. So I grabbed a glue gun and some twine.
Forty minutes later, I had a small wreath. I also had a calm head for the first time in weeks. If you want winter craft ideas for adults that feel grown-up and slow, you’re in the right place.
Below are 9 projects. Each one lists the time, cost, steps, and a tip from me.
What Do You Need Before You Start Any Winter Craft?
You need about ten cheap basics. Most of them cost less than $30 together, and they work for nearly every project here.
- Hot glue gun and glue sticks
- Sharp scissors
- Twine or ribbon
- Cinnamon sticks
- Chunky yarn
- Air-dry clay
- Soy wax flakes and wicks
- Mason jars
- White acrylic paint and a small brush
- A baking sheet
Buy these once and you can swap them between projects. That keeps each craft cheap. I check my own drawers first. I often already own half the list. [ADD YOUR OWN STORE OR TRICK.]
9 Easy Winter Craft Ideas for Adults You Can Finish in One Evening
Pick the one that fits your night. Every project lists its time, cost, skill level, and mood, so you can choose fast. Each one has full steps, so you can finish it from this page alone.
Cinnamon Stick Candle Wraps: A Cozy Gift in 20 Minutes
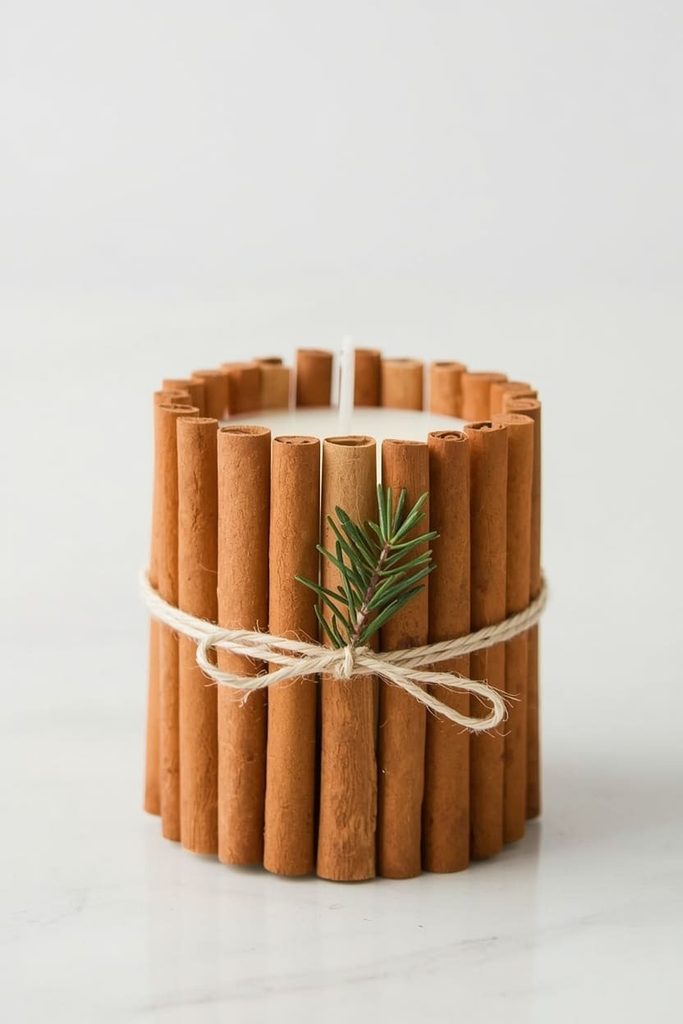
20 minutes | $8 | Beginner | Calm
This craft turns a plain candle into a gift that smells like winter. The sticks add texture and scent.
Supplies: 1 wide pillar candle, 12 to 15 cinnamon sticks, hot glue gun, twine, scissors, a small pine sprig
Steps:
- Pick a wide pillar candle, about 3 inches across. Set it on a clean, flat table.
- Plug in your glue gun. Give it 3 to 5 minutes to heat up.
- Hold one cinnamon stick against the candle. Line its top edge up with the top of the candle. Mark where it ends, then trim it with strong scissors.
- Use that first stick as your guide. Cut 12 to 15 more sticks to the same length.
- Dab three small dots of hot glue on the back of one stick. Press it to the candle for 5 seconds.
- Add the next stick right beside it. Keep the tops level and the sides touching.
- Keep going all the way around. If you see a gap at the end, cut a thin piece of stick to fill it.
- Wrap twine around the middle twice. Pull it snug and tie a tight knot.
- Tuck the pine sprig under the knot. Trim any long twine ends.
My tip: Use small dots of glue, not long lines. Too much hot glue can soften the wax. Also, never leave a burning candle with dry sticks around it. Watch it closely.
Air-Dry Clay Ring Dish: A Handmade Gift With No Kiln
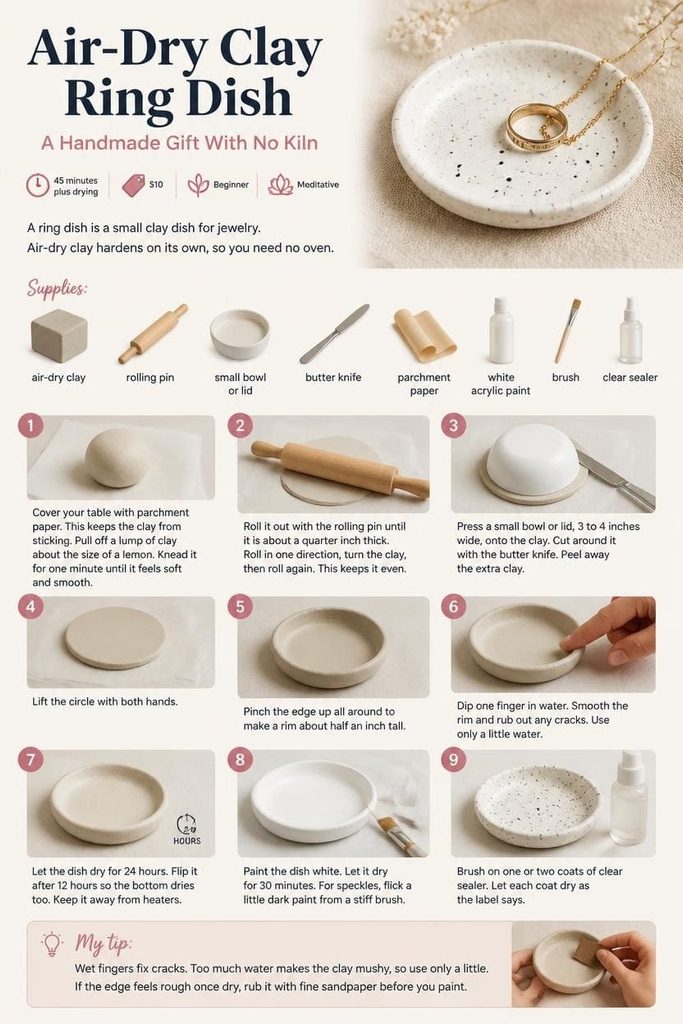
45 minutes plus drying | $10 | Beginner | Meditative
A ring dish is a small clay dish for jewelry. Air-dry clay hardens on its own, so you need no oven.
Supplies: air-dry clay, rolling pin, small bowl or lid, butter knife, parchment paper, white acrylic paint, brush, clear sealer
Steps:
- Cover your table with parchment paper. This keeps the clay from sticking.
- Pull off a lump of clay about the size of a lemon. Knead it for one minute until it feels soft and smooth.
- Roll it out with the rolling pin until it is about a quarter inch thick. Roll in one direction, turn the clay, then roll again. This keeps it even.
- Press a small bowl or lid, 3 to 4 inches wide, onto the clay. Cut around it with the butter knife. Peel away the extra clay.
- Lift the circle with both hands. Pinch the edge up all around to make a rim about half an inch tall.
- Dip one finger in water. Smooth the rim and rub out any cracks. Use only a little water.
- Let the dish dry for 24 hours. Flip it after 12 hours so the bottom dries too. Keep it away from heaters.
- Paint the dish white. Let it dry for 30 minutes. For speckles, flick a little dark paint from a stiff brush.
- Brush on one or two coats of clear sealer. Let each coat dry as the label says.
My tip: Wet fingers fix cracks. Too much water makes the clay mushy, so use only a little. If the edge feels rough once dry, rub it with fine sandpaper before you paint.
Dried Orange Garland: Cozy DIY Winter Decor That Smells Great

20 minutes work, 3 hours baking | $6 | Beginner | Calm
A dried orange garland brings color to a gray month. It also makes your home smell warm.
Supplies: 3 oranges, serrated knife, baking sheet, parchment paper, twine, a large needle
Steps:
- Heat your oven to 200°F. Line the baking sheet with parchment paper.
- Wash and dry the oranges.
- Slice them across, about a quarter inch thick. A serrated knife works best. You want 20 to 25 slices in all.
- Pat both sides of each slice with a towel. Wet slices take much longer to dry.
- Lay the slices flat on the parchment. Leave space so they do not touch.
- Bake for 2 to 3 hours. Flip the slices once an hour.
- Check them at 2 hours. They are done when the edges curl a little and the slices feel dry, not sticky. Bake 30 more minutes if needed.
- Let them cool on the pan for 20 minutes. They get crisp as they cool.
- Cut 6 feet of twine and tie a knot at one end. Thread the needle. Push it through the peel edge of each slice, leaving 3 to 4 inches between slices.
- Hang the garland with tape or small hooks.
My tip: Thin slices curl. Slices about a quarter inch thick stay flat and dry evenly. Store the garland in a dry box after the season, so it lasts for next winter.
Chunky Yarn Pom-Pom Garland: Fluffy Mantel Decor
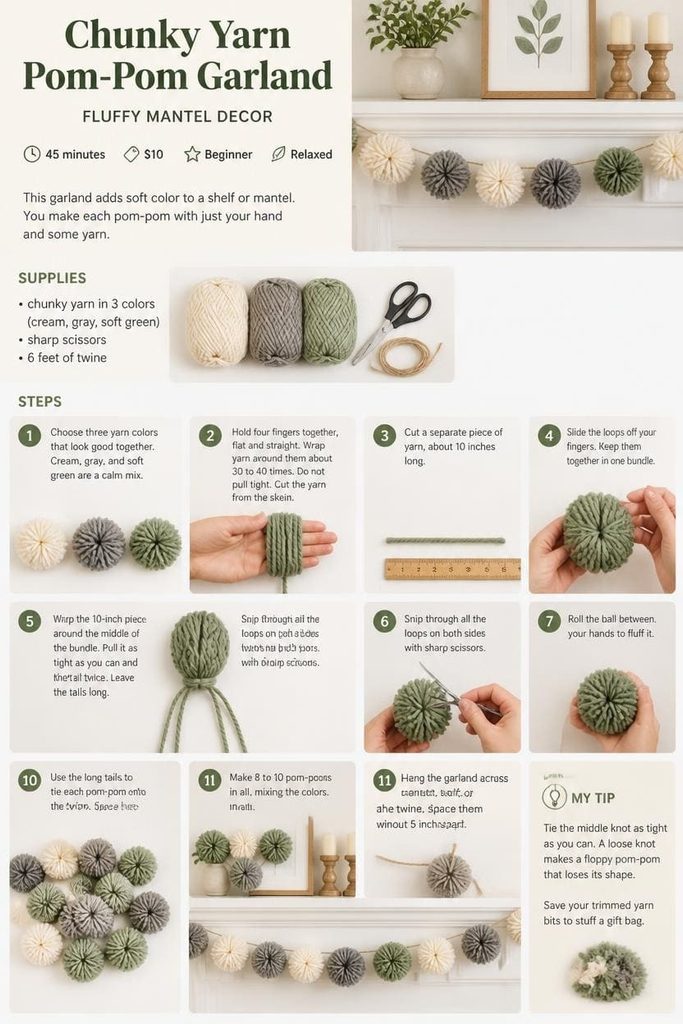
45 minutes | $10 | Beginner | Relaxed
This garland adds soft color to a shelf or mantel. You make each pom-pom with just your hand and some yarn.
Supplies: chunky yarn in 3 colors, sharp scissors, 6 feet of twine
Steps:
- Choose three yarn colors that look good together. Cream, gray, and soft green are a calm mix.
- Hold four fingers together, flat and straight. Wrap yarn around them about 30 to 40 times. Do not pull tight.
- Cut the yarn from the skein. Then cut a separate piece of yarn, about 10 inches long.
- Slide the loops off your fingers. Keep them together in one bundle.
- Wrap the 10-inch piece around the middle of the bundle. Pull it as tight as you can and knot it twice. Leave the tails long.
- Snip through all the loops on both sides with sharp scissors.
- Roll the ball between your hands to fluff it. Trim any uneven bits, turning it as you cut, until it looks round.
- Make 8 to 10 pom-poms in all, mixing the colors.
- Use the long tails to tie each pom-pom onto the twine. Space them about 5 inches apart.
- Hang the garland across a mantel, shelf, or window.
My tip: Tie the middle knot as tight as you can. A loose knot makes a floppy pom-pom that loses its shape. Save your trimmed yarn bits to stuff a gift bag.
Snowy Pines Embroidery Hoop: A Slow, Stitching Evening
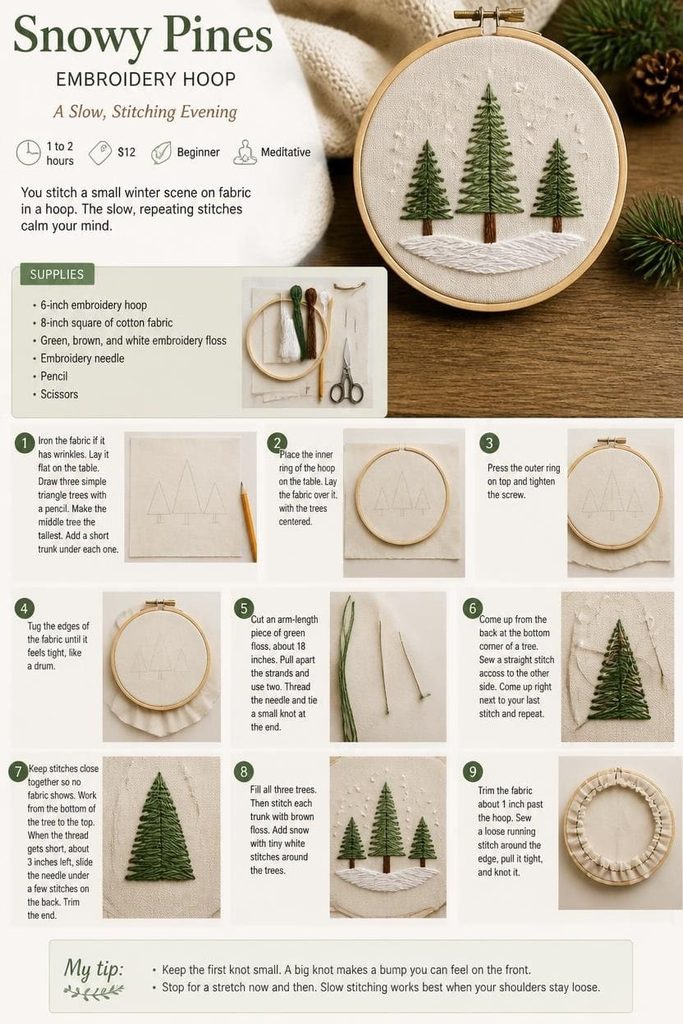
1 to 2 hours | $12 | Beginner | Meditative
You stitch a small winter scene on fabric in a hoop. The slow, repeating stitches calm your mind.
Supplies: 6-inch embroidery hoop, 8-inch square of cotton fabric, green, brown, and white embroidery floss, embroidery needle, pencil, scissors
Steps:
- Iron the fabric if it has wrinkles. Lay it flat on the table.
- Draw three simple triangle trees with a pencil. Make the middle tree the tallest. Add a short trunk under each one.
- Place the inner ring of the hoop on the table. Lay the fabric over it, with the trees centered. Press the outer ring on top and tighten the screw.
- Tug the edges of the fabric until it feels tight, like a drum.
- Cut an arm-length piece of green floss, about 18 inches. Pull apart the strands and use two. Thread the needle and tie a small knot at the end.
- Come up from the back at the bottom corner of a tree. Sew a straight stitch across to the other side. Come up right next to your last stitch and repeat.
- Keep stitches close together so no fabric shows. Work from the bottom of the tree to the top.
- When the thread gets short, about 3 inches left, slide the needle under a few stitches on the back. Trim the end.
- Fill all three trees. Then stitch each trunk with brown floss.
- Add snow with tiny white stitches around the trees.
- Trim the fabric about 1 inch past the hoop. Sew a loose running stitch around the edge, pull it tight, and knot it.
My tip: Keep the first knot small. A big knot makes a bump you can feel on the front. Stop for a stretch now and then. Slow stitching works best when your shoulders stay loose.
Watercolor Winter Cards: Quiet Painting for Beginners
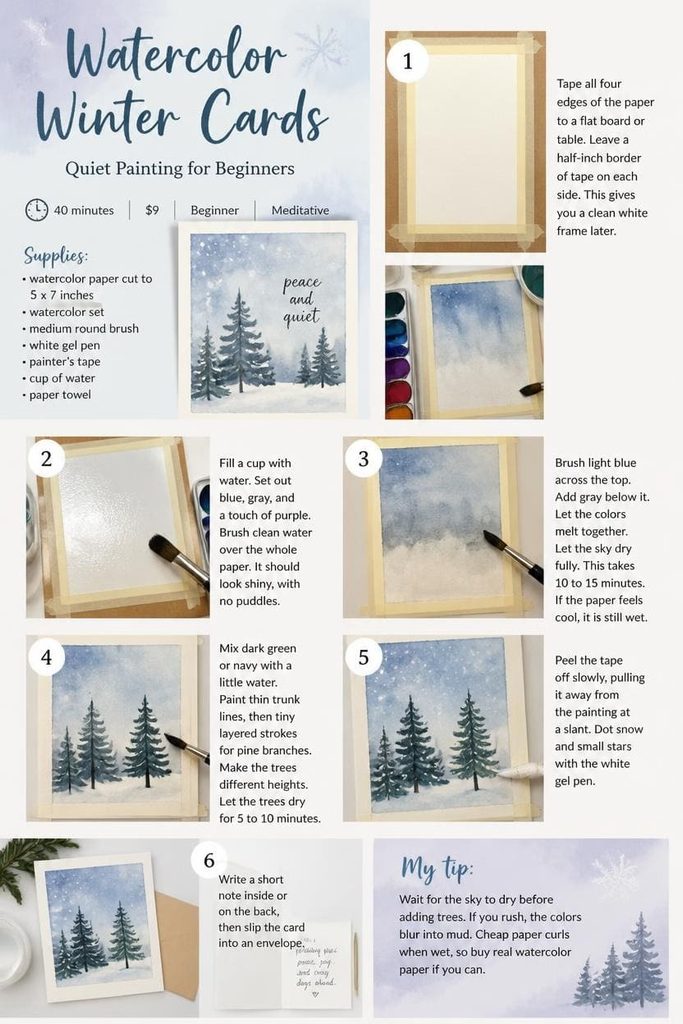
40 minutes | $9 | Beginner | Meditative
You paint a soft winter sky and a few trees. Watercolor looks good even when it is a bit messy.
Supplies: watercolor paper cut to 5 x 7 inches, watercolor set, medium round brush, white gel pen, painter’s tape, cup of water, paper towel
Steps:
- Tape all four edges of the paper to a flat board or table. Leave a half-inch border of tape on each side. This gives you a clean white frame later.
- Fill a cup with water. Set out blue, gray, and a touch of purple.
- Brush clean water over the whole paper. It should look shiny, with no puddles.
- Brush light blue across the top. Add gray below it. Let the colors melt together.
- Let the sky dry fully. This takes 10 to 15 minutes. If the paper feels cool, it is still wet.
- Mix dark green or navy with a little water. Paint thin trunk lines, then tiny layered strokes for pine branches. Make the trees different heights.
- Let the trees dry for 5 to 10 minutes.
- Peel the tape off slowly, pulling it away from the painting at a slant.
- Dot snow and small stars with the white gel pen.
- Write a short note inside or on the back, then slip the card into an envelope.
My tip: Wait for the sky to dry before adding trees. If you rush, the colors blur into mud. Cheap paper curls when wet, so buy real watercolor paper if you can.
Mason Jar Snow Luminaries: A Craft Night Idea for Friends
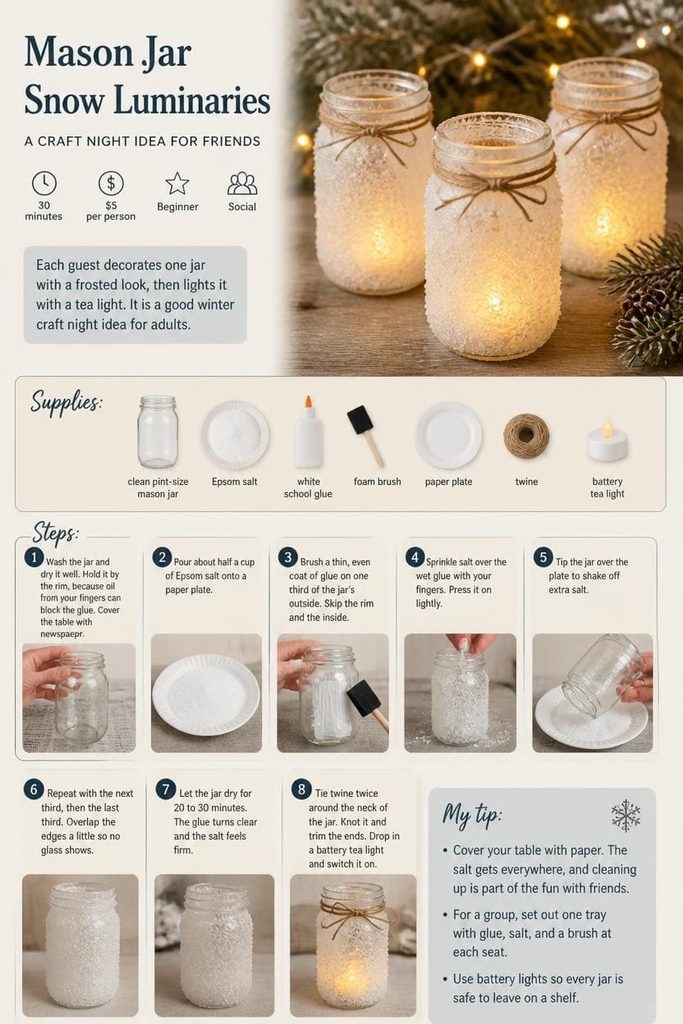
30 minutes | $5 per person | Beginner | Social
Each guest decorates one jar with a frosted look, then lights it with a tea light. It is a good winter craft night idea for adults.
Supplies: clean pint-size mason jar, Epsom salt, white school glue, foam brush, paper plate, twine, battery tea light
Steps:
- Wash the jar and dry it well. Hold it by the rim, because oil from your fingers can block the glue.
- Cover the table with newspaper. Pour about half a cup of Epsom salt onto a paper plate.
- Brush a thin, even coat of glue on one third of the jar’s outside. Skip the rim and the inside.
- Sprinkle salt over the wet glue with your fingers. Press it on lightly.
- Tip the jar over the plate to shake off extra salt.
- Repeat with the next third, then the last third. Overlap the edges a little so no glass shows.
- Let the jar dry for 20 to 30 minutes. The glue turns clear and the salt feels firm.
- Tie twine twice around the neck of the jar. Knot it and trim the ends.
- Drop in a battery tea light and switch it on.
My tip: Cover your table with paper. The salt gets everywhere, and cleaning up is part of the fun with friends. For a group, set out one tray with glue, salt, and a brush at each seat. Use battery lights so every jar is safe to leave on a shelf.
Teacup Soy Candle: A Handmade Winter Gift in One Evening
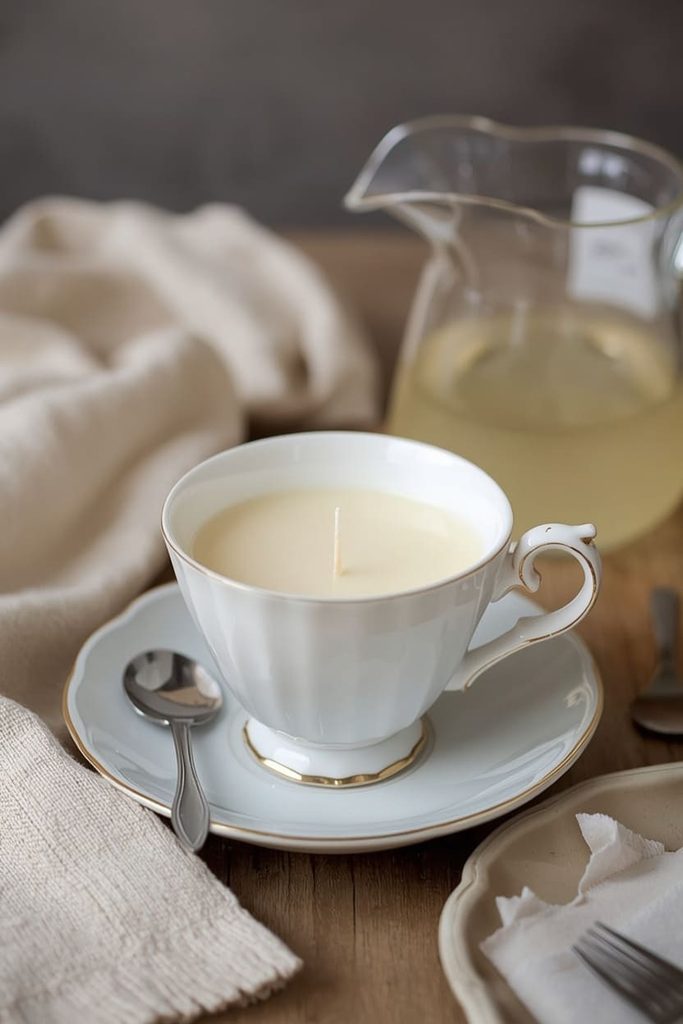
1 hour plus setting time | $14 | Intermediate | Calm
You pour soy wax into a pretty old teacup. It makes a gift that looks store-bought.
Supplies: soy wax flakes, wick with a sticker base, heat-safe teacup, pouring jug, pot for hot water, essential oil, pencil
Steps:
- Check that your teacup is heat-safe and has no cracks. Wash and dry it.
- Press the sticker base of the wick onto the center of the cup’s bottom. Hold it for 10 seconds.
- Fill the teacup with wax flakes, then fill it a second time. Pour all the flakes into the jug. Flakes shrink a lot when they melt, so this gives you enough.
- Set the jug in a pot with about 2 inches of simmering water. Stir the wax now and then until it is fully clear. This takes about 10 to 15 minutes. Stay in the kitchen the whole time.
- Lift the jug out with a towel. Stir in your essential oil. Check the wax label for how much to use.
- Let the wax cool for a few minutes. Many soy waxes say to pour around 135°F, so check your label.
- Pour slowly into the center of the cup. Stop about half an inch below the rim.
- Rest a pencil across the top of the cup. Wrap the wick around it so the wick stays straight.
- Leave the candle alone for 24 hours. Do not move it while it sets.
- Trim the wick to a quarter inch before you light it.
My tip: Let the candle set for 24 hours before you burn it. Never leave melting wax alone. If the top sinks as it cools, melt a little extra wax and pour a thin layer to smooth it.
Pinecone and Greenery Wreath: Rustic Winter Decor
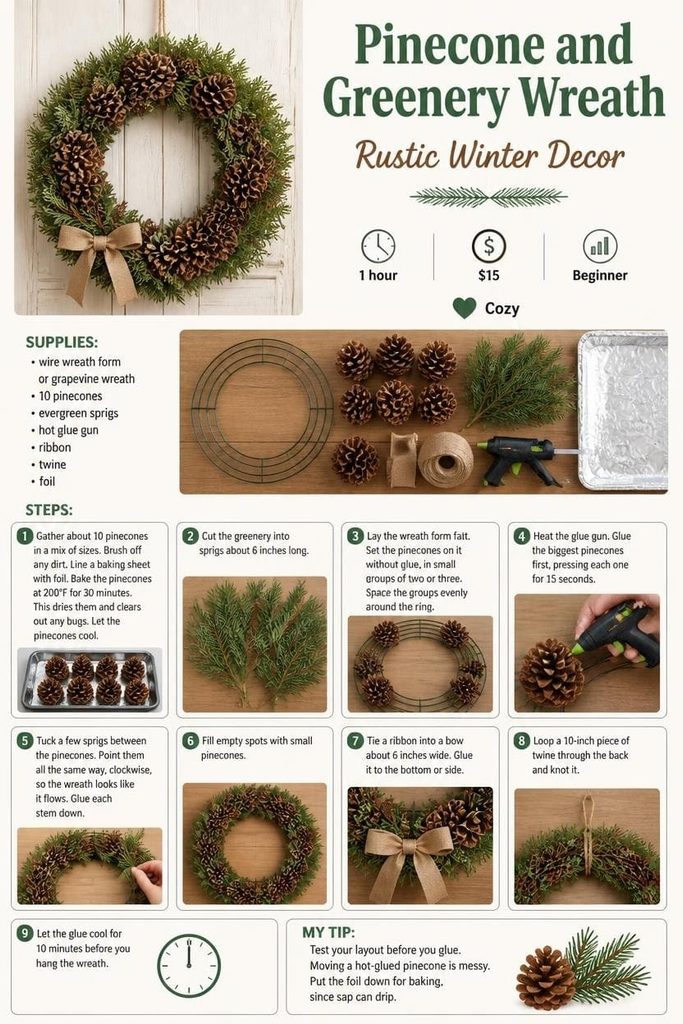
1 hour | $15 | Beginner | Cozy
This wreath uses pinecones and small branches. It looks natural and costs little.
Supplies: wire wreath form or grapevine wreath, 10 pinecones, evergreen sprigs, hot glue gun, ribbon, twine, foil
Steps:
- Gather about 10 pinecones in a mix of sizes. Brush off any dirt.
- Line a baking sheet with foil. Bake the pinecones at 200°F for 30 minutes. This dries them and clears out any bugs.
- Let the pinecones cool. Cut the greenery into sprigs about 6 inches long.
- Lay the wreath form flat. Set the pinecones on it without glue, in small groups of two or three. Space the groups evenly around the ring.
- Heat the glue gun. Glue the biggest pinecones first, pressing each one for 15 seconds.
- Tuck a few sprigs between the pinecones. Point them all the same way, clockwise, so the wreath looks like it flows. Glue each stem down.
- Fill empty spots with small pinecones.
- Tie a ribbon into a bow about 6 inches wide. Glue it to the bottom or side.
- Loop a 10-inch piece of twine through the back and knot it.
- Let the glue cool for 10 minutes before you hang the wreath.
My tip: Test your layout before you glue. Moving a hot-glued pinecone is messy. Put the foil down for baking, since sap can drip.
How Do You Choose the Right Winter Craft for Your Night?
Pick based on your time, budget, and mood. If you have 20 minutes, do the candle wraps. If you have a whole evening, try the embroidery hoop.
- Short on time: cinnamon candle wraps, mason jar luminaries
- Tight on budget: dried orange garland, watercolor cards
- Need calm: embroidery hoop, watercolor cards, clay dish
- Want to host: mason jar luminaries
- Want a gift: teacup candle, ring dish
Start easy. A quick win makes the next craft feel less scary.
What Simple Tricks Make Handmade Winter Crafts Look Store-Bought?
Clean finishing makes the biggest difference. Small details turn a homemade item into a polished one.
- Trim every loose thread and glue string.
- Stick to two or three colors.
- Add a simple tag in neat handwriting.
- Wrap gifts in plain kraft paper and twine.
- Let glue and paint fully dry before you touch anything.
I learned the glue-string trick the hard way. A hair dryer on low heat melts thin strings in seconds.
Frequently Asked Questions
What are good winter crafts for adults with no experience?
Start with candle wraps, a pom-pom garland, or a dried orange garland. They need few tools and simple steps. You can finish any of them in one evening, and mistakes are easy to hide or fix.
What crafts can I make with items I already have at home?
Try watercolor cards, a pinecone wreath, or a yarn garland. Many people already own paper, glue, yarn, or twine. Look in your drawers and on your shelves before you shop. You may need just one or two extra items.
What are easy winter crafts to make and sell?
Candles, clay ring dishes, and watercolor cards sell well. They are small and easy to pack. Check your local rules for selling candles and other handmade goods. [ADD YOUR OWN SELLING EXPERIENCE, IF ANY.]
How do I host a winter craft night for adults?
Choose one simple craft that everyone can finish in under an hour. Buy supplies ahead and set up one table. Add warm drinks, snacks, and a quiet playlist. Mason jar luminaries work well because each guest takes one home.
What winter crafts make good gifts?
Teacup candles, ring dishes, and cinnamon candle wraps make lovely gifts. They look pretty and feel personal. Add a small tag and wrap them in kraft paper. Most cost under $15 each.
Which One Will You Make First?
Pick one project and set aside one quiet evening. You don’t need to be good at crafts. You just need a table, a warm drink, and a little time. I’d start with the cinnamon candle wrap. It takes 20 minutes and works as a gift. Make it tonight, then come back and tell me how it turned out.

Sohel Rana is the writer, editor, publisher, and founder of The Tidy Porch. He is the man who is responsible for the craft (my wife created) being converted into a written piece. He also helps her wife (Sumona) by capturing videos of each craft. In short, he brings each craft created by her wife in front of you by transforming it into an article and a video.
