
Busy hands, buzzing bees: that’s the theme for this bee handprint craft.
My child pressed their palm down in yellow paint, and once it dried, we turned it into wings, added black stripes, and gave our little bee some googly eyes.
Along the way, we chatted about how bees help flowers grow, which made the craft feel like a mini nature lesson too. Simple supplies, a little imagination, and one adorable bee to show for it.
Materials Needed
- Bee template
- Yellow cardstock
- White cardstock
- Black marker
- Red marker
- Small googly eyes
- Glue stick
- Scissors
How to Make a Bee Handprint Craft
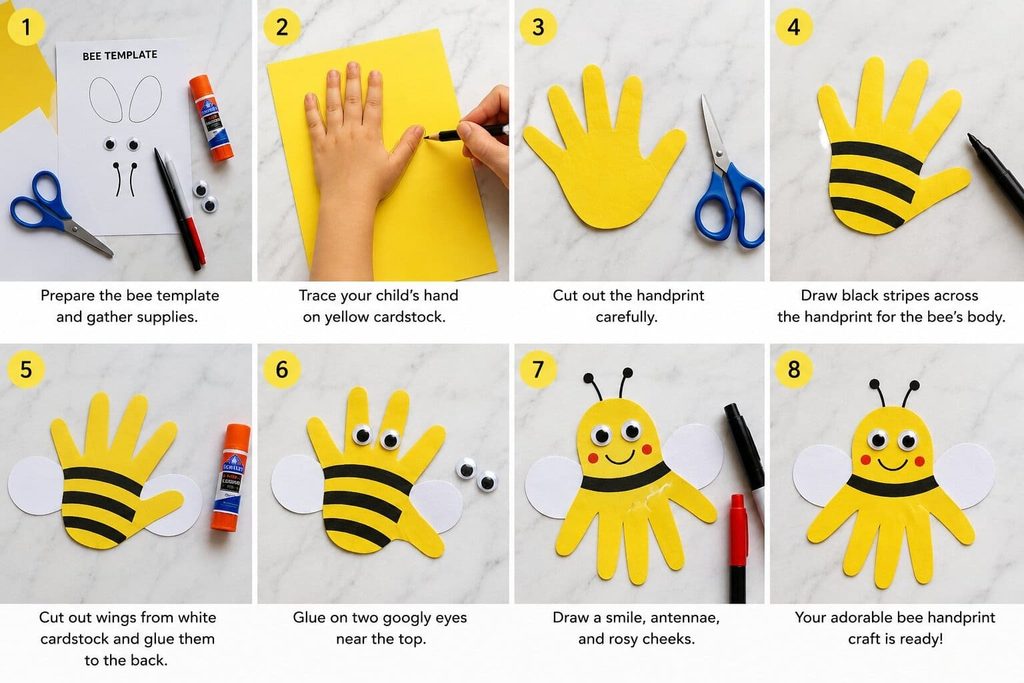
Step 1: Prepare the Bee Template
Start by printing or drawing your bee template on a sheet of paper. The template will help you make the bee’s body and other parts neatly.
Before you begin, place all the craft supplies on a clean table. This makes it easier for your child to find each item during the project.
If your child is young, keep the scissors with you and help with any cutting that needs extra care.
Step 2: Trace Your Child’s Hand
Place the yellow cardstock on the table. Have your child place one hand flat on the paper with their fingers spread slightly apart.
Help your child keep their hand still while you carefully trace around it with a pencil.
Try to trace around each finger and along the side of the hand. The fingers will become part of the bee’s shape, so take your time with this step.
Once you finish tracing, your child can lift their hand from the paper.
Read More Articles On Handprint Crafts:
Step 3: Cut Out the Handprint
Now it is time to cut out the handprint.
Carefully cut along the pencil outline. If your child is old enough to use scissors safely, let them practice cutting around the shape while you supervise.
For younger children, an adult can do the cutting.
When you finish, you should have a yellow handprint shape. This will become the main part of your bee handprint art.
Step 4: Make the Bee’s Body
Take the yellow handprint and look at the shape. The palm will become the bee’s body, while the fingers will help create the bee’s fun handprint shape.
Use a black marker to draw several curved or straight lines across the palm. These will look like the black stripes on a honey bee.
Leave enough space at the top for the bee’s face.
You can let your child help draw the stripes. They do not have to be perfect. Slightly uneven lines can make the finished craft look more playful.
Step 5: Create the Bee’s Wings
Next, use the white cardstock to make the bee’s wings.
Draw two small oval or rounded wing shapes on the white cardstock. Cut them out carefully.
You can use the bee template as a guide if it includes wing shapes.
Place the wings behind the yellow handprint to see where they look best. Once you are happy with their position, use the glue stick to attach them.
Press each wing gently for a few seconds so it sticks well.
Step 6: Add the Googly Eyes
Now give your little bee a face!
Place two small googly eyes near the top of the palm. Check their position before adding glue.
Once they look right, use the glue stick to attach them.
The googly eyes will make your handprint bee look cute and cheerful.
If your child wants to choose where the eyes go, let them have fun with it. This is their craft, so it does not need to look exactly like a real bee.
Step 7: Draw the Bee’s Face
Use the black marker to draw a small smile below the googly eyes.
You can also use the black marker to add two tiny antennae above the bee’s head.
Let your child help with these details. They can decide how the bee’s face should look.
For an extra pop of color, use the red marker to add two small rosy cheeks.
Step 8: Add the Finishing Touches
Take a moment to look at your finished bee handprint craft.
Check that the wings, eyes, and other pieces are firmly attached. If anything feels loose, add a little more glue and press it down.
You can also add small details with the black or red marker if your child wants to decorate the bee further.
Once everything looks good, place the craft on a flat surface and let the glue dry completely.
Your adorable handprint bee craft is now ready!
Give It A Try
This bee handprint craft is a piece of cake for your child. Just grab the supplies, help your little one trace and cut the handprint, and let them have fun decorating their very own bee.
The best part is that every handprint bee will look a little different. Your child can choose the placement of the eyes, draw the face, and add their own creative touches.
Once the craft is finished, display it on the fridge, in a classroom, or on a craft wall. It can also become a sweet little keepsake to remember how small your child’s hand was.
So grab your cardstock, googly eyes, and markers, and give this cute bee handprint craft a try!
We would love to see your child’s finished craft. Share a photo with us on Instagram and tag us using #thetidyporch.
Explore More Handprint Crafts On The Tidy Porch:

Sohel Rana is the writer, editor, publisher, and founder of The Tidy Porch. He is the man who is responsible for the craft (my wife created) being converted into a written piece. He also helps her wife (Sumona) by capturing videos of each craft. In short, he brings each craft created by her wife in front of you by transforming it into an article and a video.
