
Halloween crafting hit different this year when my kid asked for a spider instead of the usual pumpkin. So we grabbed black paper, paint, and a paper plate, and got started on this spider handprint craft together.
My child pressed their palm down for the legs, and I traced around it while they picked out big wiggly eyes for the face. I handled the cutting and hole-punching, since those parts need steady hands.
My child took over the gluing and painting for our spider handprint craft, adding their own silly touches along the way. In the end, our eight-legged spider turned out perfectly creepy and cute, and it’s now sitting proudly on our craft shelf.
Materials Needed
- Construction paper – Use black or other colors for the handprint and spider details.
- Paper plate – This will become the spider’s round body.
- Acrylic paint – Black paint works well for a classic spider.
- Paintbrush – Use it to paint the paper plate.
- One-hole punch – Use this to make holes for the spider’s yarn legs.
- Black yarn – Cut it into pieces to create eight spider legs.
- Googly eyes – These give the spider a cute and playful face.
- Glue tape – Use it to attach the handprint, eyes, and other paper pieces.
- Scissors – Use them to cut out the handprint and yarn. Adult help may be needed for younger children.
- Pencil – Use it to trace your child’s hand.
Step-by-Step Instructions For Spider Handprint Craft
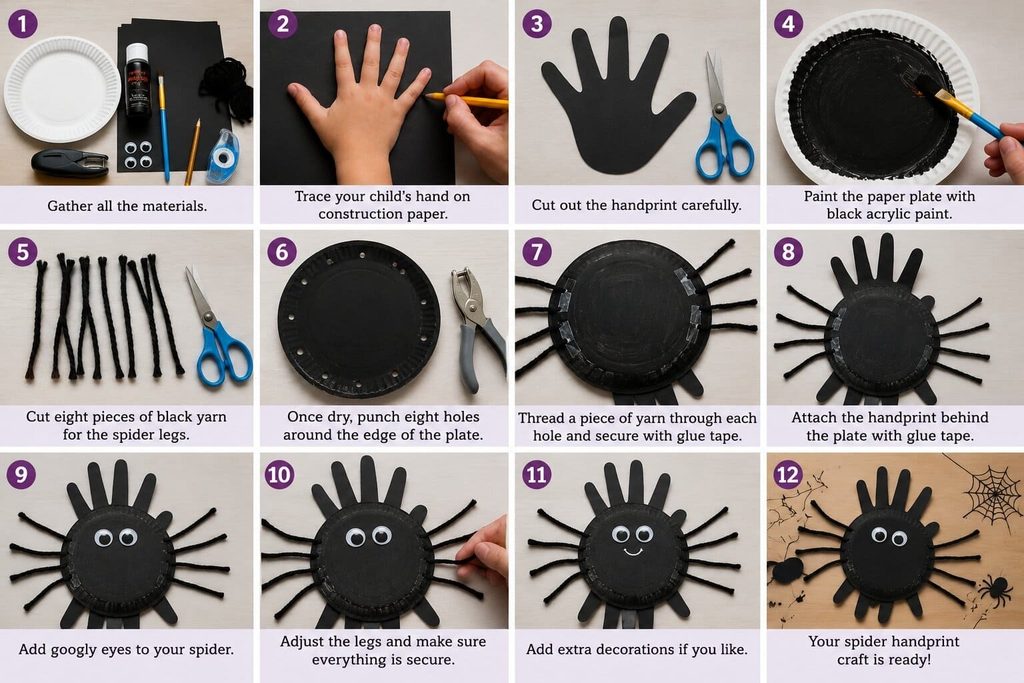
Step 1: Prepare the Craft Area
Before you begin, cover your work surface with some scrap paper or an old newspaper. Acrylic paint can stain tables, clothes, and other surfaces.
Place all your craft supplies nearby so your child can easily reach the safe materials.
For younger children, keep the scissors, hole punch, and paint away until they are needed.
Step 2: Trace Your Child’s Hand
Place a sheet of construction paper on the table.
Ask your child to place one hand flat on the paper. Spread the fingers slightly apart. Use a pencil to carefully trace around the hand and fingers.
Try to keep the hand still while you trace.
The handprint will become part of the spider’s legs, so make sure you trace all five fingers clearly.
Parent tip: The tracing does not have to be perfect. Small bumps or uneven lines will give the craft a fun, handmade look.
Read More Handprint Crafts:
| Easy Turkey Handprint Craft for Kids | Thanksgiving DIY |
| Easy Butterfly Handprint Craft for Kids | Paper Butterfly |
| Easy Ghost Handprint Craft for Kids | Halloween Craft |
Step 3: Cut Out the Handprint
Carefully cut around the pencil outline.
You can let an older child practice cutting with child-safe scissors under your supervision. For younger children, it is best for an adult to handle this step.
Once finished, you should have a paper handprint with five fingers.
Set it aside for later.
Step 4: Paint the Paper Plate
Place the paper plate on your covered work surface.
Give your child the paintbrush and let them cover the front of the plate with black acrylic paint. Try to spread the paint evenly over the entire plate.
Your child does not need to make it perfect. A few visible brush marks can add character to the spider.
Parent tip: Hold the edge of the plate while your child paints. This makes it easier to cover the middle without moving the plate around.
Set the painted plate aside and allow it to dry completely before moving to the next step.
Step 5: Prepare the Spider’s Legs
While the paint dries, prepare the black yarn.
Cut eight pieces of yarn that are about the same length. These will become the spider’s eight legs.
You can make the legs slightly different lengths if you want a more playful look.
For younger children, an adult should do the cutting.
Step 6: Punch Holes in the Paper Plate
Once the paint is dry, use the one-hole punch to make eight holes around the edge of the paper plate.
Place four holes on each side of the plate. Keep them spaced apart so the yarn legs can spread out.
Parent tip: Make the holes near the edge, but not too close. Leaving a little space from the edge helps prevent the paper plate from tearing.
Adults should handle the hole punch, especially when working with young children.
Step 7: Attach the Yarn Legs
Take one piece of black yarn and thread it through one of the holes.
Secure the yarn using glue tape on the back of the plate. Repeat this process for the remaining seven pieces.
Spread the yarn pieces out so they look like spider legs.
Once all eight pieces are attached, gently adjust them until the legs are evenly spaced.
Step 8: Add the Handprint
Now bring back the paper handprint.
Place it behind or around the bottom of the paper plate so the fingers extend outward. The handprint adds extra detail and gives the spider a fun handprint-art look.
Arrange it until you like the position.
Use glue tape to secure the handprint to the paper plate.
Parent tip: If the handprint is larger than the plate, that is completely fine. Let the fingers extend beyond the body so they can be seen clearly.
Step 9: Add the Googly Eyes
Give your spider a face by adding googly eyes.
Place two googly eyes near the top center of the painted paper plate. Use glue tape to secure them.
Your child can decide how to position the eyes. They can place them close together, farther apart, or even at slightly different angles.
This small detail can give the spider lots of personality.
Step 10: Check the Spider’s Legs
Take a moment to look at the finished spider.
Make sure all eight yarn legs are attached securely. If a piece is loose, add another small piece of glue tape to hold it in place.
You can also gently bend or curve the yarn to make the legs look more natural.
Let your child arrange the legs in any way they like.
Step 11: Add Extra Decorations
Your spider is already complete, but your child can add a few extra details if they want.
They can use construction paper to make a small mouth or other facial details. You could also add small paper shapes around the spider to create a spooky Halloween scene.
Keep the decorations simple so the handprint and spider remain the main focus.
Step 12: Display the Finished Spider
Allow any glue or paint to dry fully before moving the craft.
Once everything is secure, your handprint spider is ready to display.
Hang it on a wall, place it on a classroom bulletin board, or use it as part of your Halloween decorations. You can also write your child’s name and the date on the back as a keepsake.
Give It A Try
This spider handprint craft is a simple and creative way to enjoy an afternoon with your child.
With a paper plate, paint, black yarn, construction paper, and a few basic supplies, you can create a fun eight-legged spider together.
Let your child help with tracing, painting, arranging, and decorating while you handle cutting and hole-punching when needed.
Have fun with the colors and details, and enjoy displaying your child’s handmade spider for everyone to see!
Discover More Handprint Crafts On The Tidy Porch:

Sohel Rana is the writer, editor, publisher, and founder of The Tidy Porch. He is the man who is responsible for the craft (my wife created) being converted into a written piece. He also helps her wife (Sumona) by capturing videos of each craft. In short, he brings each craft created by her wife in front of you by transforming it into an article and a video.
