
Last spring, my neighbor’s daughter ran over with a beetle on a leaf. Then she held up her drawing and asked, “Is my bug real too?” Hers had four wings and eight legs. We laughed.
Then we counted together. That moment gave me this idea. This bug handprint craft turns one traced hand into a bug that your child invents. They pick the wings, spots, and legs.
Then they test if their bug counts as a real insect. You only need paper, scissors, and glue. Every bug comes out different.
What Is an Invent-a-Bug Handprint Craft, and Why Do Kids Love It?
It is a paper craft where one traced hand becomes a bug body that the child designs. There is no pattern to copy. Every choice belongs to the child.
I tried it with six kids at a backyard playdate. It took about 35 minutes. No two bugs matched. One child made a fuzzy purple bug with striped wings.
Another covered hers in dots and named her “Sparkle Zoomer.” They kept comparing and laughing. Nobody felt wrong, because there was no wrong bug.
What Materials Do You Need for a Handprint Bug Craft for Kids?
You need paper, glue, scissors, and a few small extras. Most of it is probably in your craft drawer. This list makes one bug.
- 1 sheet of colored cardstock for the handprint
- 1 sheet of white paper for the background
- 1 small paper scrap for the head, about 2 inches wide
- 8 pieces of pipe cleaner or paper strips, about 3 inches long (6 for legs, 2 for antennae)
- 2 googly eyes, or a black marker
- Markers, crayons, or dot stickers for spots and stripes
- 1 index card for the label
- 1 glue stick and 1 small bottle of white glue
- Child-safe scissors, plus sharper scissors for you
- 1 pencil
Cardstock works better than thin paper. It stays flat and holds the glue. White glue holds pipe cleaners better than a glue stick.
How Do You Make a Bug Handprint Craft Step by Step?
Follow the ten steps below. The craft takes about 30 to 40 minutes. It works for ages 2 to 6 with an adult nearby. Toddlers can trace, press, and add stickers. Older kids can do most of the cutting.
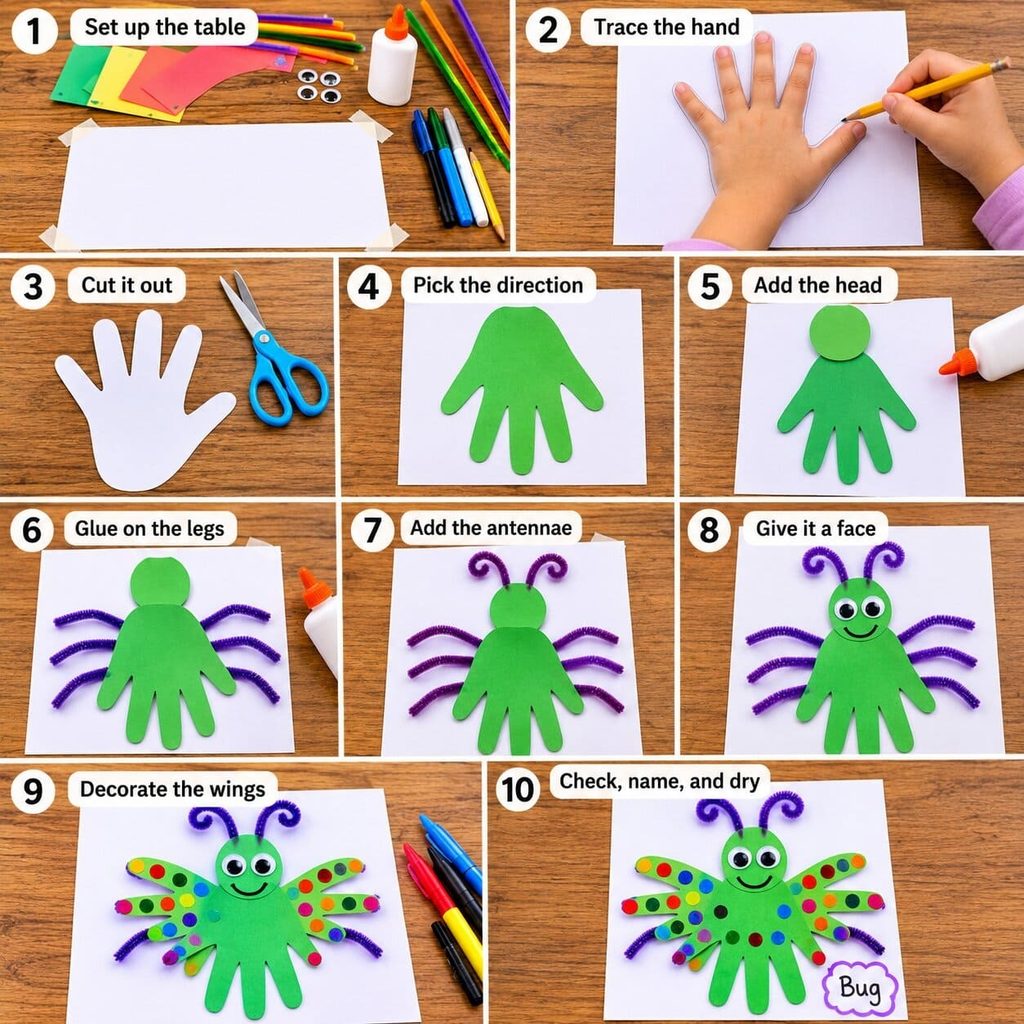
- Set up the table. Lay out the supplies and tape the white paper down so it cannot slide.
- Trace the hand. Press your child’s hand flat on the cardstock with the fingers spread. Trace around it with a pencil. Ask your child to hold still like a starfish.
- Cut it out. Cut along the line. Adults should cut for toddlers. Preschoolers can try wide curves. Wobbly edges look charming.
- Pick the direction. Turn the hand so the fingers point down. The palm becomes the middle of the bug. The fingers become the back end and wings. Glue it to the center of the white paper.
- Add the head. Cut a circle from the paper scrap, about 2 inches wide. Glue it above the palm so the edges touch.
- Glue on the legs. Place three pipe cleaner pieces on each side of the palm. Add white glue. Press each one for about ten seconds. Spread them out like real legs.
- Add the antennae. Glue two pieces to the top of the head. Curl the tips around a pencil for a fun twist.
- Give it a face. Glue on googly eyes or draw dots with a marker. Add a smile or a funny frown.
- Decorate the wings. Use markers, stickers, or fingerprint dots on the fingers. Add stripes, swirls, or spots.
- Check, name, and dry. Run the insect check and fill out the label in the next sections. Let the bug dry flat for about 20 minutes.
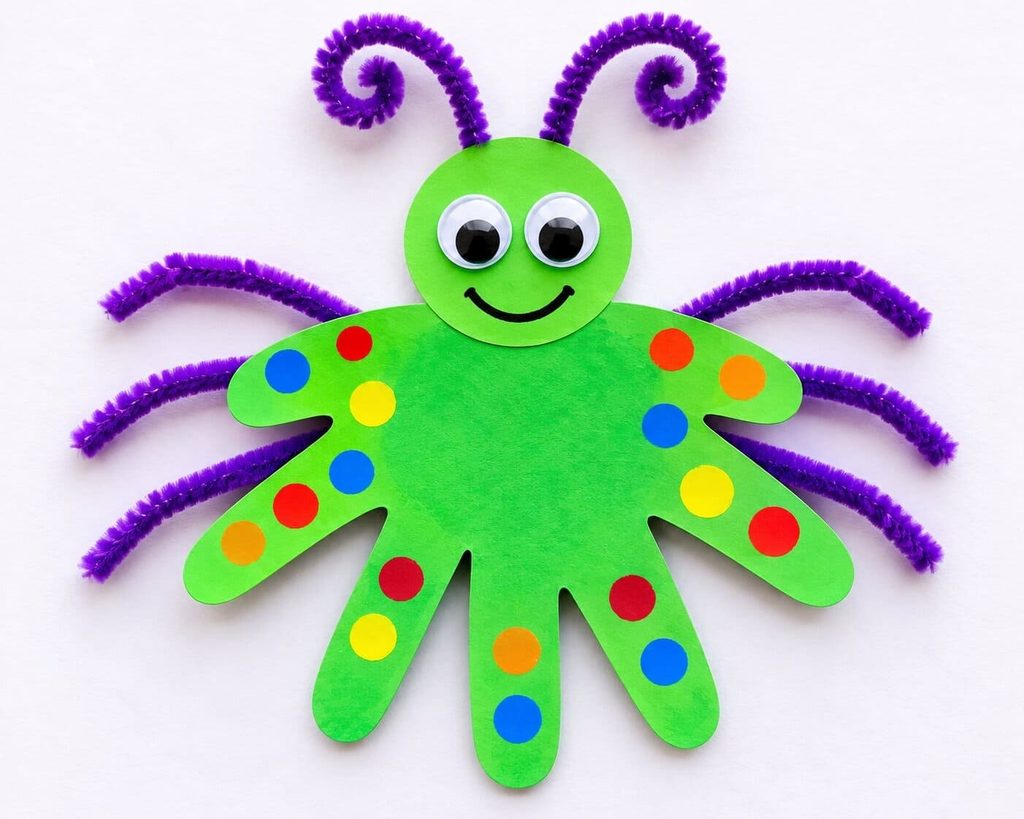
Steps two and three take the longest. If your child loses interest, stop after cutting. You can finish the next day.
How Can You Check If Your Bug Is a Real Insect?
Count three things: body parts, legs, and antennae. A real insect has three body parts, six legs, and two antennae. The three body parts are the head, the middle, and the back end.
Let your child do the counting. Point to the head, then the palm, then the fingers. Touch each leg and count out loud. Count the antennae last.
My neighbor’s daughter gave her bug eight legs. We checked together. Her bug had too many legs to be an insect. It was closer to a spider, which has eight legs. She loved that.
She kept the extra legs and renamed her bug “Spidey-Fly.” It was not wrong. It was just a different kind of bug.
How Do You Make a Bug Field Guide Label?
A Bug Field Guide label is a small card with the bug’s name and one fact. It turns a craft into a mini science lesson. Cut an index card in half. Write these four lines on it:
- Name:
- Where it lives:
- What it eats:
- Is it an insect? Yes or No
One child filled hers out like this. Name: Sparkle Zoomer. Where it lives: tall grass. What it eats: sweet flower juice. Is it an insect? Yes.
Toddlers can say their answers while you write. Older kids can write their own. Ask simple questions to help. “Where would your bug sleep?” works well.
Real bugs give good ideas too. Bees drink nectar. Ladybugs eat tiny pests called aphids. Tape the label under the finished bug.
What Are Good Ideas for Wings, Antennae, Spots, and Legs?
Mix and match until the bug looks like yours. Here are ideas that worked well for us.
- Wings: Draw stripes on each finger. Glue on squares of tissue paper. Trace the edges with glitter glue.
- Antennae: Curl them. Bend them into zigzags. Glue a small paper circle on each tip.
- Spots: Use dot stickers. Make fingerprint dots with washable ink. Draw big polka dots with a marker.
- Legs: Bend pipe cleaners into knees. Fold paper strips like an accordion for springy legs.
You can also give your bug a pattern, like checks or zigzags. Silly ideas often make the best bugs.
How Can You Help Toddlers and Preschoolers Succeed?
Keep each step short and let kids do the parts they can handle. A quick, calm session beats a long one.
- Tape the paper to the table before you start.
- Trace and cut the hand ahead of time for toddlers.
- Let toddlers add stickers and fingerprint spots. Most of them love it.
- Skip googly eyes for children under three. Draw the eyes with a marker instead.
- Keep baby wipes close for sticky fingers.
- Split the craft into two short sessions if your child gets tired.
- Praise the ideas, not the neatness.
How Do You Turn the Bugs Into a Class Display?
Hang every bug on one board and let the differences be the point. A display of different bugs looks lively and fun. It also shows teachers how each child thinks.
Cover a bulletin board with green paper for grass. Title it “Our Bug Garden.” Staple each bug on the board with its label below. Add paper leaves and flowers in the gaps.
Then try a gallery walk. Let kids stroll past the board and guess which bugs are real insects. Count them together. How many have six legs? How many do not? This adds a quick math lesson and keeps kids curious for days.
Bug Handprint Craft FAQs
What age is this bug handprint craft best for?
It works well for ages 2 to 6 with an adult nearby. Toddlers can trace, stick, and press. Kindergarten kids can handle the field guide label.
Can I use paint instead of paper?
Yes. Paint your child’s palm and press it on the white paper. Let it dry. Then add the head, legs, and antennae on top. The print will look softer, and that is fine.
How do I make the bug stand out from the page?
Use a dark or bright background so the bug pops. You can also glue only the palm and let the wing fingers lift a little. That gives it a three-dimensional look.
Can I make this without googly eyes?
Yes. Draw the eyes with a marker. You can also use paper circles or round stickers. This is also safer for toddlers.
Is a spider an insect?
No. Spiders are arachnids. They have eight legs, two body parts, and no antennae. Insects have six legs, three body parts, and two antennae.
How do I make it a keepsake?
Write your child’s name, age, and the date on the back. Store the bug flat in a folder or frame it. A few years later, the small hand will look surprising.
Your Bug Handprint Craft Is Ready
This bug handprint craft needs only a few supplies and a little time. Your child makes a bug that no one else has. They learn the basics of insects along the way. Hang it on the fridge, a window, or a classroom wall. Then make another one with new colors and a new name.

Sohel Rana is the writer, editor, publisher, and founder of The Tidy Porch. He is the man who is responsible for the craft (my wife created) being converted into a written piece. He also helps her wife (Sumona) by capturing videos of each craft. In short, he brings each craft created by her wife in front of you by transforming it into an article and a video.
