
Last December, my neighbor’s four-year-old grabbed a fork from my kitchen drawer. Not a brush. A fork. I almost took it back.
Then she dipped it in green paint and pressed it onto paper. One press made a tiny pine branch. Six presses later, she had a tree. I had spent years drawing wobbly triangles. She finished in two minutes.
That’s why I love this fork painted Christmas tree craft. You don’t need talent. You need one fork, three greens, and ten quiet minutes. Today, you’ll make your own.
What Is a Fork Painted Christmas Tree Craft?
It’s a painting where you press a fork into paint, then onto paper, to make pine branches. Each press leaves tiny lines that look like needles.
You stack the presses in tiers, and a tree appears. Fork painting a Christmas tree for kids works because the fork does the drawing. You only press and drag. Kids ages 2 to 6 can do it. So can grandparents who say they can’t draw.
What Supplies Do You Need for Fork Painting a Christmas Tree?
You likely own everything already. Here’s my full list:
- 1 sheet of white cardstock, 8.5 x 11 inches
- Washable tempera paint in light, medium, and dark green
- Brown paint for the trunk
- Yellow paint for the star, and red for ornaments if you like
- 1 plastic or metal fork
- 1 paper plate to use as a palette
- 1 damp cloth or a few wipes
- Newspaper or a plastic tablecloth
- A flat spot to dry
Cardstock stops the paper from going soggy. Use a plastic fork for toddlers. It’s light, and it’s safe if it ends up in a mouth. Use a metal fork for older kids and adults. Its stiffer tines leave sharper lines. Only have one green? Mix your own. Add yellow for light green and a dot of black for dark.
How Much Paint Should You Put on the Fork?
Use a dime-size blob of paint on the plate. Press the tines into it until they’re lightly coated. Too much paint fills the gaps between the tines. You get a solid green smear instead of needle lines. Test on scrap paper first. You should see five or six clear lines. If they blur, wipe the fork on the plate edge. Reload after every two or three presses. The fork runs dry fast, and faded lines make a tired-looking tree. I ruined my first three trees before I learned this.
How Do You Fork Paint a Christmas Tree Step by Step?
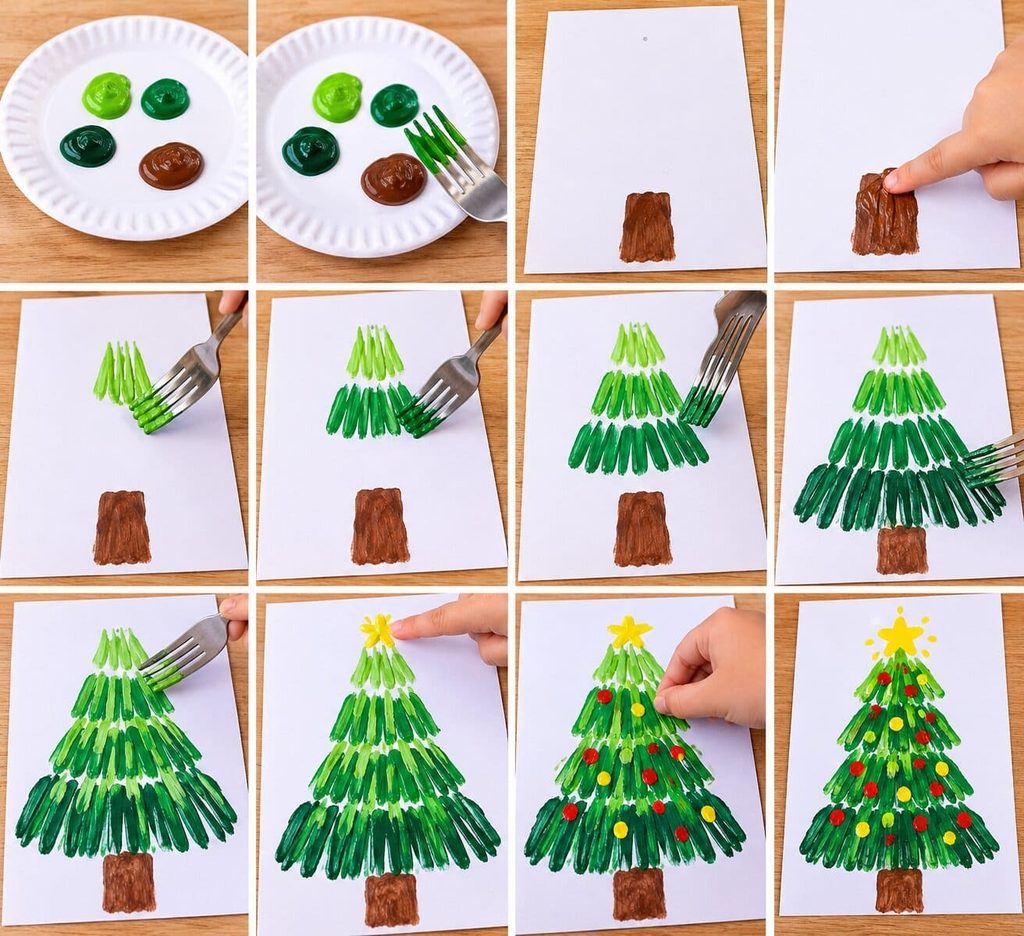
Paint the tree from top to bottom, in four tiers. The whole project takes about 15 minutes, plus 20 to 30 minutes to dry. Top to bottom works best because the narrow tip sets your width. If you start with a wide base, the tree often runs off the page.
Set Up and Paint the Trunk
- Cover your table. Put the paper plate in front of you.
- Add a dime-size blob of each green in three spots. Add brown to one side.
- Turn the cardstock so it’s tall. Make a light pencil dot near the top center. That’s your star spot.
- Paint the trunk first. Press your finger in brown until you have a block about 1 inch wide and 1.5 inches tall at the bottom center. Painting it first lets the lowest tier overlap the trunk top, so the tree looks like it’s growing.
Press and Drag the Four Tiers
Your fork is about 1 inch wide. That makes sizing easy. One press equals one inch.
- Tier one: Dip the fork in light green. Press at the pencil dot. Drag down about half an inch. Lift straight up. That’s one press, one inch wide.
- Tier two: Switch to medium green. Move down so your presses touch the bottom of tier one. Make two presses side by side. This tier is 2 inches wide.
- Tier three: Switch to dark green. Make three presses side by side, centered. This tier is 3 inches wide.
- Tier four: Stay with dark green. Make four presses, 4 inches wide. Angle the outer presses slightly outward.
- Wait five minutes. Dip the fork in light green with half the usual paint. Lightly press over the tip of each tier. This adds highlights and makes the tree look layered.
Add the Star and Ornaments
- Dab yellow on the pencil dot with your fingertip. Add four small dabs around it. It reads as a star.
- Wait 10 minutes. Then dab red or yellow fingerprints on the tiers. Waiting stops the colors from blending into mud.
- Dry flat for 20 to 30 minutes. Don’t stack the paintings.
Keep the Mess Under Control
Use washable paint. Wipe the fork between colors. Wash forks in warm, soapy water right away, before paint dries on them. Watch toddlers, so paint stays out of mouths.
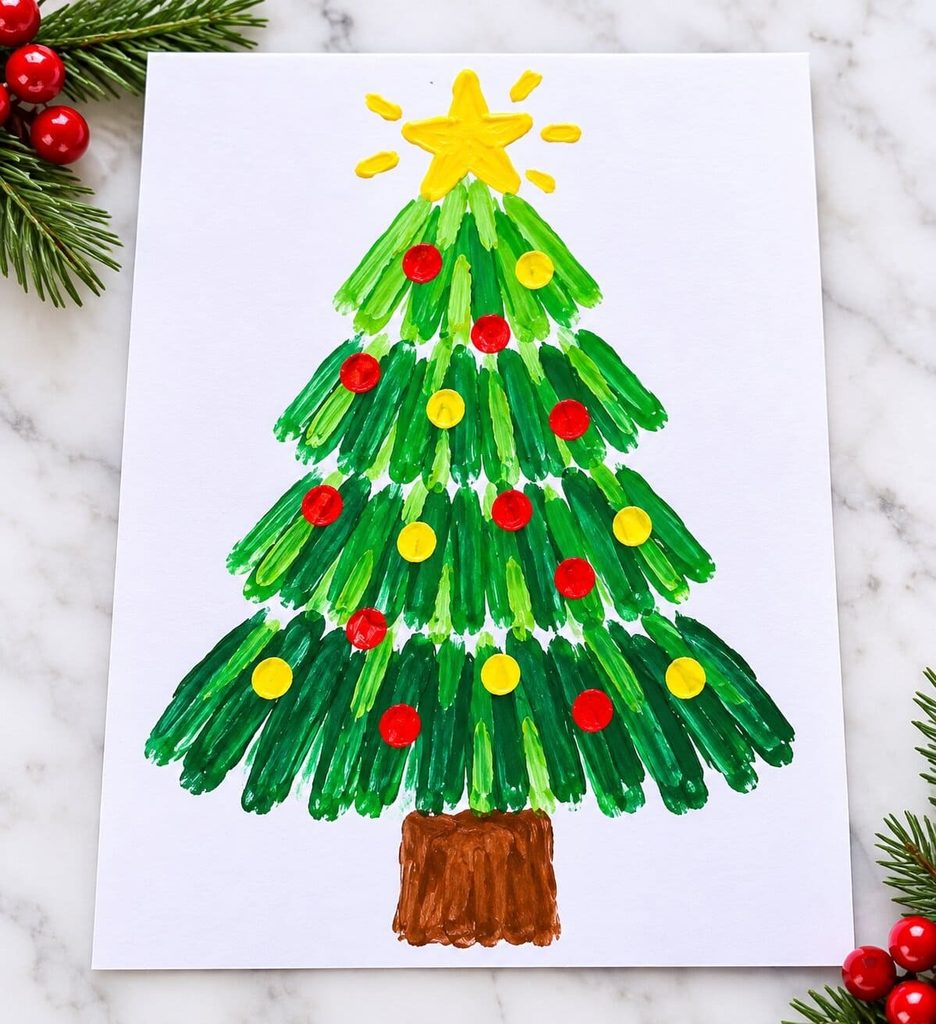
How Do You Fix a Smudged or Messy Tree?
Let it dry, then paint over it. A second thin layer hides most mistakes. Here’s what to try:
- A solid green blob: Let it dry. Press a lighter green fork print over it. The lines return.
- A smeared tier: Blot with a dry paper towel. Don’t rub.
- Uneven tiers: Add a fifth small tier or more ornaments to hide the gap.
- Paint stuck on the fork: Wipe the fork on the plate, and load less paint.
- Curling paper: Press it flat under a heavy book while it dries.
How Can You Make This Craft for Toddlers, Preschoolers, and Keepsakes?
Change the tiers, the colors, and the finish. The base technique stays the same. Here are three versions.
Toddler Version (Ages 2 to 3)
Draw a light pencil triangle first. Give your child a plastic fork and two greens. Sit beside them and press first, so they see the motion. Let them press anywhere inside the triangle. Add fingerprint ornaments. Toddlers can press, but they can’t plan tiers yet. The triangle gives them a target. This also makes easy Christmas tree art for toddlers.
Preschool Version (Ages 4 to 6)
Use all four tiers and three greens. Glue on buttons or pom-poms with a glue stick for ornaments. Ask your child to count the presses per tier: 1, 2, 3, 4. It turns the craft into a quiet counting game. It’s a great Christmas tree fork painting preschool activity.
Keepsake Version
Paint on cardstock cut to 5 x 7 inches. Write your child’s name and the year on the back. Then pick a finish. Glue it onto a folded sheet for a card. Cut around it, punch a hole, and add ribbon for a gift tag. Or slip it into a 5 x 7 frame for grandparents.
How Do You Run This Craft With a Whole Class?
Set up paint stations of four or five children each. For 20 kids, that’s four stations. Put one plate with three greens at each station, and one fork per child. One shared palette for 20 children creates a line, and lines create mess. Mark the pencil star dots on every sheet before class. That saves about five minutes. Keep a bucket of soapy water nearby so used forks can soak. Lay finished trees flat on a counter to dry. Then hang them together on a board as a forest.
Ready to Try Your Fork Painted Christmas Tree Craft?
Yes, and you can finish it today. You need one fork, three greens, and 15 minutes. The fork does the hard part. You just press, drag, and lift. Hang it on the fridge and let your child tell the story of how they made it.
FAQs About Fork Painted Christmas Trees
What kind of paint works best for fork painting?
Washable tempera paint works best. It’s thick, so the fork lines stay crisp. It also washes off hands and clothes. Thin craft paint runs and blurs the needles.
Can toddlers do fork painting?
Yes, from about age 2. Give them a plastic fork and two colors. Let them press anywhere. Expect an abstract tree, and call it perfect.
What paper is best for fork painted Christmas trees?
Cardstock is best. It doesn’t curl or tear when wet. Thin printer paper wrinkles and soaks through fast.
How long does the paint take to dry?
Thin layers dry in 20 to 30 minutes. Thick spots can take an hour. Wait until the paint is dry to the touch before you stack or frame it.
How do I keep the paint from smearing?
Use less paint and lift the fork straight up. Work from top to bottom. Rest your hand on a scrap sheet so it never touches wet paint.
Can I turn fork painted trees into cards or ornaments?
Yes. Fold cardstock and glue the tree on the front for a card. For an ornament, cut around the dried tree, punch a hole at the top, and thread a ribbon through it.

Sohel Rana is the writer, editor, publisher, and founder of The Tidy Porch. He is the man who is responsible for the craft (my wife created) being converted into a written piece. He also helps her wife (Sumona) by capturing videos of each craft. In short, he brings each craft created by her wife in front of you by transforming it into an article and a video.
