
Create a cheerful daisy that looks soft and natural with this easy daisy flower paper craft.
Using extra-fine crepe paper, floral wire, and a few simple tools, you can make a beautiful handmade flower for a vase, bouquet, or home decoration.
The white petals and yellow center give this paper daisy its classic look, while the green stem and leaves add a realistic finish.
With a little curling and shaping, the crepe paper gives the flower a lovely three-dimensional appearance.
Materials Needed
- White Crepe Paper (Extra Fine) – Use this for the daisy petals.
- Yellow Crepe Paper (Extra Fine) – Use this to create the flower center.
- Dark Green Crepe Paper (Extra Fine) – Use this for the leaves and small details around the flower base.
- 18-Gauge Floral Wire – This will form the sturdy flower stem.
- Floral Tape – Use it to cover and secure the floral wire.
- Scissors – Use sharp scissors to cut the crepe paper into petals, strips, and leaves.
- Paper Curler – This helps curl and shape the delicate petals.
- Glue Gun – Use hot glue to attach the paper pieces and secure the flower. Handle the glue gun carefully, as the glue becomes very hot.
How to Make a Daisy Flower With Crepe Paper
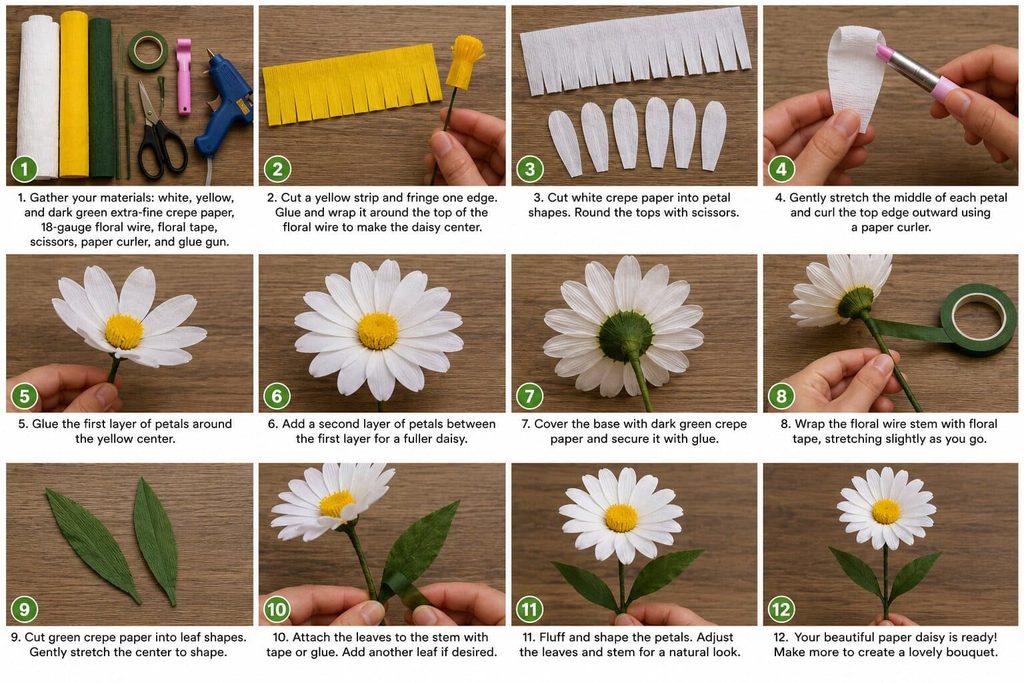
Step 1: Prepare the Crepe Paper
Gather your white, yellow, and dark green extra-fine crepe paper. Place each color on a clean, flat work surface.
Extra-fine crepe paper works well for paper flowers because it is lightweight and easy to fold, cut, stretch, and shape. When working with crepe paper, pay attention to the direction of its grain. Keeping the grain in the right direction helps the petals stretch and curve more naturally.
Cut the paper into manageable pieces before you begin making the flower.
Step 2: Make the Yellow Flower Center
Start by making the center of the daisy.
Cut a narrow strip of yellow crepe paper. Make small cuts along one long edge to create a fine fringe. Keep the cuts close together so the finished center looks full and textured.
Place the end of the fringed strip near one end of the floral wire. Add a small amount of hot glue and carefully begin wrapping the yellow strip around the top of the wire.
Continue winding the strip around itself until you have a small, rounded yellow flower center. Add a little glue at the end to keep the paper secure.
Fringing the yellow paper creates tiny pieces that resemble the textured center of a real daisy.
Step 3: Cut the White Daisy Petals
Next, prepare the white petals.
Cut a strip of extra-fine white crepe paper wide enough to create your desired petal length. Make evenly spaced cuts from one long edge toward the other, leaving the bottom section connected.
Round the top of each strip with your scissors to create soft, daisy-shaped petals.
You can make around 12 to 14 petals for a simple flower. More petals will give your daisy a fuller appearance.
Try to keep the petals similar in size, but do not worry if they are not perfectly identical. Small differences can make the handmade flower look more natural.
Step 4: Shape the Petals
Before attaching the petals, gently shape each one.
Hold a petal between your fingers and carefully stretch the middle of the crepe paper. This creates a slight cup shape and gives the petal more volume.
Next, use the paper curler to gently curl the top edge of each petal outward. Work slowly because extra-fine crepe paper is delicate.
The goal is to create soft, curved petals rather than flat strips of paper. Shaping and curling the petals is what gives the finished daisy its three-dimensional look.
Step 5: Attach the Petals to the Flower Center
Take one shaped white petal and apply a small dot of hot glue to its bottom.
Attach it directly around the yellow flower center. Hold it in place for a few seconds until the glue sets.
Continue adding the remaining petals around the center. Place them close together and slightly overlap their bases.
For an even flower, attach petals around opposite sides as you work. Then fill the spaces between them. This helps create a balanced arrangement and prevents large gaps between the petals.
Step 6: Add a Second Layer of Petals
For a fuller daisy, add another layer of white petals.
Place the second layer between the petals from the first layer. This creates a staggered arrangement and fills any spaces that may be visible.
Apply only a small amount of hot glue to each petal base. Too much glue can make the flower bulky and may show through the thin crepe paper.
After attaching the petals, gently spread them apart and check the shape from above.
Step 7: Secure the Flower Base
Turn the flower over carefully so you can see its underside.
Add a small amount of hot glue around the base if any petals feel loose. Press them gently into place.
Cut a small piece of dark green crepe paper and shape it around the base of the flower. This green section helps cover the petal ends and creates a more finished floral base.
You can gently pinch the green paper around the wire so it fits neatly underneath the flower.
Step 8: Wrap the Floral Wire Stem
Now cover the 18-gauge floral wire with floral tape.
Start near the base of the flower. Stretch the floral tape slightly as you wrap it around the wire at an angle.
Continue winding the tape downward until the entire visible wire is covered.
Stretching the tape slightly while wrapping helps it grip itself and creates a smooth-looking stem. Floral tape is commonly used to cover floral wire and connect the flower base to the stem.
Step 9: Make the Green Leaves
Use dark green crepe paper to make one or two leaves.
Cut a long, pointed leaf shape from the paper. You can make the leaves narrow at the tip and slightly wider near the base.
Gently stretch the center of each leaf to give it a soft curve.
If you want more detail, lightly pinch a crease down the middle of the leaf. This gives it a natural shape.
Step 10: Attach the Leaves to the Stem
Place one leaf against the floral wire a little below the flower head.
Secure the base of the leaf with a small amount of hot glue or floral tape.
Continue wrapping the floral tape around the stem to cover the leaf base. Add a second leaf lower on the stem if desired.
Wrapping the leaves into the stem creates a neat connection and gives the paper daisy a more realistic appearance.
Step 11: Fluff and Shape the Finished Daisy
Turn the flower upright and look at the petals from different angles.
Gently separate the petals with your fingers. Curl any flat petals outward with the paper curler and adjust any petals that look too crowded.
You can make some petals curve more than others. This small variation gives the flower a softer, more natural appearance.
Be gentle when shaping the crepe paper. Too much stretching can tear the delicate material.
Once you are happy with the flower, allow the hot glue to cool and set completely.
Your handmade paper daisy is ready!
Step 12: Create a Paper Daisy Bouquet
Make several daisies using the same technique to create a cheerful paper flower arrangement.
Try making flowers with slightly different petal shapes or stem lengths. Place several stems together in a vase, or combine your daisies with other handmade paper flowers.
You can also use the finished flowers as table decorations, handmade gifts, party decorations, or a long-lasting floral display.
Give It A Try
This daisy flower paper craft is a lovely way to turn simple crepe paper and floral supplies into a realistic handmade bloom. The soft white petals, textured yellow center, green leaves, and wrapped wire stem give the flower a natural look.
Take your time when shaping and curling each petal, and do not worry about making every piece perfect. A little variation makes handmade flowers more charming. Gather your supplies, create your first paper daisy, and give this beautiful craft a try!

Sohel Rana is the writer, editor, publisher, and founder of The Tidy Porch. He is the man who is responsible for the craft (my wife created) being converted into a written piece. He also helps her wife (Sumona) by capturing videos of each craft. In short, he brings each craft created by her wife in front of you by transforming it into an article and a video.
