
Create a delicate flower with just a square sheet of paper and a skewer! This easy lily flower paper craft is a fun way to turn simple origami paper into a beautiful handmade bloom.
The folding steps are simple to follow, and the skewer helps you gently curl the petals for a natural look.
Choose pink, white, yellow, or any color you like to make your own paper lily. This craft is perfect for beginners, kids with adult help, and anyone who enjoys simple paper flowers.
Materials Needed
- Origami paper or square-colored paper – Choose a square sheet in any color you like. Lightweight paper is easier to fold and shape.
- Skewer – Use a wooden or bamboo skewer to gently curl and shape the flower petals.
How to Make a Lily Flower With Paper
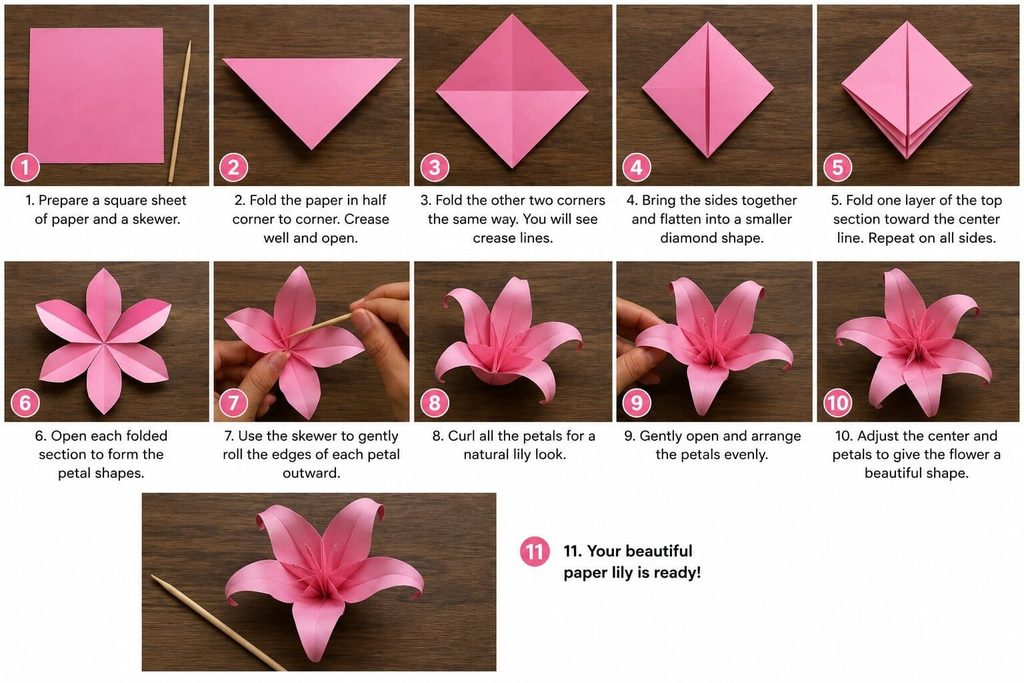
Step 1: Prepare the Square Paper
Start with one square sheet of origami paper or colored paper. A sheet around 6 x 6 inches works well for a medium-sized flower.
Place the paper flat on your work surface with the color you want for the lily facing down. If your paper has different colors on each side, decide which side you want to see on the finished flower.
Make sure all four corners are easy to identify before you begin folding.
Step 2: Fold the Paper in Half
Bring the bottom corner up to meet the top corner. Press along the fold to make a neat crease.
Open the paper again. Then fold the left corner over to meet the right corner. Press the fold firmly and unfold the paper.
You should now have diagonal crease lines crossing through the center of the square.
These creases will help you find the center and guide the next folds.
Step 3: Create the Basic Folded Shape
Turn the paper so it looks like a diamond.
Bring the side corners toward each other and gently push the folds inward. Flatten the paper into a smaller diamond-shaped folded form.
Press along the edges to make the shape neat and flat.
Take your time with this step. Strong, clear creases will make the later petal folds much easier.
Step 4: Fold the Petal Sections
Hold the folded diamond with the open edges facing you.
Take one side and fold it toward the center line. Press the crease firmly with your finger.
Repeat the same fold on the other side. Continue around the folded shape until the sections are evenly folded.
These folded sections will become the individual petals of your paper lily.
Try to keep the folds as even as possible, but do not worry if they are not perfect. Small differences can give the handmade flower a natural appearance.
Step 5: Shape the Lily Petals
Carefully open the folded sections one at a time.
Pull each section outward and flatten it gently to form a long, pointed petal shape.
Continue with the remaining sections until you have several petals spreading out from the center.
The flower should begin to look like a lily at this point. Keep the center tight while allowing the petals to spread outward.
Step 6: Fold and Define Each Petal
Look at each petal carefully. If a petal looks too wide or uneven, gently adjust its fold.
Press the center crease of each petal with your fingertip. This creates a slight ridge and gives the paper flower more shape.
Work around the entire flower so that each petal has a similar form.
Do not press the paper too hard. Gentle folds will make it easier to curl the petals in the next step.
Step 7: Use the Skewer to Curl the Petals
Now take the skewer and use it to shape the edges of the petals.
Place the skewer near the outer edge of one petal. Gently wrap the paper around the skewer and roll it slightly inward.
Do not make a tight roll. The goal is to create a soft curve rather than a sharp curl.
Repeat this process with each petal. Curl some petals slightly more than others to give your lily a natural, open appearance.
If children are making this craft, an adult should help with a pointed skewer.
Step 8: Open and Arrange the Flower
Once all the petals have been curled, gently spread them apart.
Look at the flower from above and adjust the petals until they are evenly spaced.
Some petals can point upward while others can curve outward. This gives the paper lily more depth and makes it look more like a real flower.
Avoid flattening the petals completely. Keeping some curves will help the bloom maintain its three-dimensional shape.
Step 9: Shape the Flower Center
The center of a lily is an important part of its appearance. Gently pinch or adjust the middle of the flower so the petals meet neatly at the center.
You can use the tip of the skewer carefully to help open small spaces between the petals if needed.
If you want to add more detail, you can make a second small paper piece for the center or use a different color of paper. However, the flower can also look beautiful with a simple folded center.
Step 10: Give the Lily Its Final Shape
Hold the finished paper flower gently and look at it from different angles.
Adjust any petals that look too flat. Use the skewer again to add a little more curve where needed.
Try not to make every petal exactly the same. Real flowers have small differences in their petals, so a little variation can make your handmade lily look more natural.
Once you are happy with the shape, place the flower on a flat surface or hold it carefully by the center.
Your paper lily is complete!
Step 11: Make a Colorful Lily Collection
Once you have made one lily, try creating a few more using different colors.
White paper can create an elegant lily, while pink, yellow, purple, or orange paper can make a bright and cheerful flower display.
You can also use different paper sizes to make large and small blooms. Arrange several paper lilies together to create a simple handmade flower display.
If you want to make the project more decorative, pair your flowers with paper leaves or use them as part of a larger paper flower arrangement.
Give It A Try
This lily flower paper craft is a simple way to turn an ordinary square sheet of paper into a delicate handmade bloom. The folding creates the basic flower shape, while the skewer helps you curl and shape the petals.
Try different paper colors and sizes to create your own collection of paper lilies. Whether you are making a single flower or a whole bouquet, this easy craft is a fun way to enjoy paper folding and creativity. Gather your paper and skewer, and give this beautiful lily craft a try!

Sohel Rana is the writer, editor, publisher, and founder of The Tidy Porch. He is the man who is responsible for the craft (my wife created) being converted into a written piece. He also helps her wife (Sumona) by capturing videos of each craft. In short, he brings each craft created by her wife in front of you by transforming it into an article and a video.
