
Last winter, I came home with two grocery bags and a dripping umbrella. My foot caught a sneaker. The eggs flew. So did I.
Our front door opened into a hallway barely four feet wide, and shoes had taken over every inch. I spent the next few weeks testing fixes. Some flopped.
Five held up. Each one fits a tight entry, and you can finish any of them in a weekend or less. Pick the one that suits your space, your budget, and your people. Then let’s clear that doorway.
How to Choose Front Door Shoe Storage Before You Buy Anything
Start with a tape measure, not a shopping cart. Storage only works if it fits your wall, your floor, and your door swing.
Write down three numbers. First, the width of the wall beside your door. Second, the floor depth you can use before the door bumps something. Third, the space the door needs to swing open. Next, count the pairs your household wears in a normal week. Most people rotate through three to five. The rest can live in a closet.
Now match your answers to an idea. Renters should look at Ideas 1 and 2. Handy owners can build Idea 3. Parents will love Idea 4. Anyone who hates visible clutter should jump to Idea 5.
Idea 1: Hang an Over-the-Door Organizer and Use Zero Floor Space
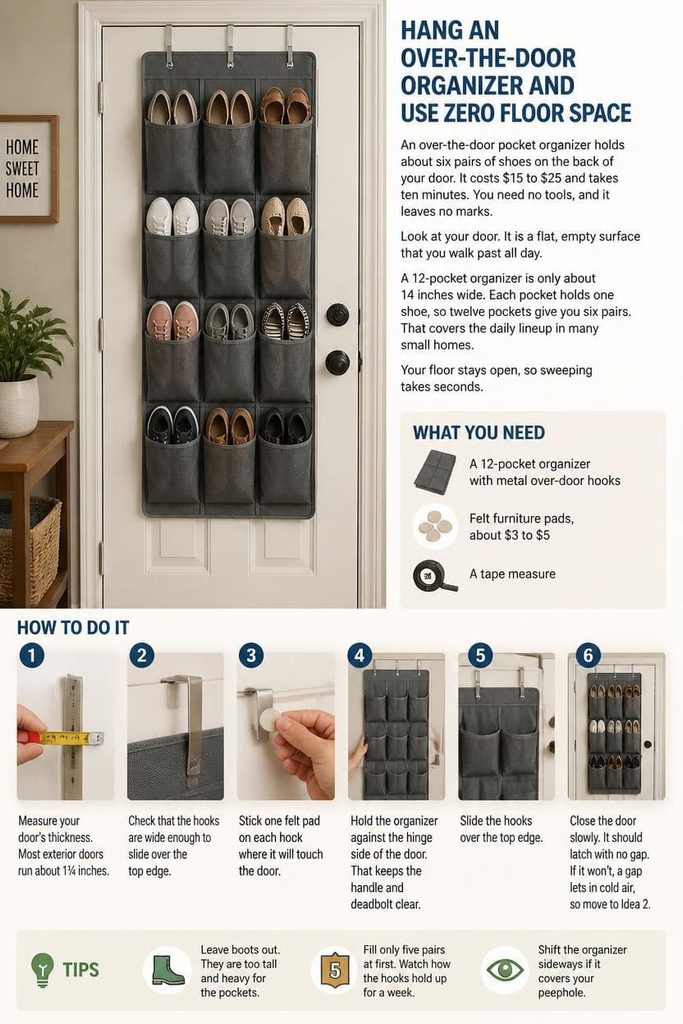
An over-the-door pocket organizer holds about six pairs of shoes on the back of your door. It costs $15 to $25 and takes ten minutes. You need no tools, and it leaves no marks.
Look at your door. It is a flat, empty surface that you walk past all day. A 12-pocket organizer is only about 14 inches wide. Each pocket holds one shoe, so twelve pockets give you six pairs. That covers the daily lineup in many small homes. Your floor stays open, so sweeping takes seconds.
What You Need
- A 12-pocket organizer with metal over-door hooks
- Felt furniture pads, about $3 to $5
- A tape measure
How to Do It
- Measure your door’s thickness. Most exterior doors run about 1¾ inches.
- Check that the hooks are wide enough to slide over the top edge.
- Stick one felt pad on each hook where it will touch the door.
- Hold the organizer against the hinge side of the door. That keeps the handle and deadbolt clear.
- Slide the hooks over the top edge.
- Close the door slowly. It should latch with no gap. If it won’t, a gap lets in cold air, so move to Idea 2.
- Fill the bottom pockets with your heaviest pairs. Put flats and sandals up top.
Tips
- Leave boots out. They are too tall and heavy for the pockets.
- Fill only five pairs at first. Watch how the hooks hold up for a week.
- Shift the organizer sideways if it covers your peephole.
Idea 2: Set Up a Two-Tier Rack and Boot Tray With No Drilling
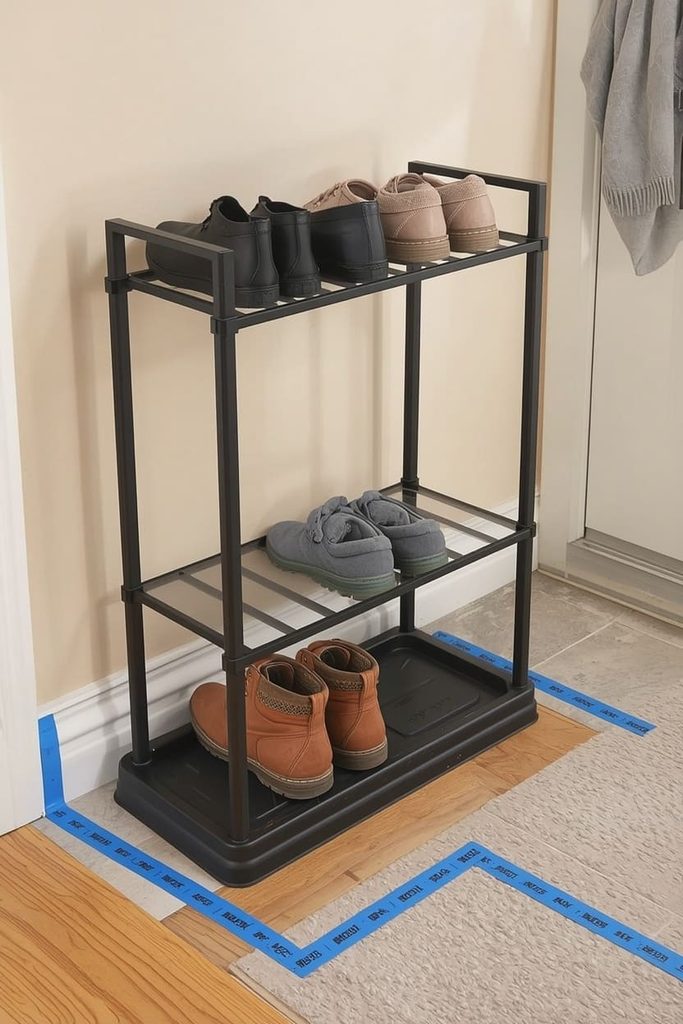
A two-tier rack on a boot tray holds about eight pairs and catches every drip. It costs $40 to $65 in total and takes about 20 minutes. Nothing goes into your walls.
Height is the secret here. A rack that is 28 inches wide uses only about 10 inches of floor depth. Each tier fits four pairs. The tray underneath collects slush, mud, and puddles, so your floor and your deposit stay safe. That small tray does more work than any other piece in this setup.
What You Need
- A stackable two-tier shoe rack, 27 to 30 inches wide
- A rubber boot tray, about 30 inches long
- A non-slip rug pad, about $8
- Painter’s tape
- Scissors and a tape measure
How to Do It
- Tape a 30 by 10 inch rectangle on the floor beside your door.
- Swing the door open and shut a few times. The tape should never get bumped.
- Cut the rug pad to match the rectangle.
- Lay the pad down inside the tape.
- Set the boot tray on top of the pad.
- Snap the rack together using the box directions.
- Place the rack over the tray so drips land in it.
- Give kids the bottom tier. Adults get the top.
Tips
- Wipe the tray once a week with a damp cloth.
- Keep one slot empty. Guests then have a spot for their shoes.
- Measure your wall before you buy. A rack that is too wide will stick out into your walkway.
Idea 3: Build Two Floating Plank Shelves for About $40
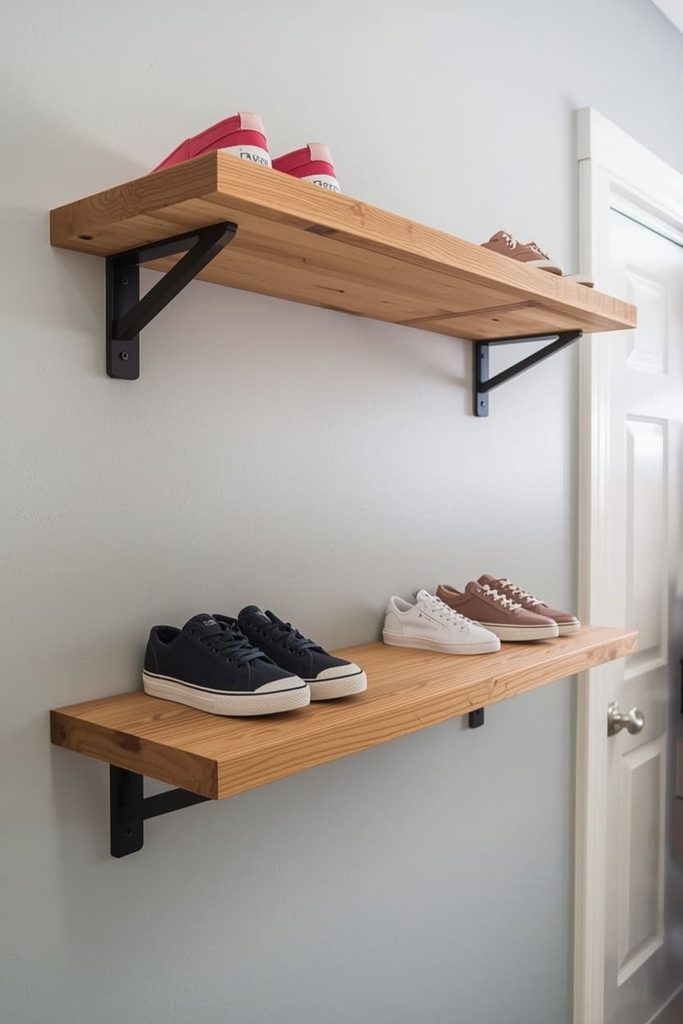
Two wall-mounted pine shelves hold eight pairs and free up your whole floor. The project costs $40 to $60 and takes about two hours. You need a drill, so owners can start right away. Renters should ask first.
Open floor changes how a small entry feels. A 36-inch board fits four pairs side by side, since most shoes need about 9 inches. A real 1×12 board is about 11¼ inches deep. That is enough room for adult sneakers and loafers. Stacking two shelves doubles your space without adding any floor clutter.
What You Need
- Two 1×12 pine boards, cut to 36 inches (most hardware stores cut them for free)
- Six 10-inch L-brackets
- Six 2½-inch wall screws
- Twelve ⅝-inch screws for the boards
- Stud finder, level, pencil, and drill
- 120-grit sandpaper
- Paint or stain, plus a brush
How to Do It
- Sand the faces and edges of both boards.
- Paint or stain them. Let them dry as long as the can says.
- Find two wall studs near the door and mark them.
- Mark the low shelf so its top sits 8 inches above the floor.
- Mark the high shelf so its top sits 17 inches above the floor.
- Screw three brackets into the wall at each mark.
- Check each row with the level before you move on.
- Set a board on each row of brackets.
- Drive the short screws up through the brackets into the boards.
- Line up four pairs on each shelf.
Tips
- Aim for studs. If you miss them, use heavy-duty wall anchors rated for 50 pounds.
- Round the front corners with sandpaper. Hips and little heads will find them.
- Pick short screws for the boards. Long ones poke through the top and scratch your shoes.
Idea 4: Make a Kid-Height Cubby With One Bin Per Person
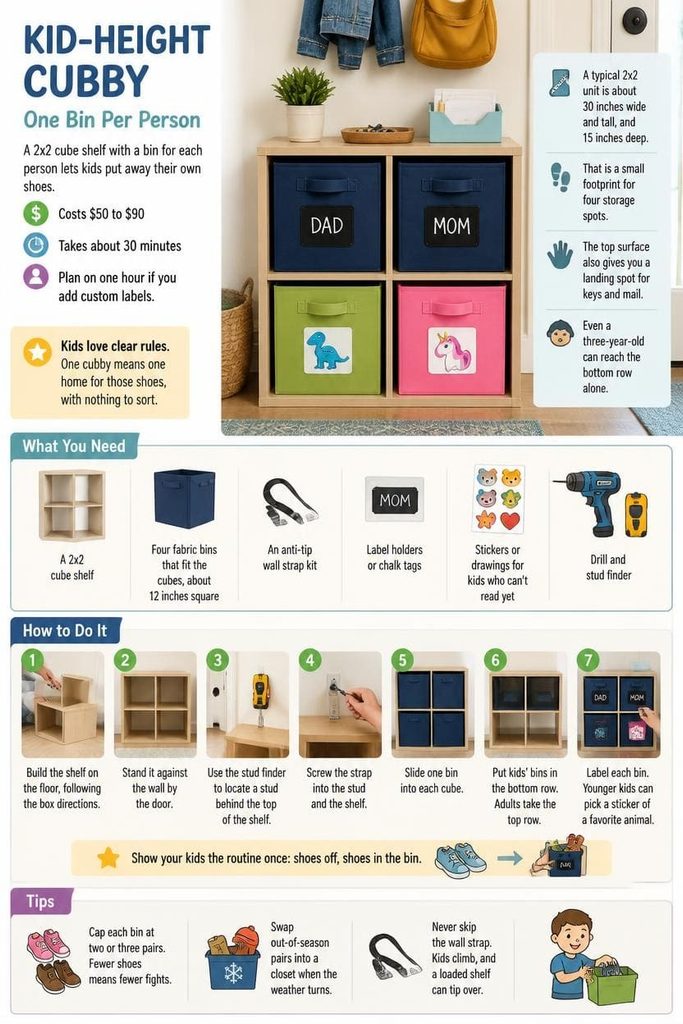
A 2×2 cube shelf with a bin for each person lets kids put away their own shoes. It costs $50 to $90 and takes about 30 minutes. Plan on one hour if you add custom labels.
Kids love clear rules. One cubby means one home for those shoes, with nothing to sort. A typical 2×2 unit is about 30 inches wide and tall, and 15 inches deep. That is a small footprint for four storage spots. The top surface also gives you a landing spot for keys and mail. Even a three-year-old can reach the bottom row alone.
What You Need
- A 2×2 cube shelf
- Four fabric bins that fit the cubes, about 12 inches square
- An anti-tip wall strap kit
- Label holders or chalk tags
- Stickers or drawings for kids who can’t read yet
- Drill and stud finder
How to Do It
- Build the shelf on the floor, following the box directions.
- Stand it against the wall by the door.
- Use the stud finder to locate a stud behind the top of the shelf.
- Screw the strap into the stud and the shelf.
- Slide one bin into each cube.
- Put kids’ bins in the bottom row. Adults take the top row.
- Label each bin. Younger kids can pick a sticker of a favorite animal.
- Show your kids the routine once: shoes off, shoes in the bin.
Tips
- Cap each bin at two or three pairs. Fewer shoes means fewer fights.
- Swap out-of-season pairs into a closet when the weather turns.
- Never skip the wall strap. Kids climb, and a loaded shelf can tip over.
Idea 5: Hide Shoes in a Slim Flip-Down Cabinet
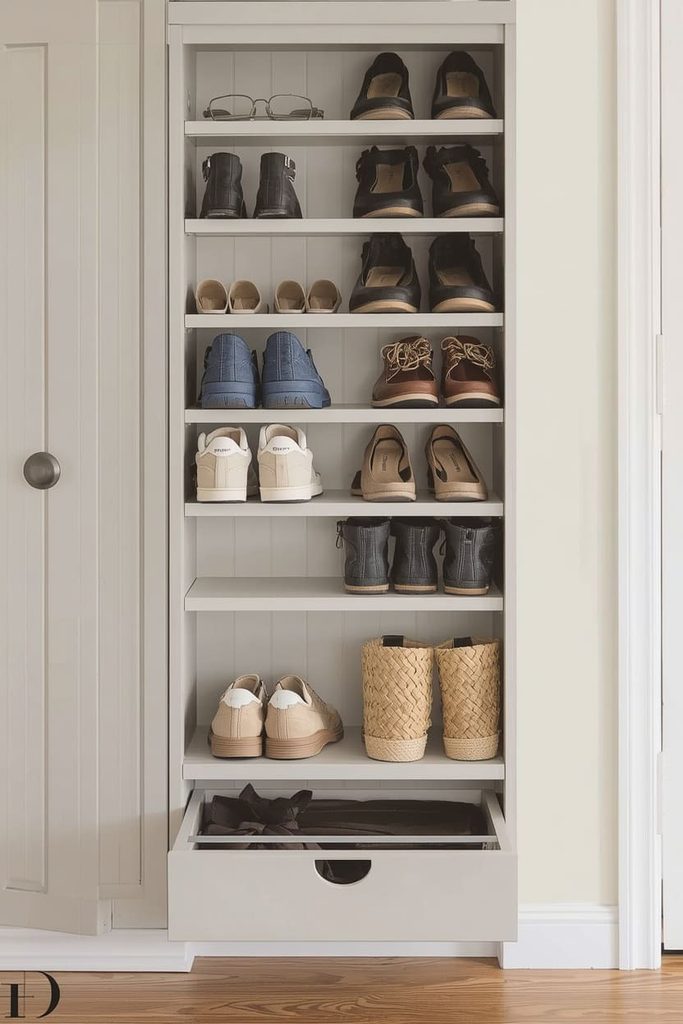
A slim flip-down cabinet hides nine to twelve pairs behind closed fronts. It costs $80 to $180 and takes one to two hours. This gives you the cleanest look of all five.
Notice the tilt. Each drawer flips forward and holds shoes at an angle. That lets the whole cabinet stay only 7 to 9 inches deep, which is slim enough for most hallways. The closed fronts also hide the mess from guests. You see a tidy wall, and the shoes stay one pull away.
What You Need
- A slim flip-down shoe cabinet, 7 to 9 inches deep, with two or three drawers
- Drill and screwdriver
- Level
- Stud finder
- Anti-tip strap
- Small felt pads
How to Do It
- Measure your wall. Make sure the open drawers can tip forward without hitting the door.
- Lay out every part and count it against the list.
- Build the cabinet on the floor. Hand-tighten each screw first, then snug them down.
- Stand it where you want it.
- Check it with the level.
- Anchor the strap to a wall stud.
- Stick felt pads to the drawer edges to quiet the flip.
- Slide each pair in toes-back. Heavier shoes go in the bottom drawer.
Tips
- Dry wet shoes on a tray first. Damp pairs can make a closed cabinet smell.
- Leave a little breathing room. If a drawer won’t shut, take a pair out.
- Test the door swing with the cabinet in place before you tighten the anchor.
FAQs About Front Door Shoe Storage
How many pairs should I keep by the front door?
Plan for the pairs you wear each week. That is usually three to five per person. A closet or under-bed bin can hold the rest.
What should I do with wet shoes?
Park them on a boot tray or a lipped mat for a few hours. Let them dry before you tuck them into a cabinet or pocket. This stops stains and odors.
How do I store shoes when I have no floor space?
Go up the wall or behind the door. An over-the-door organizer or floating shelves both free your floor.
Can renters use these ideas?
Yes. Ideas 1, 2, and 4 need little or no drilling. For Ideas 3 and 5, ask your landlord first. Small screw holes are easy to patch when you move.
What works best for toddlers?
Pick a low cubby with one bin per child. The bottom row is easy to reach. Picture labels help kids who can’t read yet.
How can I keep my entry from smelling like shoes?
Dry every pair before you store it. Wipe trays weekly. Open closed cabinets now and then so air can move through.
Start With One Small Fix Tonight
A clear doorway does not need a mudroom. It needs one idea that fits your space. Measure your wall and floor tonight. Choose the idea that matches your life. Finish it this weekend. Then walk in with your arms full and enjoy the open path. Your feet will notice. So will your eggs.

Sohel Rana is the writer, editor, publisher, and founder of The Tidy Porch. He is the man who is responsible for the craft (my wife created) being converted into a written piece. He also helps her wife (Sumona) by capturing videos of each craft. In short, he brings each craft created by her wife in front of you by transforming it into an article and a video.
